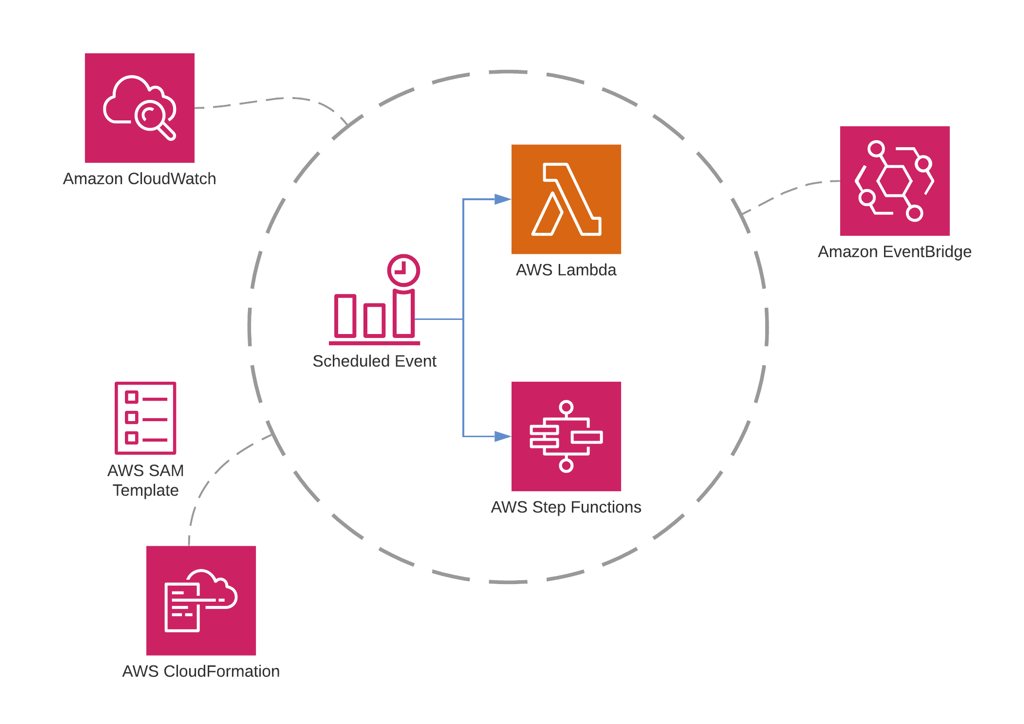
In addition to API development, AWS Lambda has many use cases. One of them is running some background jobs in scheduled intervals. Besides, if you need a chain of sequential or parallel AWS Lambda functions, the ideal way to orchestrate them is using AWS Step Functions.
In this post, I will talk about how to schedule your AWS Lambda functions or Step Functions state machine executions using AWS CloudWatch and EventBridge consoles as well as AWS Serverless Application Model (SAM) and CloudFormation templates.
What is a scheduled Amazon CloudWatch event?
As we discussed in our previous posts, Amazon CloudWatch is your monitoring service on AWS. It collects metrics and logs from your resources. Amazon CloudWatch Events is a sub-service of CloudWatch which streams near-real time system events upon changes on your AWS resources. You can take actions by defining targets to these events. For example, if one of your EC2 instances is started, it streams an event to Amazon CloudWatch Events. You can create a rule to trigger an AWS Lambda function whenever this event happens. This type of events are triggered when a change occurs on your AWS resources.
On the other hand, you can also define event rules that self-trigger regularly and configure a target action to do some regular work. So you can define an Amazon Lambda function or AWS Step Functions state machine as scheduled targets. Hence, when this event is triggered at the specified time or interval you defined, your function or state machine is executed. These types of events are called scheduled Amazon CloudWatch Events and we will make example of them in this blog post.
By the way, Amazon EventBridge is the new version of CloudWatch events, a serverless event bus service. It also allows you to build an event-driven architecture and integrate your SaaS applications with AWS resources easier. I will also show you how you can use Amazon EventBridge console to create scheduled events.
How to define a schedule for an event?
There are two options to define a scheduled event:
1) You can use a cron expression. This type of usage is very similar to the cron jobs you define on your Linux servers. But this time, it will be serverless and you will not need to pay for the idle time your servers run. For example, you can configure an event to be triggered on every Monday at 10:00 in GMT.
2) You can define a simple fixed interval, a rate expression, such as every 5 minutes, every 15 days, etc. You have less control in rate definitions. It starts from the time you create the event and calculates the next trigger time according to its creation time.
Scheduling an AWS Lambda function
Now let’s talk about how to schedule a single AWS Lambda function. I will show how to achieve this on Amazon CloudWatch Console first, then using the new Amazon EventBridge Console, and finally in your AWS SAM templates.
Using Amazon CloudWatch Console
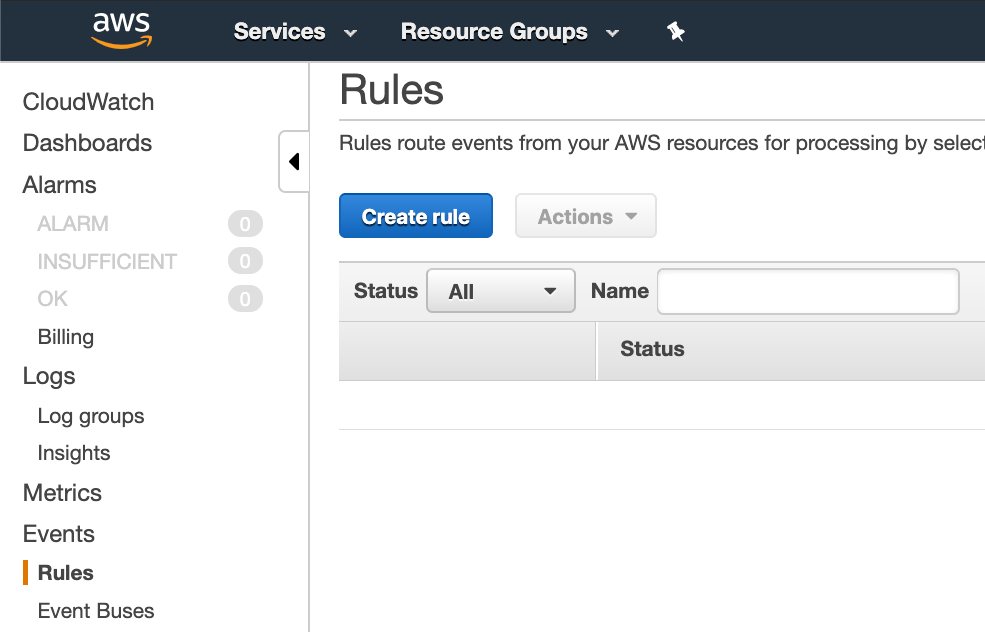
Let’s start with Amazon CloudWatch Events Console to create a scheduled event for our AWS Lambda function. To do this,
- click
Rulesunder theEventssection on the left menu. This will lead you to theEventslist. - To create a new rule, click
Create rulebutton at the top of this list.
Defining a pattern for the rule
Next, you will see the event rule form in which Event pattern is selected. It is for the resource originated events that we discussed above. Hence, for scheduled events, you need to select Schedule option.
You will see that rate expression is enabled by default when you enable Schedule option. There are two information you need to provide to define a fixed rate: The interval and its unit. The unit can be minutes, hours and days. Hence, the minimum interval can be 1 minute. At this time, you cannot define an interval in seconds.
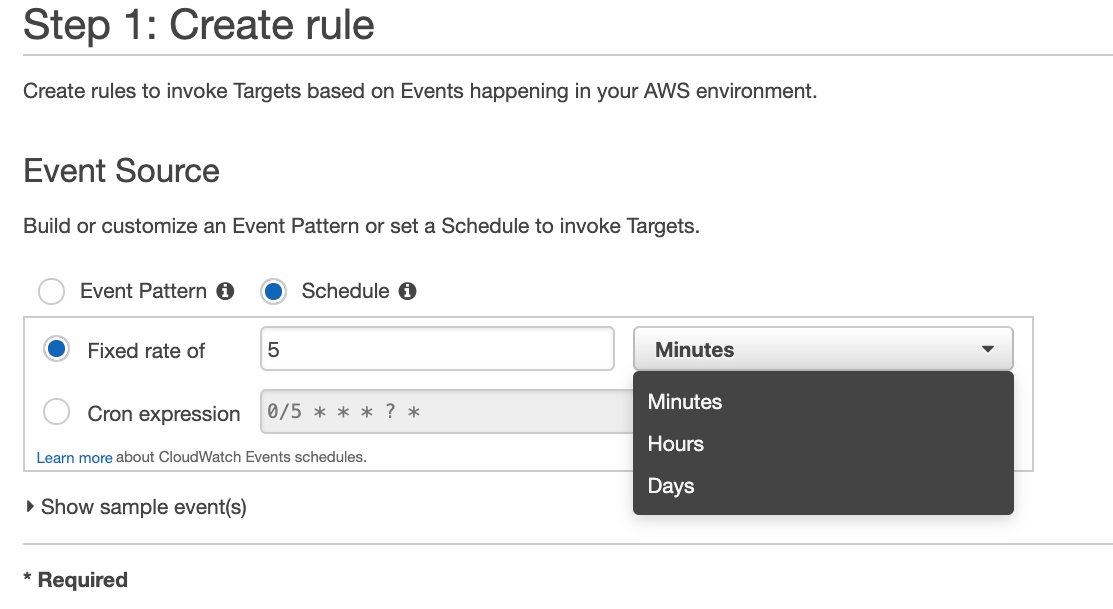
This is how to provide a fixed rate expression. But let’s define a cron expression by selecting Cron expression option.
In this example, I will define an expression to trigger this event in every Tuesday at 10:00 AM in GMT+3 time zone. The result will be as below.
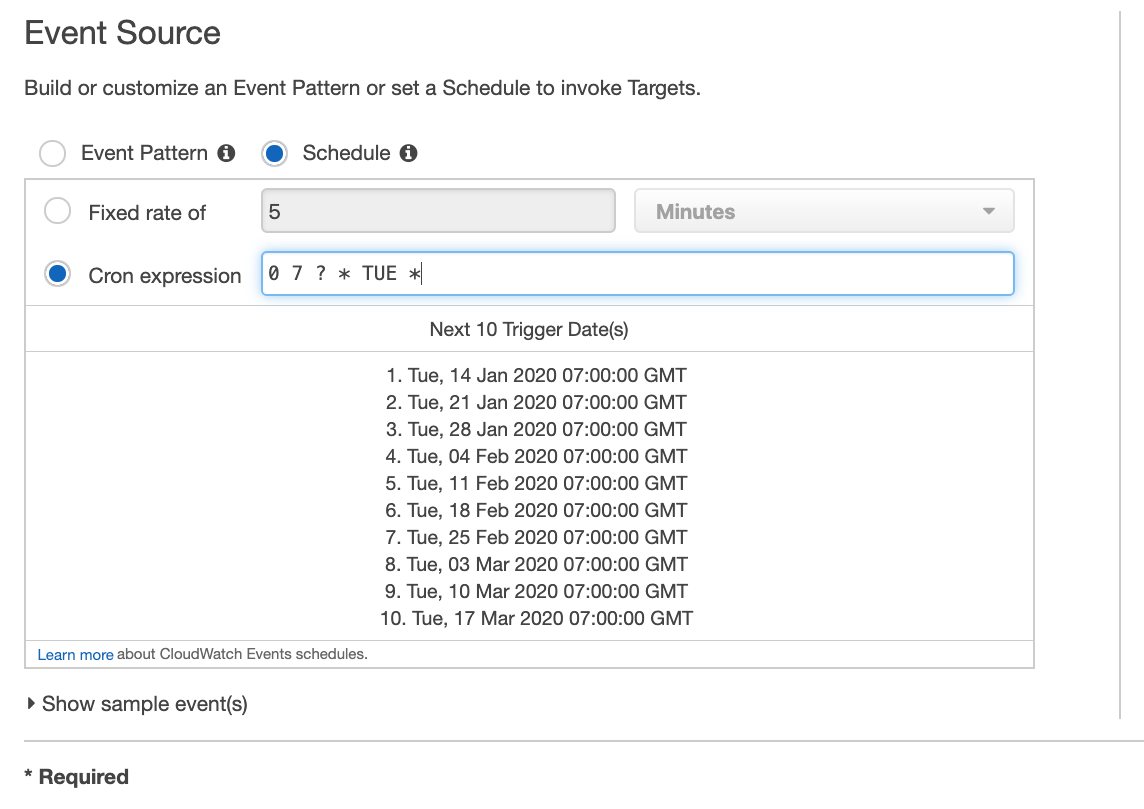
Now let me explain what 0 7 ? * TUE * means briefly.
Firstly, we need to convert the time to GMT time zone. Because all schedules should be in this time zone. Therefore, 10:00 AM GMT+3 becomes 7:00 AM GMT. The first two character is minutes and hours (24-hour style) respectively, so we have
0 7as a start.The third character is the
day of monthin numbers. For example, if you use 4 here, it will trigger the event in every 4th of that month. But in that case,TUEvalue in the fifth character will conflict with this. In our example we don’t care which date it is, it should be just Tuesday, so we use?to express this.The forth character is the month of the year. We want this event to be triggered every week regarless of the month it is in, so we use
*to select all months.The fifth character is the day of the week. We use
TUEto select only Tuesdays from the week.The last character is the year. We use
*again to select all years.
You can learn more on Schedule Expressions for Rules reference. In addition to these, when you complete your rule, Amazon CloudWatch Console demonstrates dates and times of the next 10 events. It is pretty helpful to validate.
Defining AWS Lambda as target
Now we need to define our AWS Lambda function as target to this event in order to trigger it when the event happens. Click Add target button under the Targets section on the right.

By default, it will be a Lambda target, but if you click the list you can see that there are more options for this.
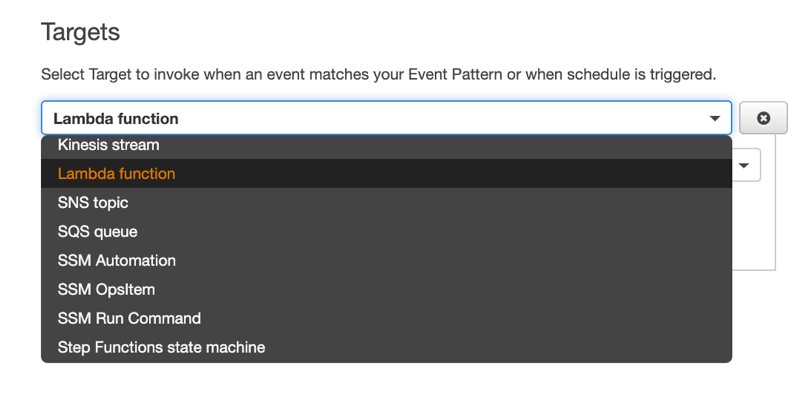
For this example, I created a simple AWS Lambda function named testFunction. So I select it from the list like below.
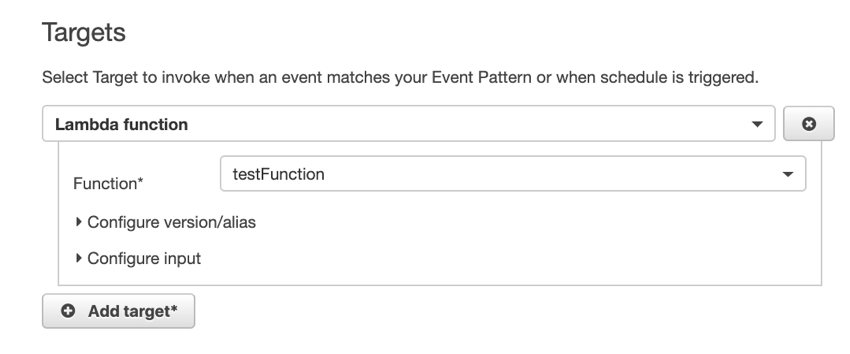
You can select an alias/version or configure the input to transform it. But I will leave that part to you. You can see a sample for the events by clicking Show sample event below the cron expression.
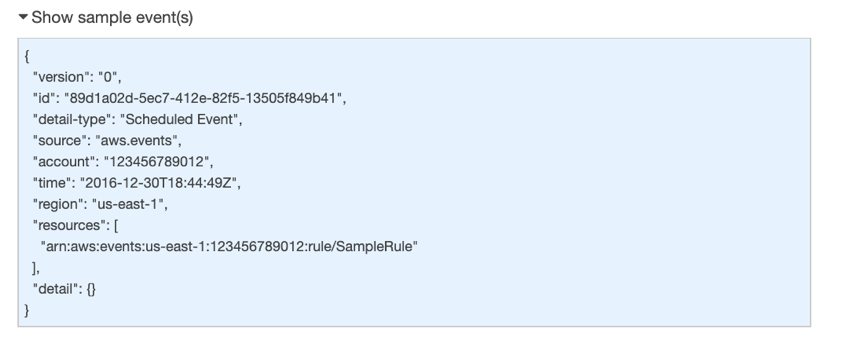
To continue creating your scheduled event, click Configure details button.
Configure Details
Now you need to provide a name and description to your event rule and click Create rule below it. Do not forget to leave Enabled as checked. Otherwise, you disable the rule and it will not be triggered. But of course, you can enable/disable a rule in the future whenever you want.
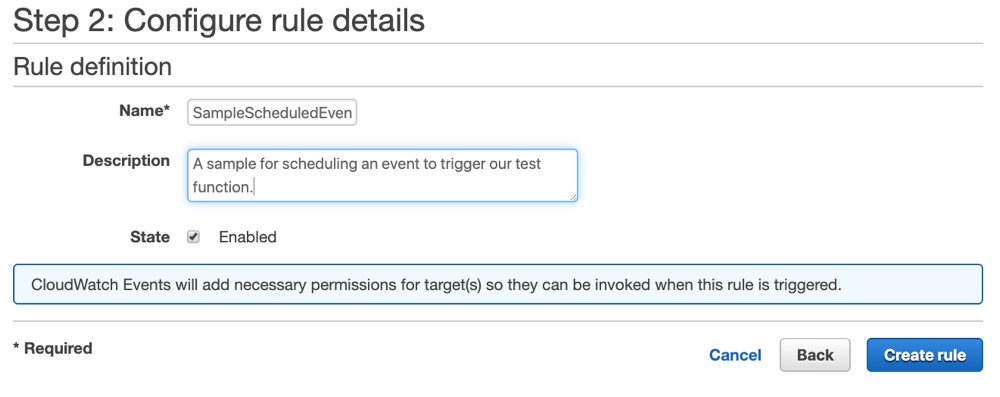
After these, your event rule will be created and you will be redirected to the Rules list again. Actually, this list displays not only the scheduled but all event rules you have. But we have only one rule as an example.
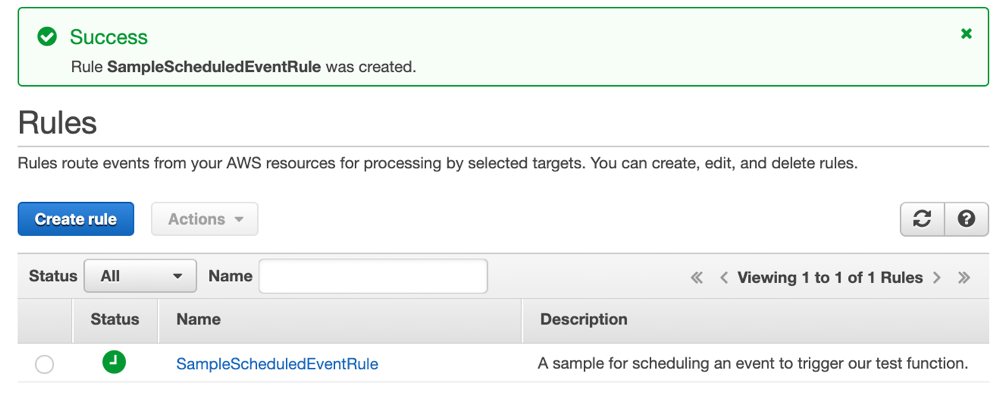
Now this event will be triggered in every Tuesdays at 7 AM in GMT and it will also trigger our AWS Lambda function accordingly.
Using Amazon EventBridge Console
Amazon EventBridge is the new version of Amazon CloudWatch Events service. It is a serverless event bus and also helps you to integrate your SaaS applications by streaming data into AWS and makes building event driven architectures easier. It can be your central place on AWS to manage all your events. So I will show you how to create a scheduled event rule on Amazon EventBridge Console.
Firstly, you need to go to Amazon Event Bridge console and click Rules from the left menu.
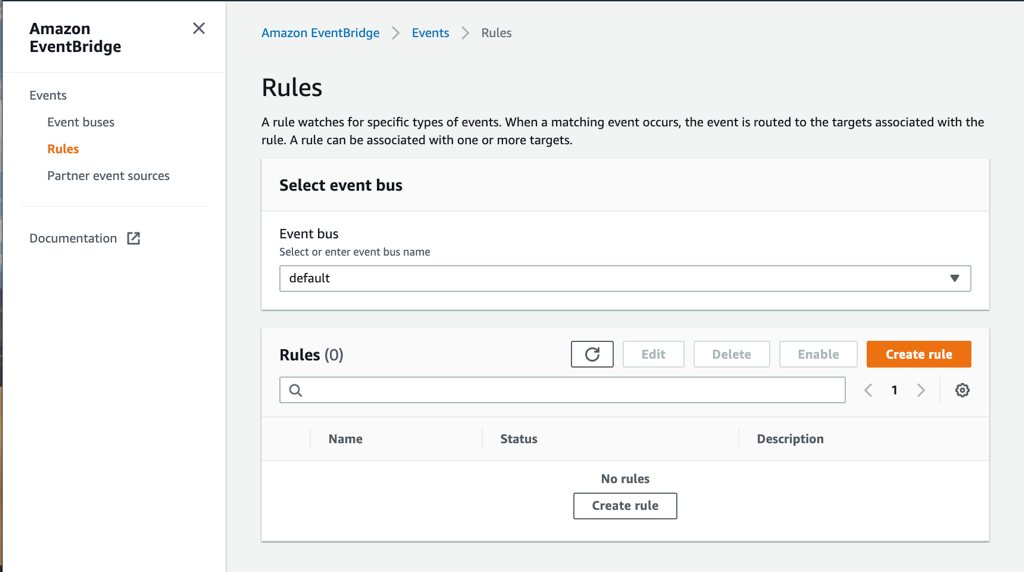
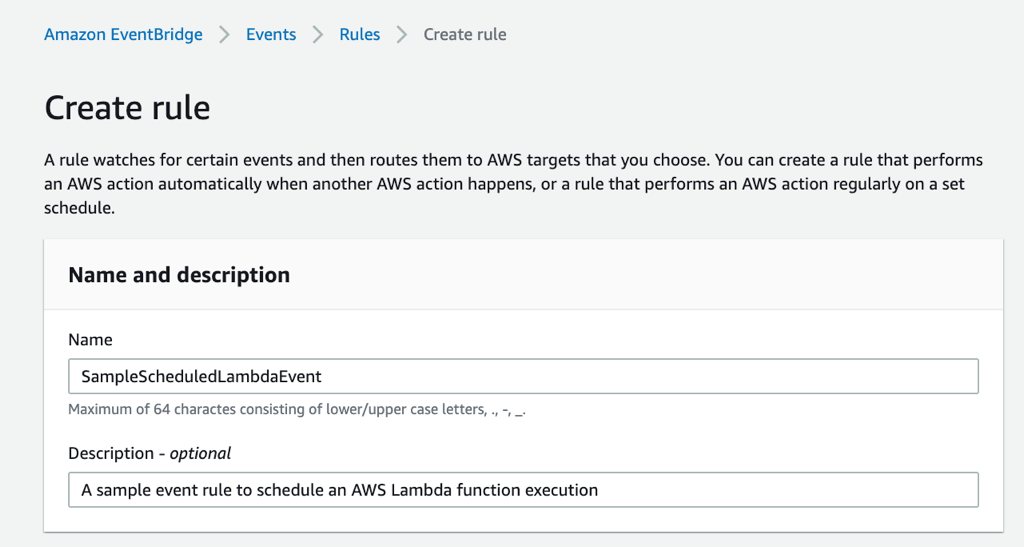
To create a new rule, click one of the Create rule buttons on the page. It will lead you to a form to create event rules. On this form, you need to provide a name and description to your rule like we did Configure details part on CloudWatch Console. Actually, Description is not mandatory, but it will be a good practice to write a meaningful explanation to remember it later easily.
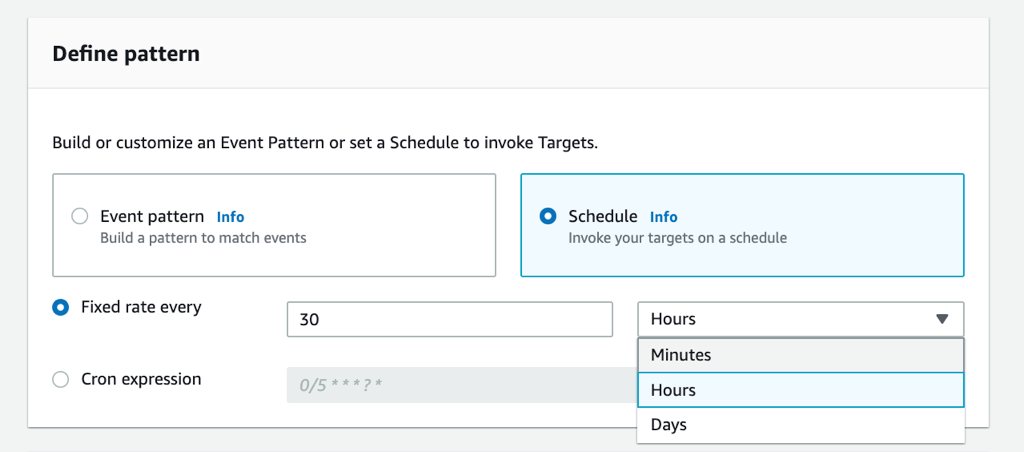
Next, you need to choose Schedule option on Define pattern section. The default Event pattern option is for defining triggers from resource based events.
Here you can provide a fixed rate schedule such as 30 minutes like below. If you do this, it will be triggered in every 30 minutes from the time you create.
But let’s make a cron example such as every Thursday at 7 AM GMT. Its cron expression becomes 0 7 ? * THU * and you can define it by selecting Cron expression option.
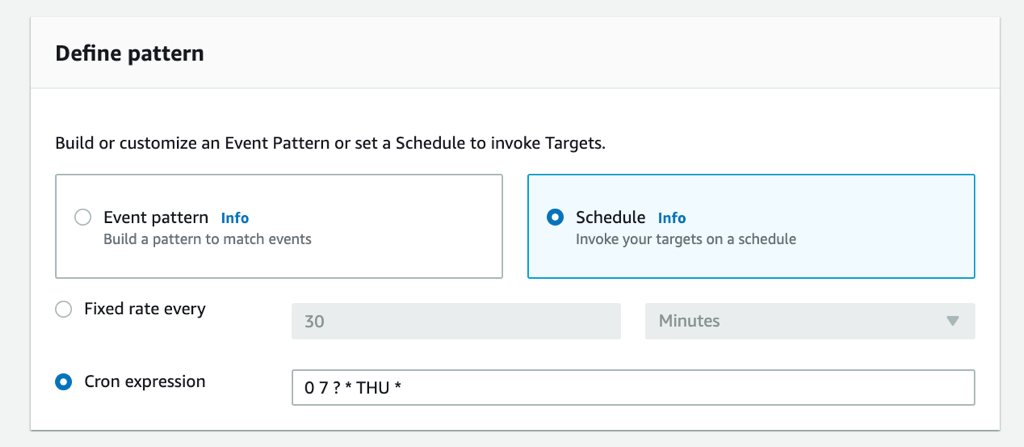
This time we do not see the next 10 schedules as in AWS CloudWatch Events Console. It would be convenient if we had this. Maybe, in the future, they can build this feature to here as well.
Next, leave AWS default bus selected and proceed to the Targets section below to define your AWS Lambda function as target to this event. By default Lambda function option will be selected in the list, you will only need to select your AWS Lambda function from the function list.
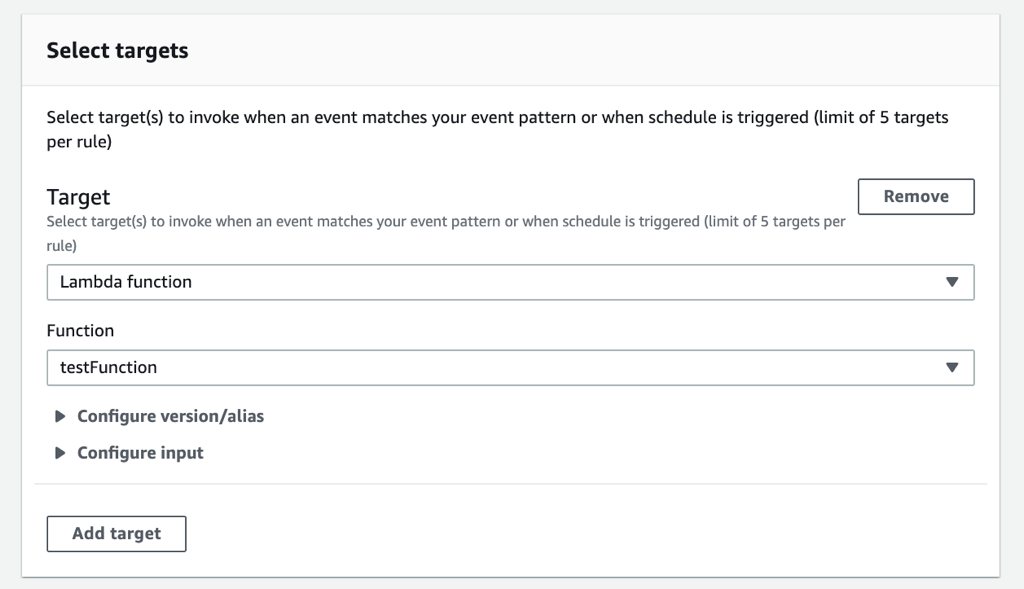
To finish the creation, click Create and you will be redirected back to the Rules list where you can see your new scheduled event.
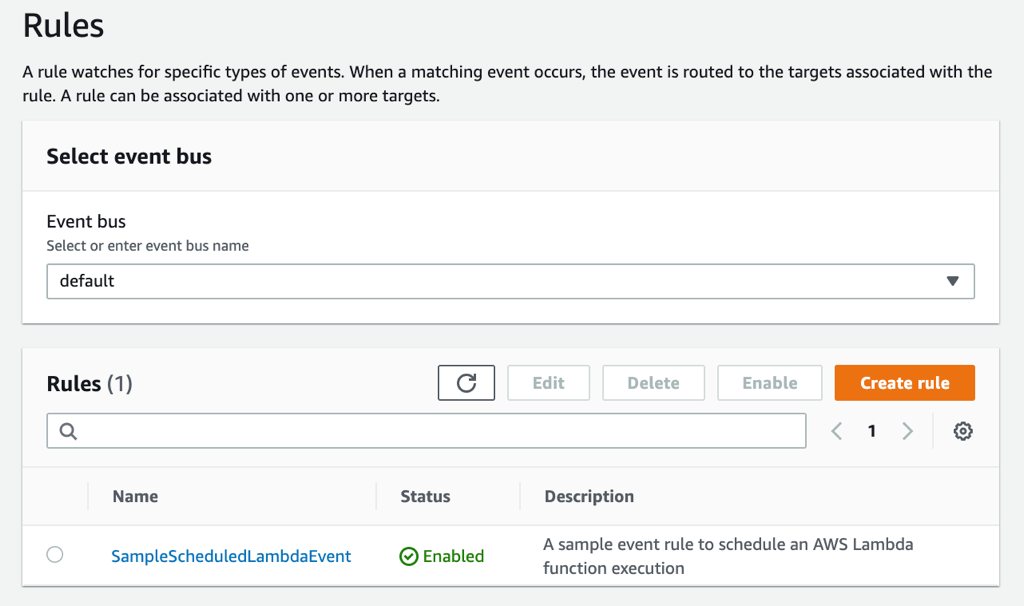
From now on, your AWS Lambda function will be triggered every Thursdays at 7 AM in GMT time zone. You can see your new scheduled rule on Amazon CloudWatch Events console as well.
Using AWS Serverless Application Model (SAM)
If you read my previous blog posts, I do not use AWS Management Console to define resources for production environments. I only use it for trying something, viewing or demonstrating resources. I mainly use AWS CloudFormation, and SAM templates for serverless resources. So I would like to demonstrate how you can configure scheduled events in AWS SAM as well.
Actually, it is very simple. You can achieve all we did above with a few lines of code as below.
AWSTemplateFormatVersion: '2010-09-09'
Transform: AWS::Serverless-2016-10-31
Description: >
  Sample SAM Template for triggering AWS Lambda functions via scheduled CloudWatch events.

Globals:
  Function:
    Timeout: 3
    Runtime: python3.7

Resources:
  TestFunction:
    Type: AWS::Serverless::Function
    Properties:
      CodeUri: test_function/
      Handler: app.lambda_handler
      Events:
        ScheduledEvent:
          Type: Schedule
          Properties:
            Schedule: cron(0 7 ? * TUE *)
            Description: Sample Lambda function scheduling with SAM
            Enabled: True
It is repeatable and testable. The beauty of infrastructure as code is obvious.
AWS SAM has built-in support for scheduled CloudWatch events as it is one of the most common triggers of AWS Lambda. Let’s explain the crucial parts here.
- The
Typeof your event should beSchedule. - Under the
Propertiesof this event, you should have aScheduleproperty which takes the rule expression I explained above. Hence,cron(0 7 ? * TUE *)meansevery Tuesday at 7:00 AM GMT. But if you need to define a rate expression like in every 30 minutes, you can replace this withrate(30 minutes), too. You can customize the field between parantheses as you like once you decide whether you will usecron()orrate(). Descriptionproperty is not mandatory, but I often use it as a best practice. There is also aNameattribute which you can give a name to your event, but I prefer to omit and leave it to CloudFormation to generate it from the stack name. If you use the same name for different events, you may end up with conflicts between your templates. So it is better to make it dynamic. If you still need to name your event, I recommend to use!Subfunction and prepend the stack name to it.Enabledattribute defines whether you enable or disable this scheduled event as we talked before while using Amazon CloudWatch Console.
This is how to schedule a single AWS Lambda function, now let’s talk about scheduling an AWS Step Functions state machine.
Scheduling an AWS Step Functions state machine execution
If you need to trigger a sequence of AWS Lambda functions or execute some of them in parallel, AWS Step Functions is the proper way to orchestrate this. The good thing is you can schedule AWS Step Functions - state machine executions like an AWS Lambda function. CloudWatch Events has built-in support for AWS Step Functions, too.
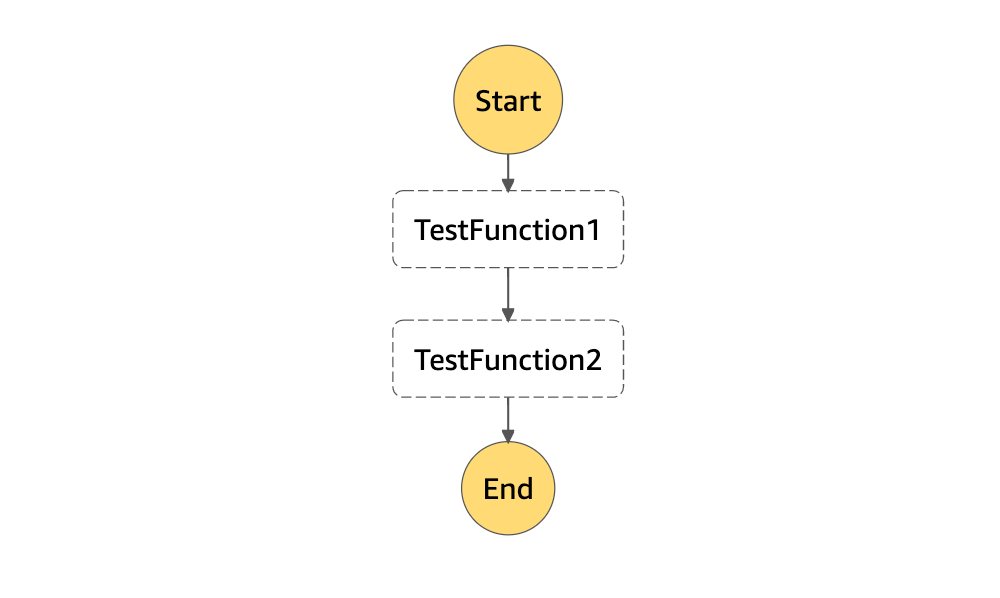
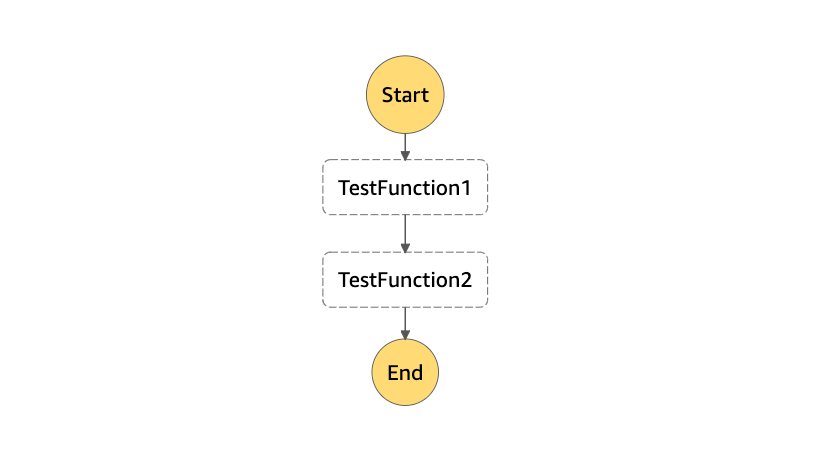
For this example, I created 2 AWS Lambda functions a simple AWS Step Functions State Machine to execute them sequentially. Here is the diagram of my state machine:
Using Amazon CloudWatch Console
Again let’s start with Amazon CloudWatch Console. The rule expression definition will be same same as above, but the target part will be different. This time when you click Add target button, you need to select Step Functions state machine from the listbox instead of the default Lambda function
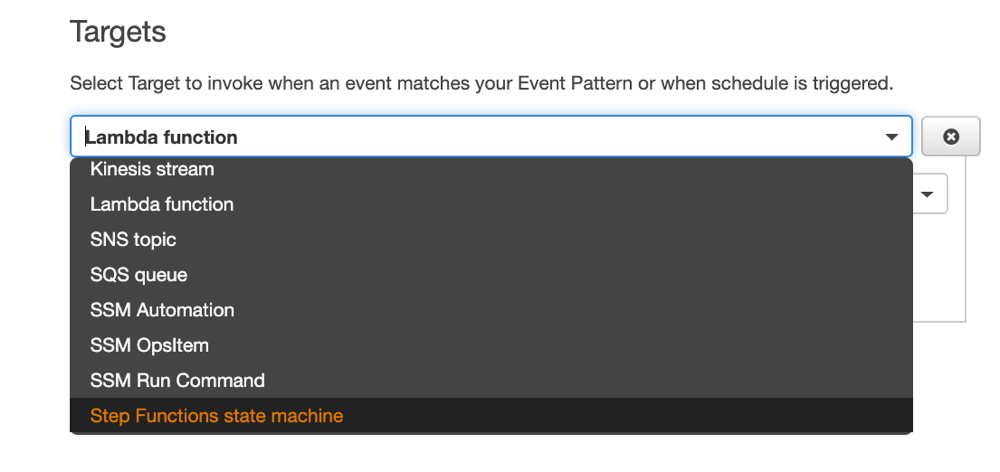
When you do this, you will not see Lambda specific fields like alias/version as before. You only need to select the state machine that you would like to trigger as target from the list.
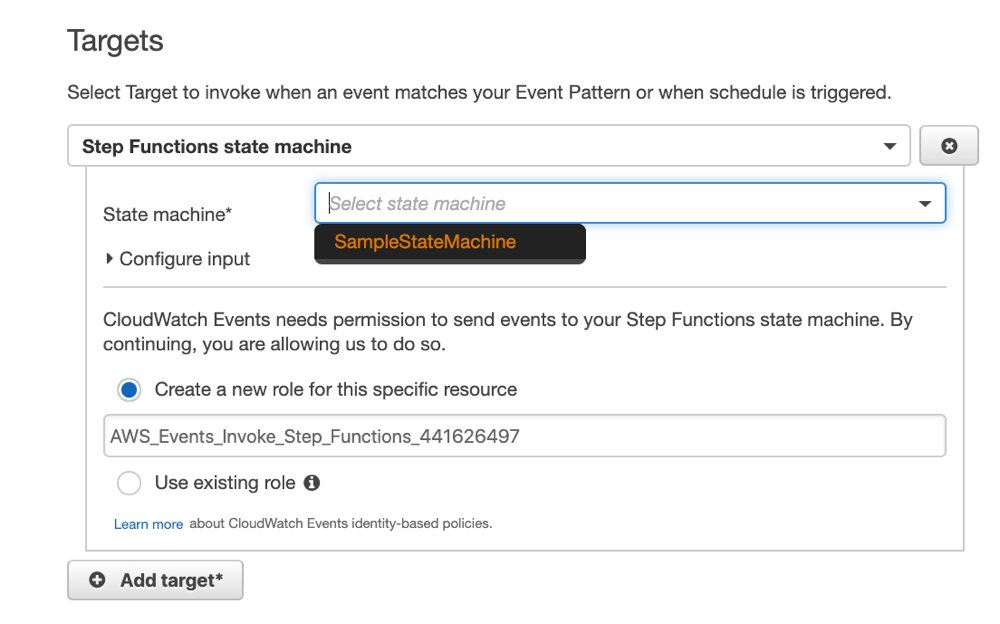
That’s all. The final screen will be as below, just click Configure details and give a name to your scheduled event as we did in AWS Lambda part.
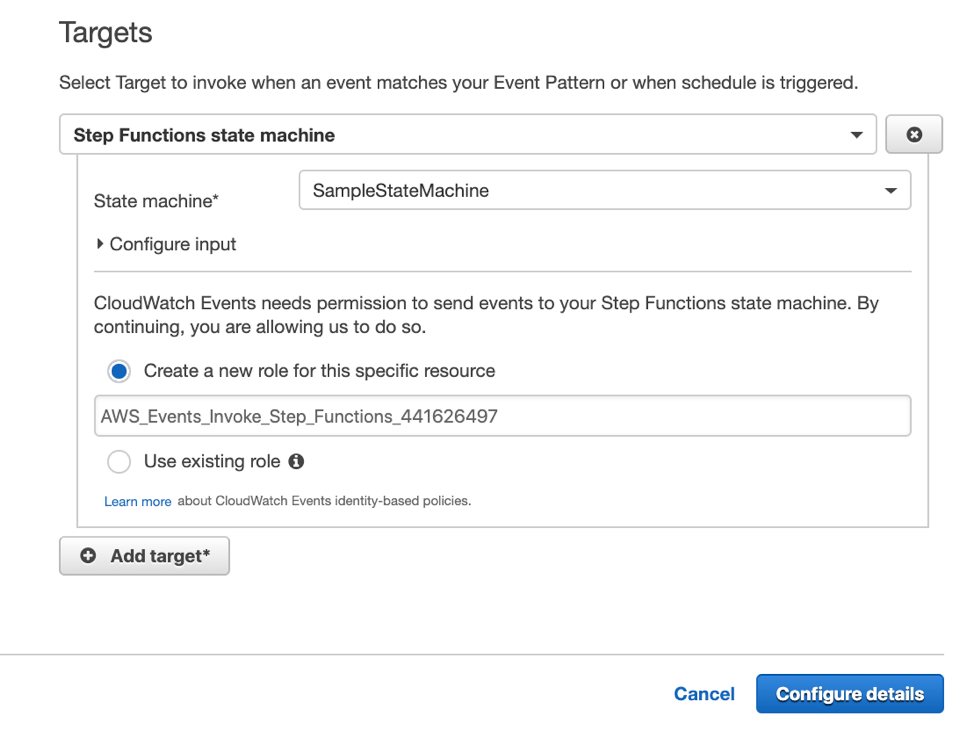
Using Amazon EventBridge Console
Now let’s talk how to achieve this Amazon EventBridge Console. Again, only the target part will be changed on the assumption that you want to trigger your event in the same interval.
- You should select
Step Functions state machineinstead of Lambda. - You should select your state machine from the list afterwards.
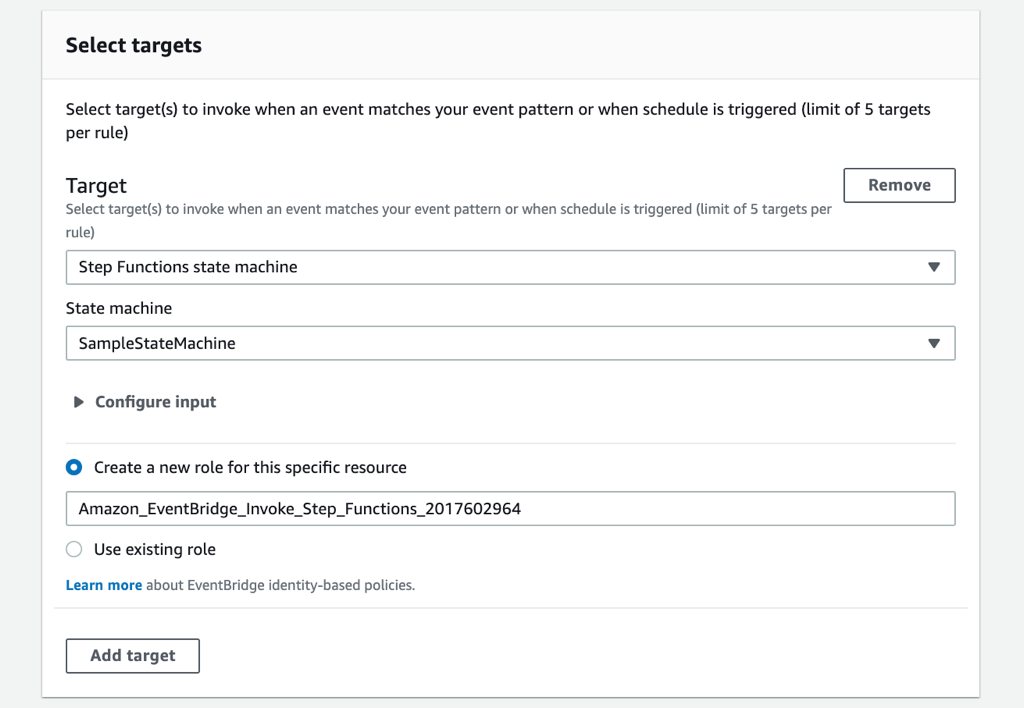
As you see, there is also an IAM role field here. Your event should have privileges to execute this state machine in order to trigger it as a target. If you have an existing IAM role you can use it or leave it to EventBridge console to create a new one as I do here.
Using AWS CloudFormation and SAM
Unfortunately, AWS SAM has not built-in support for step functions or its scheduled event triggers yet. But this does not mean that we cannot define state machines in our SAM templates, actually we can. Because AWS SAM is based on AWS CloudFormation. Hence, we can define anything in a SAM template as long as it is supported by AWS CloudFormation.
But why use AWS SAM to define a Step Functions state machine? Your state machine will trigger one or more AWS Lambda functions which are very simple to define and organize with SAM. So I recommed to use AWS SAM for other benefits even though it does not have support for Step Functions yet.
Defining AWS Lambda functions and State Machine in AWS CloudFormation
I will not dive into the details of defining state machines in a CloudFormation template. If you know AWS CloudFormation well enough, it should be easily understandable for you. But let me explain a few things.
- In the template below I have 2 AWS Lambda functions and a state machine that triggers them sequentially. It is same as the state machine I talked above.
- You need to define an IAM role for your state machine that has privileges to execute your AWS Lambda functions. This one is different than the one I explained above.
- You need to provide the Amazon States Language definitions for your state machine as a JSON string in the
DefinitionStringproperty. To create dynamic strings containing ARNs of your AWS Lambda functions, you can use the intrinsicFn::Joinfunction of AWS CloudFormation like I do below.
AWSTemplateFormatVersion: '2010-09-09'
Transform: AWS::Serverless-2016-10-31
Description: >
  Sample SAM Template for triggering AWS Step Functions state machines via scheduled CloudWatch events.

Globals:
  Function:
    Timeout: 3
    Runtime: python3.7

Resources:

  # AWS Lambda functions ----
  TestFunction1:
    Type: AWS::Serverless::Function
    Properties:
      CodeUri: test_function1/
      Handler: app.lambda_handler

  TestFunction2:
    Type: AWS::Serverless::Function
    Properties:
      CodeUri: test_function2/
      Handler: app.lambda_handler

  # IAM role for the Step Functions State Machine
  StateMachineIAMRole:
    Type: AWS::IAM::Role
    Properties:
      AssumeRolePolicyDocument:
        Version: "2012-10-17"
        Statement:
          -
            Effect: "Allow"
            Principal:
              Service:
                  - Fn::Sub: "states.${AWS::Region}.amazonaws.com"
            Action:
              - "sts:AssumeRole"
      Policies:
        -
          PolicyName: StatesExecutionPolicy
          PolicyDocument:
            Version: "2012-10-17"
            Statement:
              -
                Effect: "Allow"
                Action: "lambda:InvokeFunction"
                Resource:
                  - !GetAtt TestFunction1.Arn
                  - !GetAtt TestFunction2.Arn

  # State Machine to orchestrate AWS Lambdas ---
  StateMachine:
    Type: AWS::StepFunctions::StateMachine
    Properties:
      StateMachineName: !Sub "${AWS::StackName}-StateMachine"
      RoleArn: !GetAtt StateMachineIAMRole.Arn
      DefinitionString: !Join
        - "\n"
        - - '{'
          - ' "StartAt": "TestFunction1",'
          - ' "States": {'
          - '   "TestFunction1": {'
          - '     "Type": "Task",'
          - !Sub '      "Resource": "${TestFunction1.Arn}",'
          - '     "Next": "TestFunction2"'
          - '   },' # end-of-TestFunction1
          - '   "TestFunction2": {'
          - '     "Type": "Task",'
          - !Sub '      "Resource": "${TestFunction2.Arn}",'
          - '     "End": true'
          - '   }' # end-of-TestFunction2
          - ' }' # end-of-States
          - '}' # end-of-Definitions
This will create the state machine below, just like the one I showed you earlier.
Now let’s define a scheduled event for this state machine.
Defining Scheduled CloudWatch Event
When compared to AWS Lambda and its scheduled event definitions, we have a few more work to do. We need to define 2 things:
- A second IAM role that will be assumed by AWS CloudWatch Events rule and have necessary privileges to trigger the state machine.
- A CloudWatch scheduled event that assumes this role and triggers the state machine above.
Hence, these lines will be added to our template.
...
  ScheduledEventIAMRole:
    Type: AWS::IAM::Role
    Properties:
      AssumeRolePolicyDocument:
        Version: "2012-10-17"
        Statement:
          -
            Effect: "Allow"
            Principal:
              Service:
                  - Fn::Sub: "events.amazonaws.com"
            Action:
              - "sts:AssumeRole"
      Policies:
        -
          PolicyName: StateMachineExecutionPolicy
          PolicyDocument:
            Version: "2012-10-17"
            Statement:
              -
                Effect: "Allow"
                Action: "states:StartExecution"
                Resource:
                  - !Ref StateMachine

  ScheduledEventRule:
    Type: "AWS::Events::Rule"
    Properties:
      Description: "Scheduled event to trigger Step Functions state machine"
      ScheduleExpression: cron(0 7 ? * TUE *)
      State: "ENABLED"
      Targets:
        -
          Arn: !Ref StateMachine
          Id: !GetAtt StateMachine.Name
          RoleArn: !GetAtt ScheduledEventIAMRole.Arn
Again let’s explain a few things:
- Your event rule type should be
AWS::Events::Rule. - This time you provide your schedule in
ScheduleExpressionproperty in the form of cron or rate expressions. This part is same as theScheduleproperty in our AWS Lambda scheduling example above. - There is no
Enabledproperty. Instead, we haveStateproperty which takes eitherENABLEDorDISABLED. - You can give a
Nameas I explained in AWS Lambda example, but I left it to AWS CloudFormation. Targetsproperty is the place where you define your state machine as target. You useArnproperty to do this.Idcan be anything, but I use the name of the state machine to distinguish it easily. You also provide the IAM role we defined to let the event rule assume it while triggering the state machine using theRoleArnfield.
Let me add that, you can define multiple targets to your scheduled events. But the aim of this example is doing them separately and explaining the differences in them.
Would you like to learn AWS CloudFormation?
If you are a beginner to AWS CloudFormation or learn more advanced features, my beginner and advanced level AWS CloudFormation courses on Udemy may help you.
Level 1:
AWS CloudFormation Step by Step: Beginner to IntermediateIf you are a beginner to AWS CloudFormation, this course is for you. It will teach you how to create, update, delete CloudFormation stacks, write your own templates with YAML and use template sections efficiently. You will also learn to use change sets to update your stacks safely and the cloudformation commands of AWS CLI.
Ineterested? To view the course topics and enroll in it with a special discount, please use this link: Join AWS CloudFormation Step by Step: Beginner to Intermediate on Udemy!
Level 2:
AWS CloudFormation Step by Step: Intermediate to AdvancedThis course continues from
AWS CloudFormation Step by Step: Beginner to Intermediateand teaches you more advanced topics like cross-stack references and nested stacks, helper scripts, stack policies, custom resources, stack drifts, and so on. It also includes a dedicated section for defining and deploying serverless resources withAWS Serverless Application Model (SAM). However, for this course, finishing the beginner-level course or knowing all its topics is a prerequisite.You can check the course page and enroll with a special discount using this link: Join AWS CloudFormation Step by Step: Intermediate to Advanced on Udemy!
I organized these courses to help you learn AWS CloudFormation in detail step by step. So, I recommend finishing the beginner-level course first and continuing with the advanced course afterward for a better learning experience. You can also find all my courses on our online courses page.
So, see you in my AWS CloudFormation courses!
Conclusion
In this post, we made an introduction to scheduled events to trigger AWS Lambda functions or AWS Step Functions state machines. Scheduling AWS Lambda function is good, but scheduling an AWS Step Functions state machine is great! Because you should use AWS Lambda functions as small pieces of your applications and if you need to do more, you should consider AWS Step Functions. We applied this to some of my clients effectively with the addition of retries, SNS notifications, etc. So I definitely recommend considering AWS Step Functions.
By the way, AWS Serverless Application Model (SAM) is also becoming a thing. It is evolving day by day. I am one of the early adopters of AWS SAM and also recommend you to give it a try in your serverless projects.
Thanks for reading!

