When you build a new application, developing a secure, scalable user pool and authorization mechanism is a necessity. It takes time and effort, and sometimes, it even delays the development of the core features that will bring actual value to your business.
Amazon Cognito provides a scalable and secure user pool for your mobile and web applications. It provides a hosted user interface and SDKs for sign-in and sign-up actions. It has many features, such as sending verification emails and SMS messages to your users. In this blog post, I will discuss how you can create an Amazon Cognito User Pool to use as an authentication mechanism in your applications.
What is Amazon Cognito?
Amazon Cognito provides built-in authentication features such as sign up, sign in actions for use in your mobile and web applications. It gives you the flexibility to create your own user directories as User Pools or choose to provide SAML identity federation or authenticate your users through their social identities such as Facebook. In addition, Amazon Cognito Sync provides additional features enabling cross-device application synchronization for user data in your mobile and web applications, empowering you to design a seamless user experience even when they are offline.
Amazon Cognito also offers a hosted UI, using which you can redirect your users to sign in and define callbacks to your application after successful sign-in. If you prefer, you can choose to develop your own front end using one of Amazon Cognito SDKs, such as the Amazon Cognito Identity SDK for JavaScript, giving you the freedom to design a user interface that best suits your application.
In this post, I will demonstrate how to set up a Cognito User pool, explain the steps to follow during creation, and discuss some optional features.
Creating a User Pool on Amazon Cognito
You can easily start creating a user pool from the Amazon Cognito dashboard on Amazon Cognito Console by giving it a unique and descriptive name. Here, I will follow Step through settings instead of defaults to explain more details about sections that I find useful to discuss.
Specifying User Attributes
The first section, Attributes, is the most important because you cannot change these settings after creation. I matched most of the section names below with their respective headers on Amazon Cognito Console.
How do you want your end users to sign in?
In this section, you define sign-in methods for your users.
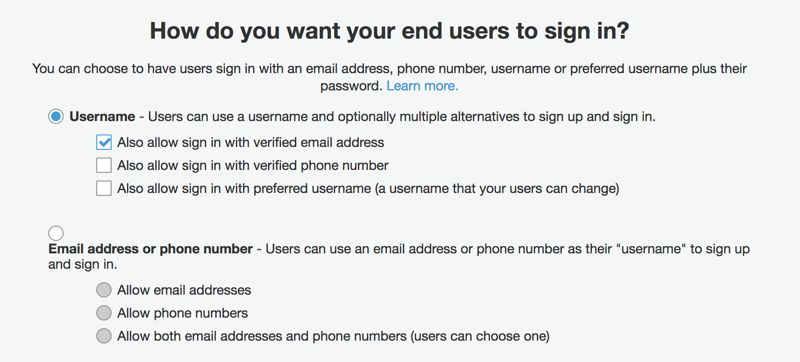
Choose Username if you would like your users to have a username. You can also select whether they can use their verified emails or phone numbers. This means that, during sign-in requests, your users can type their usernames, emails, or phone numbers in the same username field to authenticate. Amazon Cognito will handle the rest to find the correct user.
You can also allow your users to define a username that they can edit by enabling sign-in with a preferred username. This is distinct from a username that cannot be edited after it is created.
If you do not want your users to have a username and find it more convenient to use their emails or phone numbers, select Email address or phone number. Then, you need to define whether they can sign in with both their phone numbers and emails or only one of them. Actually, Amazon Cognito users always have a username. However, if you make this selection, it generates a unique username for each user behind the scenes.
I realized that I find usernames easier to sign in than typing emails. However, I usually enable both of them to provide more choices.
Which standard attributes do you want to require?
Amazon Cognito User Pools follow Open ID specification. In this section, you define the required attributes your users must provide during sign-up. In most cases, email is enough, and you can provide additional attributes during sign-up without making them required. You should also select phone number if it is one of your preferred sign-in methods in the previous section or if you plan to provide multi-factor authentication for your users.
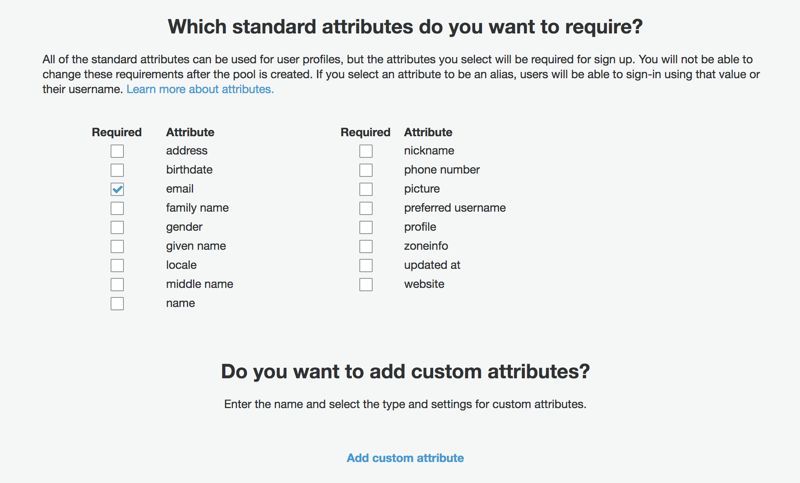
You can also define custom attributes in the Do you want to add custom attributes? section if you would like to require your users to provide custom information during sign-up.
Policy Settings on Amazon Cognito
Unlike Attributes, the settings below can be edited after creation.
What password strength do you want to require?
This is where you define a password policy for your user pool. You have to set a minimum length for passwords. You can also provide more security by requiring passwords to have numbers, uppercase and lowercase letters, and special characters. Special characters are one of ^ $ * . [ ] { } ( ) ? - " ! @ # % & / \ , > < ' : ; | _ ~ `.
If your users do not define passwords conforming to this policy, they cannot sign up or set new passwords. With a few clicks, you can set and edit password policies without any development effort. Amazon Cognito handles them automatically.
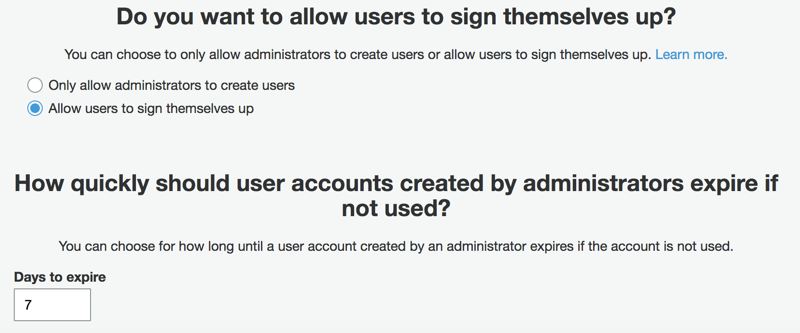
Do you want to allow users to sign themselves up?
This is also a helpful feature in various cases. For example, if you are building an application that will be used only by users in your company, you will probably select Only allow administrators to create users. An administrator will be able to create users and set a temporary password for them, which Amazon Cognito will require them to change in their first sign-in attempts. Your application should be able to handle this feature in its front end by redirecting these users to a page to set new passwords.
If a user is not used after being created by an administrator, it will be deleted automatically after an expiration set at How quickly should user accounts created by administrators expire if not used?. Amazon Cognito will clear unused users after this period.
If you are building an application that will be open to user sign-up, leave Allow users to sign themselves up checked. This will not prevent administrators from adding new users, and previous information will apply when they do.
Multi-Factor Authentication (MFA)
You can enable your users to opt-in for multi-factor authentication, or you may require them to do so. In default settings, it is not set.
Verification Requirements
You should select to verify your users’ emails if it is one of their sign-in methods.
You can also enable phone number verification if you provide the option to sign up with phone numbers or use MFA. In this case, you need to create an IAM role to allow Amazon Cognito to send text messages. Please pay attention that separate AWS charges would apply for sending SMS messages.
Other Useful Settings
Customizing Emails and SMS Messages
Amazon Cognito provides defaults for email and SMS messages. However, you can define prettier messages by customizing them in the Message customizations section.
Email verification messages
You can select one of the Code or Link features for your users to verify their emails.
If you leave
Codechecked, your email message should have a{####}text which the verification code will replace. You must handle code confirmation in your application by making necessary Cognito SDK calls.If you select
Link, Amazon Cognito will send a link in the email message for your user to verify their email.
Although it would be a generic front end, the link option may be a better choice if you do not want to make an effort to develop front-end pages and SDK calls required. However, your users will need to remember to go to your website to sign in after confirmation. It may be better suited for applications used within your company.
The ‘Code’ option is more appropriate for customer-facing applications because your users will deal with pages customized for your application, which can be redirected to sign in afterward.
Invitation messages
You can edit your invitation messages after an administrator creates a user on Amazon Cognito Console. The only requirement is to have {username} text that will be replaced by the user’s username and {####} text for the user’s password.
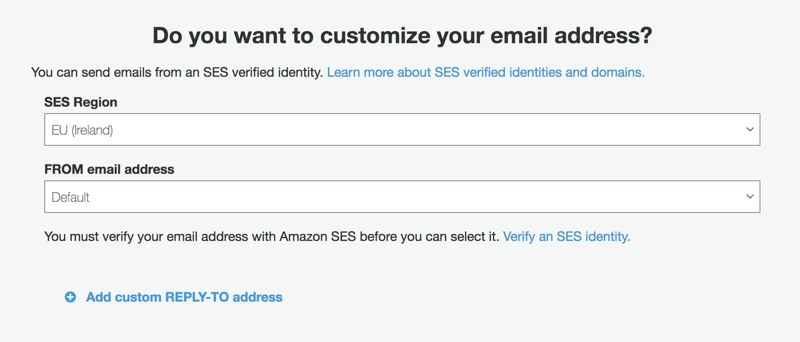
Using Custom Email Addresses
Amazon Cognito sends emails from no-reply@verificationemail.com. Wouldn’t it be better to use your own domain in the from field, such as no-reply@example.com? Amazon Cognito is integrated with Amazon SES, where you can select one of your SES-verified domain names. I might dive into SES verification in future posts, but you can find a reference in the References section.
Finishing Creation and Creating a User Example
After reviewing your setup, click Create User Pool, and you are good to go. Let’s discuss creating a new user on Amazon Cognito Console.
Under General Settings, click Users and Groups, which lists your available users and groups. I may discuss the groups feature in future posts. In summary, you can assign groups to your users and customize your applications by defining restrictions according to these groups. For example, you can define a group for admins and implement custom authorizers for your API gateway APIs. This way, you can authorize only the users in the admins group for a specific endpoint.
The Create user screen is standard. Although you selected some required fields, such as name, you will not see them in the Attributes section. They are actually for custom sign-up pages that use Amazon Cognito Identity Provider SDKs.
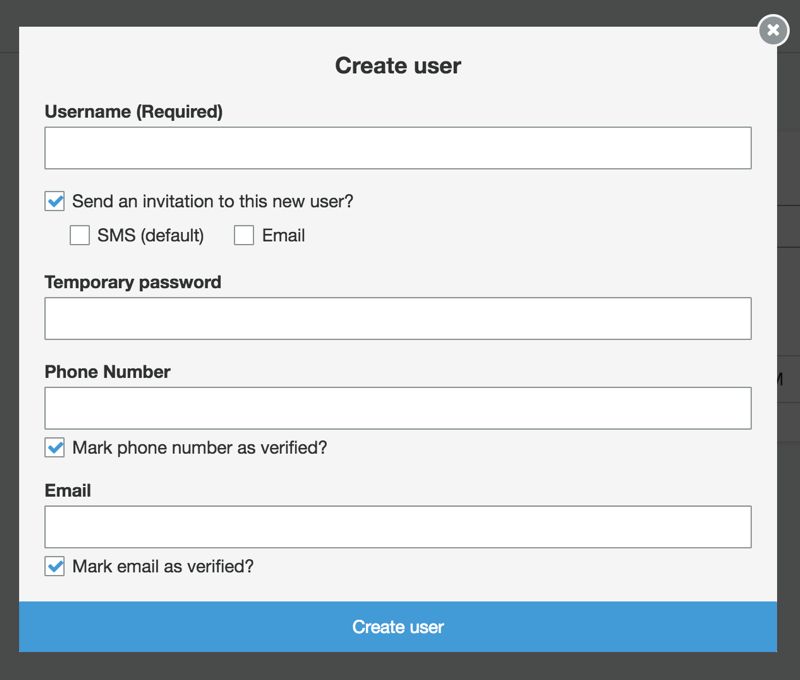
If you did not ask for phone numbers, uncheck Mark phone number as verified?. If you do not have any custom application to send verification emails using Amazon Cognito SDKs, be sure to check Mark email as verified? to make the email verified. Currently, Amazon Cognito Console lacks the option to send email verification emails to users created by administrators.
If you select Send an invitation to this new user? and check Email, an invitation email with the username and password information will be sent to the user’s email address once the creation is completed, as discussed in the Invitation Messages section.
Conclusion
Amazon Cognito User Pools provides simple tools to create a secure, scalable user pool for your applications. This will allow you to focus more on your application’s business-specific features. Even if you choose to create custom sign-up/sign-in forms in your application, Amazon Cognito will provide the back end required for these processes as SDKs, which will make you more productive.
This post only introduced Amazon Cognito User Pools for now. However, I plan to explore more features in the future, such as creating custom Cognito authorizers for API Gateway, identity federation, user groups, etc.
Thanks for reading!


