AWS CodePipeline is the AWS service to build and orchestrate your CI/CD workflows on AWS. Using CodePipeline with other AWS developer tools, you can model, visualize, and automate your software release process without maintaining any build or deploy servers.
Today, I am excited to announce the launch of my new course AWS CodePipeline Step by Step on Udemy! In this post, I will talk about what you will learn in this course section by section. Besides, I will also share a discount coupon special to launch in the end.
What will you learn in this course?
These are the main topics you will learn in this course shortly:
How to build your CI/CD pipelines using AWS CodePipeline to automate your deployments to Amazon EC2 instances and S3 buckets.
How to use AWS CodeCommit, CodeBuild, and CodeDeploy with AWS CodePipeline to create your workflow.
How to use AWS CloudFormation with CodePipeline to create and delete stacks automatically in each pipeline execution.
How to configure manual approvals and pipeline notifications.
Different CodeDeploy deployment types with their advantages and disadvantages.
Besides, we will have some deep dives into the build and deploy lifecycles, logging, and more.
How is this course organized?
As the course name suggests, we will proceed step by step.
Section 1: Introduction to AWS CodePipeline Basics
In the first section, I will introduce you to AWS CodePipeline basics such as creating, updating, and deleting a pipeline. As a start, you will create a simple pipeline between two S3 buckets as the source and deploy locations.
You will also learn how to trigger your pipeline by updating your source location on Amazon S3 as well as releasing a change manually. We will release a simple website.
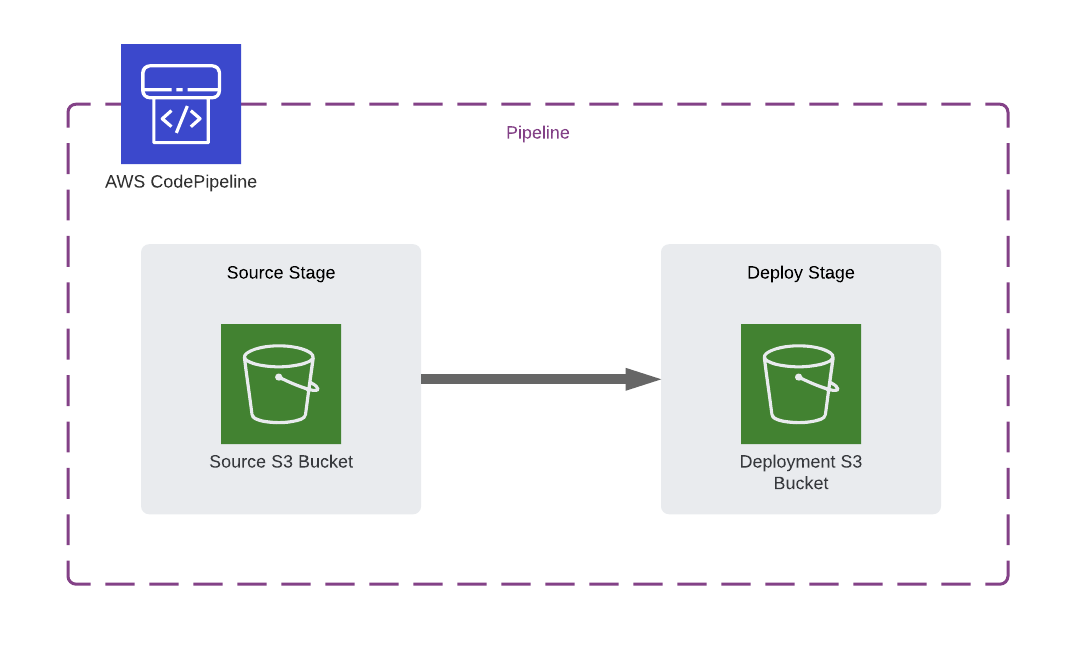
In the first section, we will not use Git yet. Our main goal will be to make you familiar with CodePipeline concepts as well as AWS CodePipeline Console.
Section 2: Using AWS CodeCommit Repositories as Source Locations
In Section 2, you will learn what AWS CodeCommit is and how to use it with AWS CodePipeline. You will create your first CodeCommit repository, connect it using HTTPS, and push your content to it. After these, you will create your first pipeline triggered by this repository.
In this section, you will also learn how to trigger your pipeline using Git commands. Besides, you will learn how to use AWS CodeCommit Console to edit files in your repositories and create commits when needed.
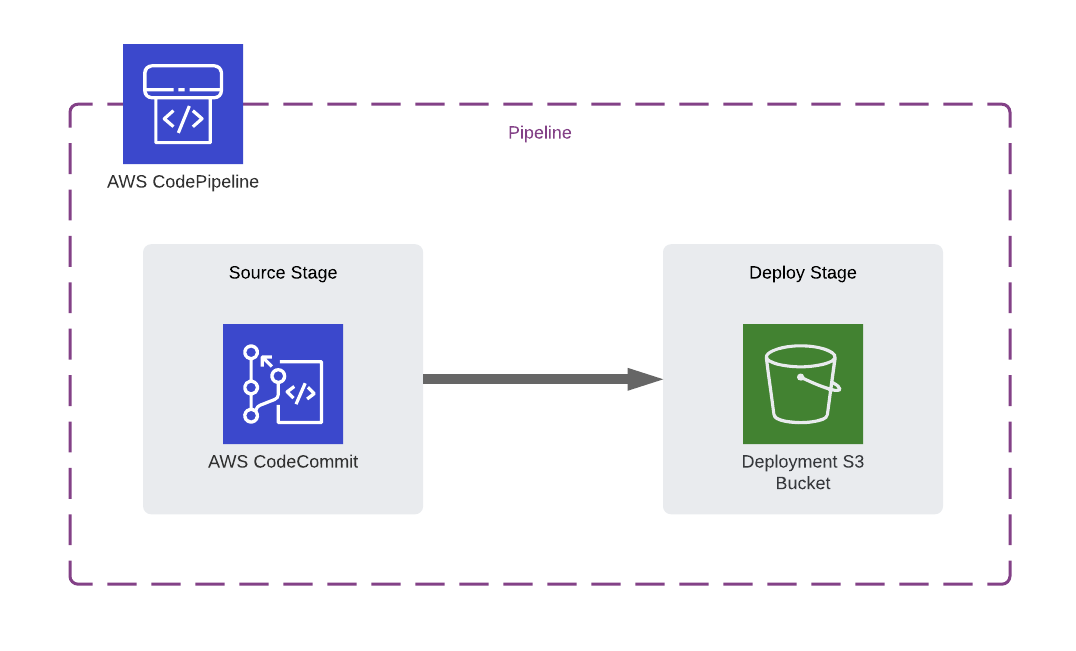
Section 3: Building Your Code With AWS CodeBuild
In the third section, we will create a pipeline with a build stage. You will learn how to use AWS CodeBuild with AWS CodePipeline to build and test your code automatically. After this section, you will be able to create build projects on CodeBuild and provide your build commands with your source code by creating a buildspec file for them.
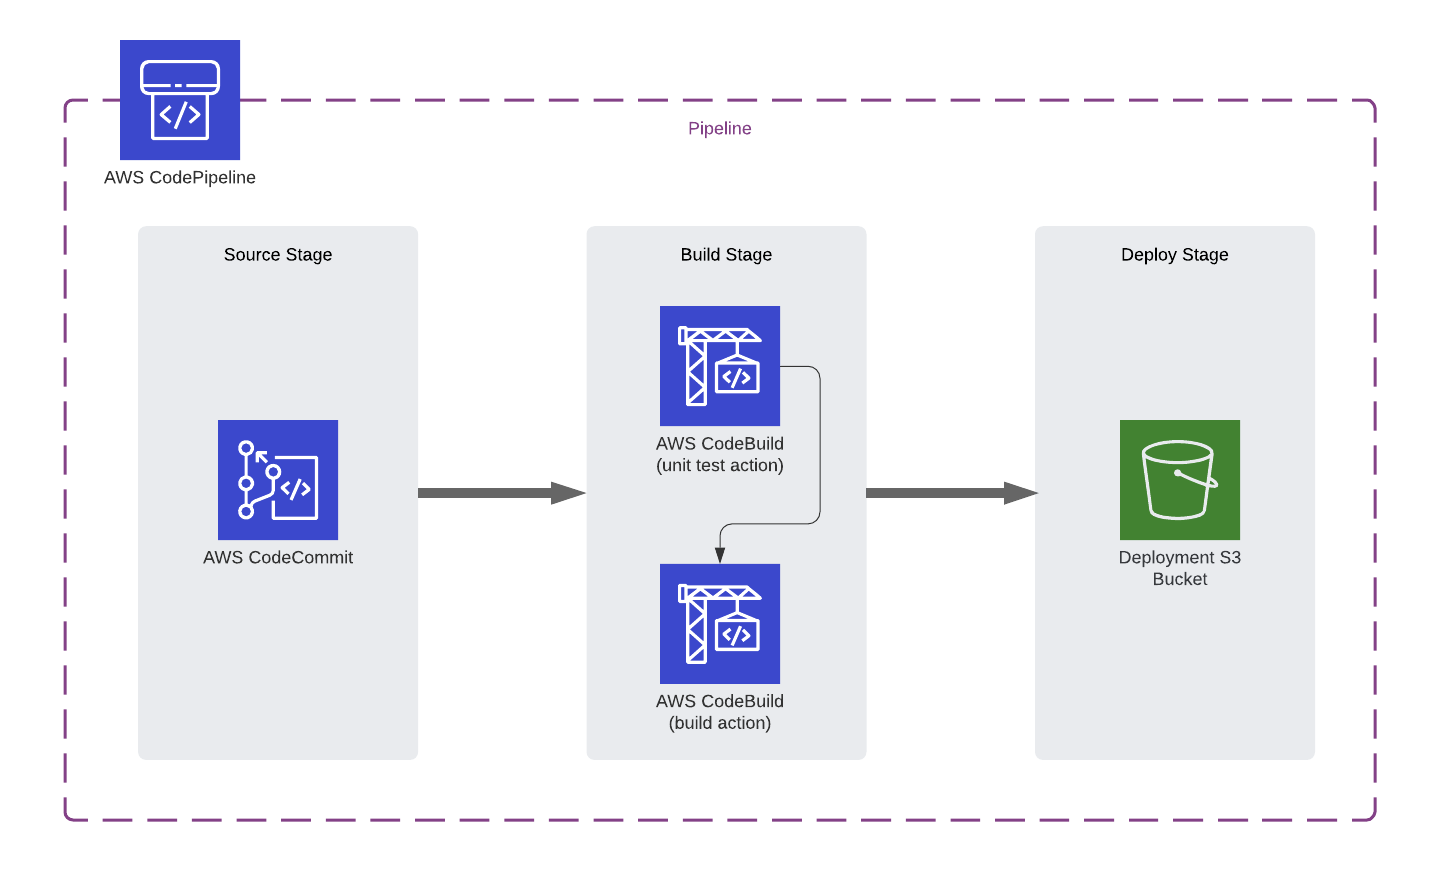
We will start using a basic Angular application in our examples. But you do not need to know or learn Angular for this. We will mainly update a version text in a single file to do hands-on practices. We will have examples for both build and test actions using Angular’s build and unit test commands as examples. But we will still deploy to Amazon S3.
Our focus will be on AWS CodeBuild and AWS CodePipeline, not Angular. The methods you learn will apply to other programming languages and frameworks.
We will not just cover the basics. You will also learn how to check build logs and understand the build lifecycle.
Section 4: Deploying to EC2 Instances With AWS CodeDeploy
Section 4 is currently the biggest section of this course. In this section, you will start deploying to Amazon EC2 instances and learn how to use AWS CodeDeploy with CodePipeline for this. In our examples, we will continue to use the same Angular application from the previous section.
We will start with a single EC2 instance and proceed with multiple instances behind an auto scaling group and an application load balancer. You will learn how to configure an EC2 instance for CodeDeploy deployments. You will create a CodeDeploy application, and use tags or auto scaling groups to create deployment groups for your EC2 instances. You will understand the structure of Appspec files and how to provide your deployment scripts and configurations with your source code as well.
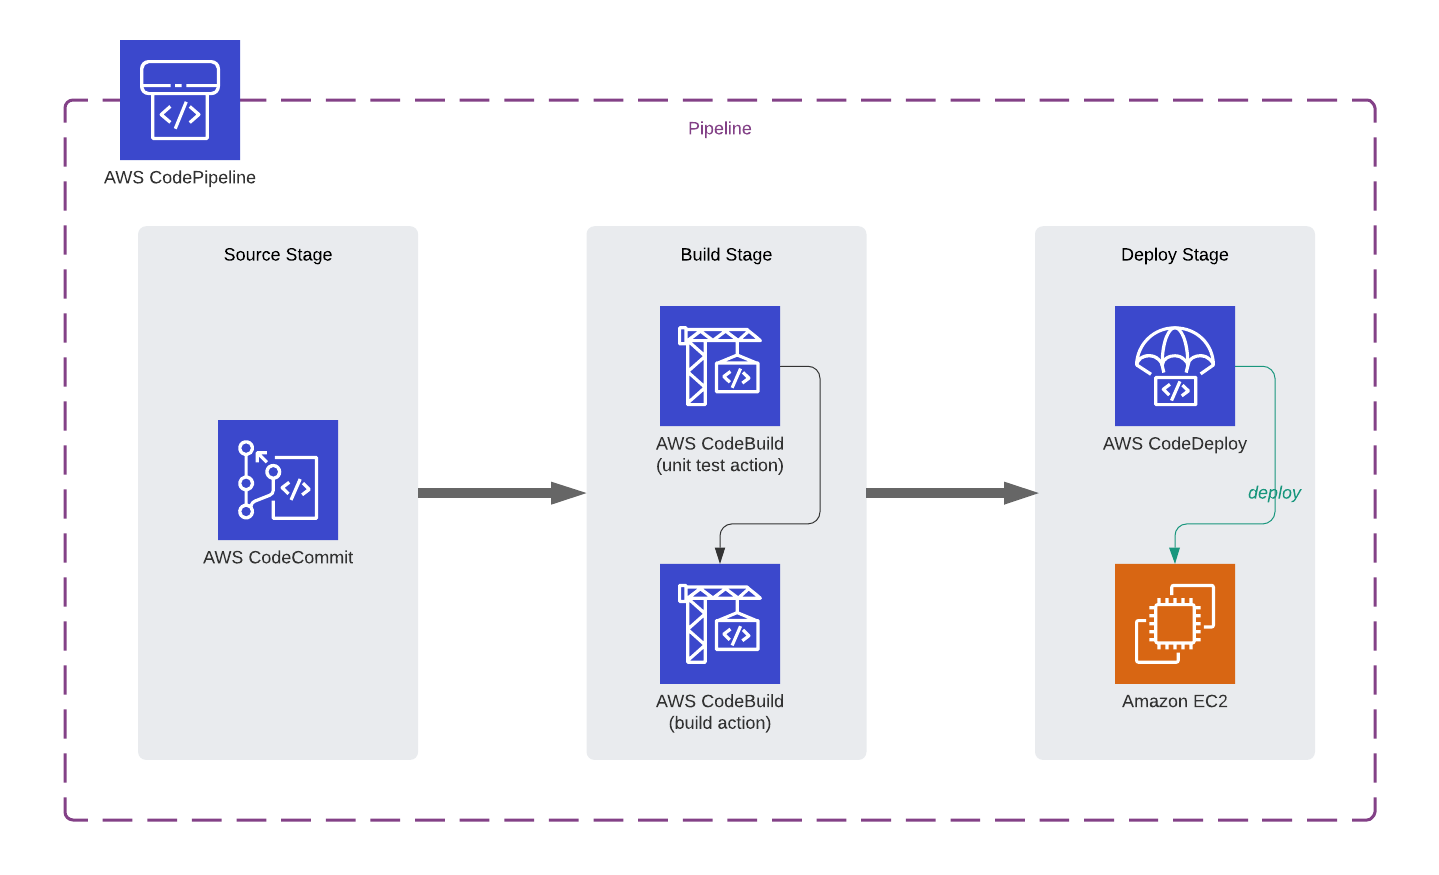
Besides, we will cover different CodeDeploy deployment types with examples. You will learn how in-place all-at-once, in-place rolling, and blue-green deployments work with auto scaling and load balancing. Our sample Angular application will help you in understanding what can go wrong in those deployments as well as the things you should consider while designing your pipelines. We will also have examples of automated rollbacks and blue-green deployment failures by simulating deployment failures.
You will also understand the deployment lifecycle on CodeDeploy. In addition, you will learn how to check deployment logs on an EC2 instance as well as how to stream them to Amazon CloudWatch Logs for long-term log storage.
Section 5: CloudFormation Deploy Actions, Manual Approvals and Notifications
In the fifth section, you will learn how to use AWS CloudFormation with AWS CodePipeline to create and update your stacks automatically. If you already enrolled in my AWS CloudFormation Step by Step: Beginner to Intermediate course, you will do fine. But even if you did not, I show you the steps, so it is not a prerequisite for the course.
We will add a staging stage to our pipeline. By defining a CloudFormation deploy action, we will create a staging environment with a single EC2 instance automatically in each pipeline execution from the launch configuration we created in the previous section. Then we will add a CodeDeploy deploy action to deploy our application revisions to the staging environment afterward.
Next, you will learn how to define manual approval actions on your pipelines. We will create an SNS topic and add a manual approval action to the staging stage after the CodeDeploy deploy action for the staging environment. You will see how manual approvals work on AWS CodePipeline.
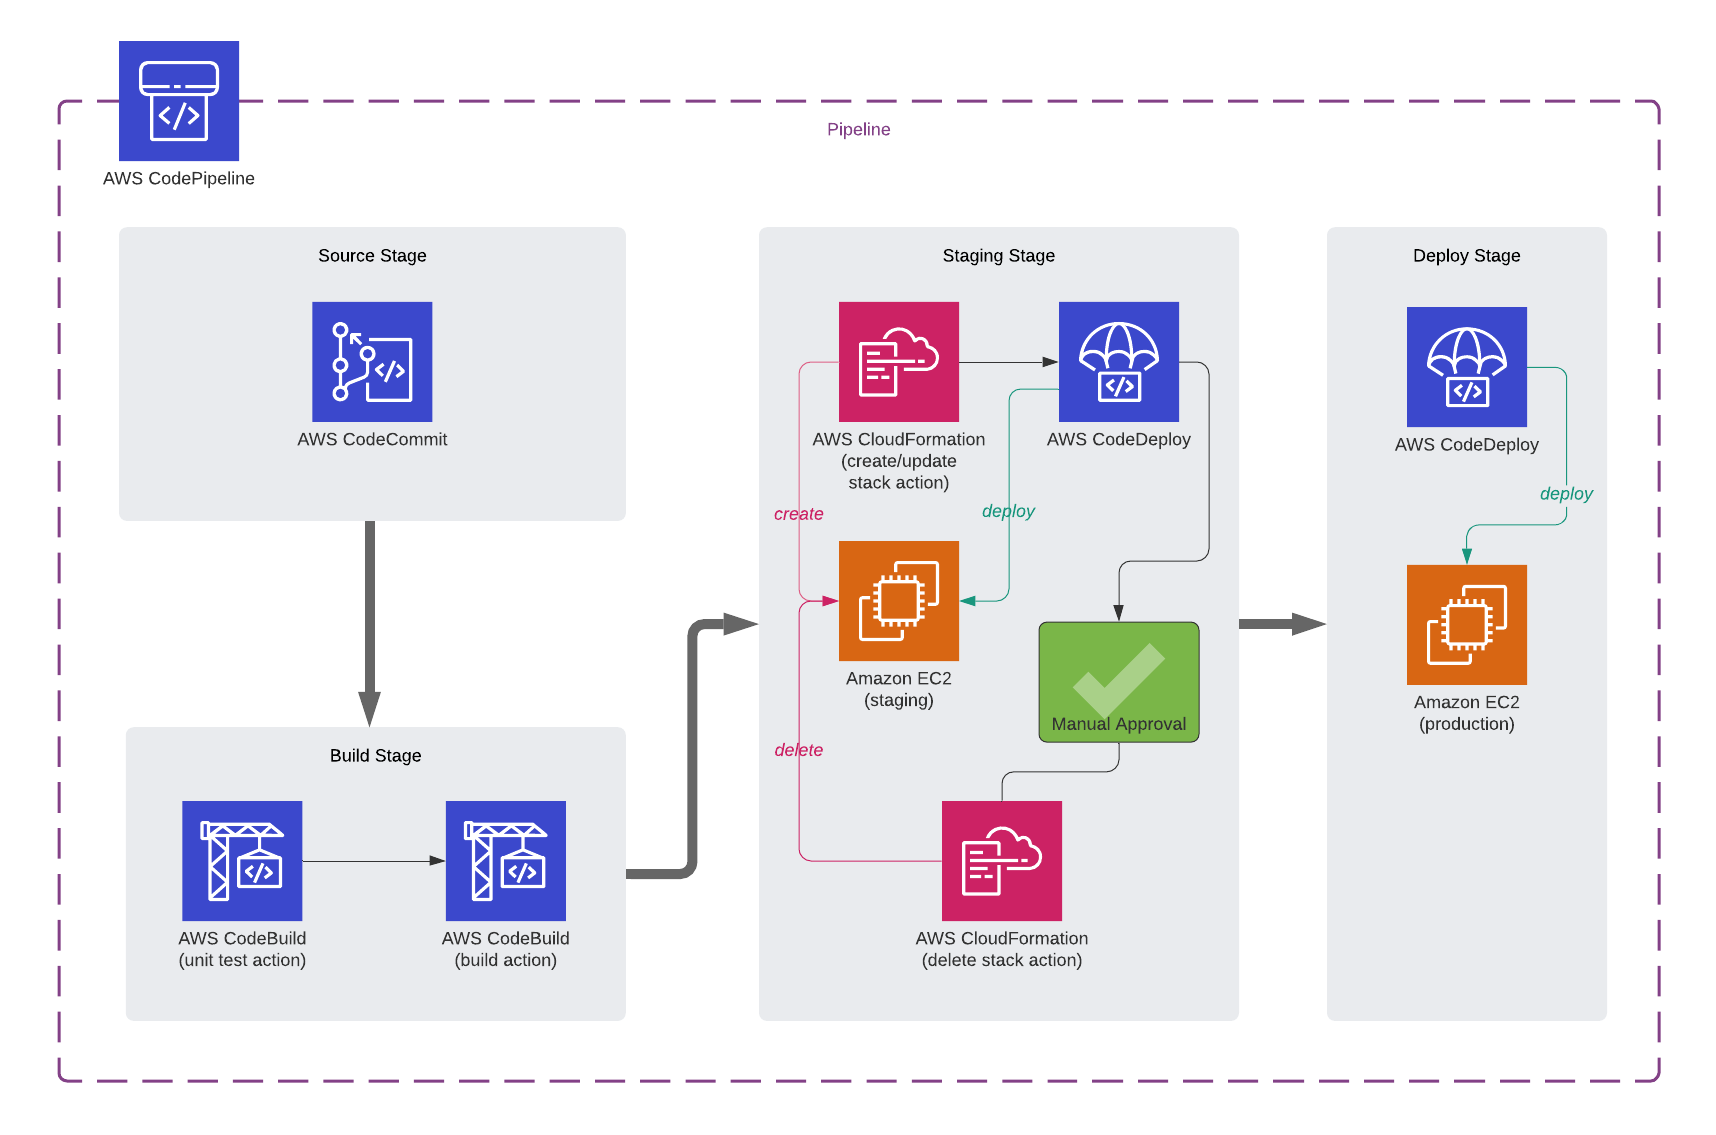
After manual approvals, we will not need our staging environment anymore. So, we will add a CloudFormation delete stack action to delete the staging environment created by the CloudFormation deploy action before.
In this section, we will also have deep dives into some AWS CodePipeline concepts. You will learn how to use action variables on your pipelines. As an example, we will make the manual approval action take the staging URL from the output of the CloudFormation stack created. Besides, we will trigger multiple concurrent executions and talk about what happens in those cases and what superseded pipeline executions are.
After these, you will learn how to receive pipeline notifications using the CodePipeline’s built-in notifications feature.
Prerequisites
I designed this course for developers, system administrators, or any AWS enthusiasts who would like to learn how to deploy their applications to EC2 instances or S3 buckets automatically, avoid human errors and minimize errors during the deployment process. I assume that you have no knowledge of AWS CodePipeline.
However, there are some prerequisites for this course:
First of all, you should have an intermediate level AWS knowledge around core services. Because, I will not dive into AWS basics such as S3, EC2, or IAM much. But I will demonstrate everything you will need.
Starting from Section 2, we will start using Git. I will make an introduction to Git and explain how it is used with CodePipeline. But you should have basic Git knowledge and experience in using Git commands from the command line.
In CodeBuild and CodeDeploy sections, we create YAML files for build and deployment specifications. Hence, I recommend you have a basic YAML knowledge for these lectures. But YAML is easy, so it is not a requirement. You will do fine if you follow me carefully.
Conclusion
It took months of work from course planning to shooting and editing the lectures. But finally, it is live! I hope you like it.
Unfortunately, the launch coupon I shared previously expired.
However, if you are interested, you can still join this course with a discount using the link below.
https://www.udemy.com/course/aws-codepipeline-step-by-step/?couponCode=JOINNOW2507
Alternatively, use the coupon code JOINNOW2507 during the checkout. This coupon will be valid only for a limited time. So, don’t miss the chance!
See you in AWS CodePipeline Step by Step!

