Automating deployments of your web applications brings many benefits, especially when you run them on AWS. You standardize the process, prevent human errors, and can integrate with other AWS services like EC2 Autoscaling and Elastic Load Balancing. Today I will talk about how to automate your Ruby on Rails deployments using AWS CodeDeploy.
Why to use AWS CodeDeploy?
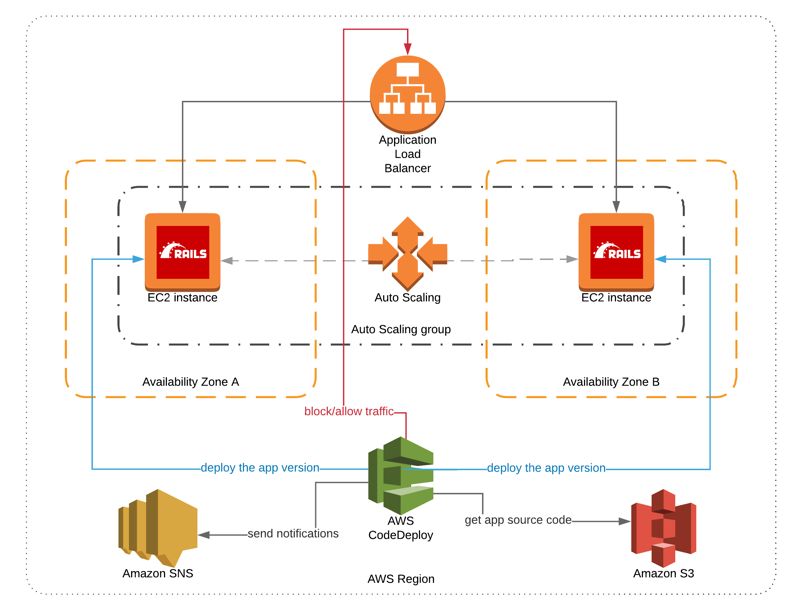
Performing manual deployments is no longer a choice when you maintain a production application on AWS. In a reliable and scalable architecture, you will have multiple, stateless, redundant EC2 instances. You cannot know when one of them will fail, or a load increase will happen on your existing instances resulting in the launch of a new instance. Also, even if you knew and ran the same commands every time using SSH, human errors can always happen. Hence, you should automate your deployment process in the best way you can.
AWS CodeDeploy is the automated deployment service provided by AWS. Using this service, you can deploy your applications on your EC2 instances, on-premise servers, as well as serverless Lambda functions. Let’s list some of its benefits and features:
- AWS CodeDeploy is well-integrated with EC2 auto scaling groups. It deploys the latest version to the new instances automatically upon launch.
- It avoids downtime during deployments by providing you rolling in-place and blue/green deployments
- You can integrate your Elastic Load Balancer with CodeDeploy to drain existing connections on the instance and avoid new ones during the deployment. CodeDeploy takes the instance back to service after the deployment succeeds. So, you can minimize downtime during deployments more.
- You can receive notifications upon deployment actions through Amazon SNS.
- You can set your CodeDeploy application and deployment group as a deployment step for your CI/CD pipeline implemented using AWS CodePipeline.
In the following sections, I will describe how you can implement AWS CodeDeploy integration for your Ruby on Rails application running on AWS with Autoscaling enabled and behind an Elastic Load Balancer.
Implementing AWS CodeDeploy integration for a Ruby on Rails application
Some of the steps of the integration are general to all type of applications that are being integrated with CodeDeploy. I will not dive into them as there are AWS resources in the references section of this post that you can get more information. These are:
- You should create an application on AWS CodeDeploy using AWS CLI or AWS Management Console.
- You should add a deployment group to your CodeDeploy application by selecting your Autoscaling Group.
- AWS CodeDeploy agent should be installed on your EC2 instances that are used in this deployment.
- I assume that Passenger-Nginx is installed on your instances and your web application is served from
/var/www/pisirpaylas/deploymentfolder wherepisirpaylasis the name of our application. You can rename your application folder with your application name or use Apache instead of Nginx. Then you will need to customizeappspec.ymland scripts below accordingly. But the theory is the same for the rest.
After you prepare these settings, you should add files and folders in the root of your application repository along with other application code. The most crucial one is appspec.yml which defines the deployment steps.
appspec.yml
Every CodeDeploy application should have this file in the root of their code repository. It defines which scripts will run in which step. As a best practice, I generally define a folder named deployment_scripts under the root directory for the deployment scripts. You are free to rename this folder, but appspec.yml is a must.
Here is how our appspec.yml file look like:
version: 0.0
os: linux
files:
  - source: /
    destination: /var/www/pisirpaylas/deployment
permissions:
  - object: /var/www/pisirpaylas/deployment
    owner: nginx
    group: nginx
    pattern: "*"
    mode: 775
    type:
      - file
      - directory
hooks:
  BeforeInstall:
    - location: deployment_scripts/arrange-deployment-folders.sh
      runas: root
  AfterInstall:
    - location: deployment_scripts/db-config.sh
      runas: nginx
    - location: deployment_scripts/install-gems.sh
      runas: nginx
    - location: deployment_scripts/compile-assets.sh
      runas: nginx
    - location: deployment_scripts/run-db-migrations.sh
      runas: nginx

  ApplicationStart:
    - location: deployment_scripts/finish-installation.sh
      runas: root
The first two lines are standard. version is specific to AWS CodeDeploy and not related to your application. It should be 0.0. I deploy into Linux instances so os attribute defines this.
files attribute is a list where your application will be installed. For this example, we have only one destination.
sourcedescribes which folder contains the application in the code repository. For Ruby on Rails, we deploy the folder as it is. So the source is root,/.destinationis where to deploy the application on the instance. As I mentioned before, I assume that our application is loaded from/var/www/pisirpaylas/deployment. So, this is the value we set for the destination.
permission section defines which OS user and group should have permissions in both folder and file level after the installation. This is about all the files and folders installed under /var/www/pisirpaylas/deployment.
hooks section is where the magic happens. Here, you list CodeDeploy specific lifecycle events and the order of the scripts in them. Besides, as I did, you can define which OS user should the script be ran by. It should be a passwordless user. I recommend running the command that performs the installations using a non-root user to avoid possible security issues.
Lifescycle events and hooks
Now, let’s describe lifecyle events and the scripts that we will run in them. There are more lifecycle events on AWS CodeDeploy, but the ones below are enough for this deployment.
BeforeInstall
This lifecycle event is just before the code installation on the instance. In other words, before our code is copied from the repository and placed under /var/www/pisirpaylas/deployment. This step is a perfect place to back up previous deployment and initialize an empty deployment folder.
#!/bin/bash

# Remove if previous deployment folder exists
rm -rf /var/www/pisirpaylas/prev-deployment

# Backup current deployment
mv /var/www/pisirpaylas/deployment /var/www/pisirpaylas/prev-deployment

# Create new deployment folder and make nginx owner
mkdir /var/www/pisirpaylas/deployment

chown nginx:nginx /var/www/pisirpaylas/deployment
We simply remove the previous deployment backup and rename existing deployment folder as prev-deployment to back it up. Normally, we do not need this and it will not be used in anyway if our automation works correctly. If deployment fails, CodeDeploy will redeploy the latest successful release to this instance assuming that we activated rollbacks on the deployment group. However, if some disruption occurs and you have to rollback manually by connecting via SSH into the instance, you can find it backed up as prev-deployment. It is just a caution.
You can perform any type of backup logic in this step. After this lifecycle is completed, the installation will be performed and our code will be deployed into a fresh deployment folder. The last command makes nginx user as the owner of the folder.
AfterInstall
As our code installed, we need to make configurations and installations to make it ready for production service. This is where AfterInstall lifecycle is used for. Below we will examine each script one by one. As you will see, in all scripts we first go to the deployment folder using cd command to run commands.
- deployment_scripts/db-config.sh
While configuring Ruby on Rails in production, using shared folders for configuration files and gems is a best practice. In our instance, we use /var/www/pisirpaylas/shared folder for this purpose. Besides, your code repository should not contain any database passwords or any other credentials. Hence, your database.yml file should not be included in your code repository. I recommend using CloudFormation templates and init scripts to create the database.yml file during provisioning. Using CfnHup is a good way to update this file with the same CloudFormation template. These are about the maintenance of your environment. Of course, you can select a different path to configure database.yml.
This script creates a link for the database.yml file inside the deployment folder to the main database.yml file in the shared folder.
#!/bin/bash

# Go to the deployment directory
cd /var/www/pisirpaylas/deployment

# Remove if there is an existing database configuration
rm -f config/database.yml

# Link the database configuration to shared db config file
ln -s /var/www/pisirpaylas/shared/config/database.yml config/database.yml- deployment_scripts/install-gems.sh
This script installs the gems into /var/www/pisirpaylas/shared/bundle folder. Using a shared folder will increase the speed of upcoming deployments. Because it will not download existing gems.
#!/bin/bash

# Go to the deployment directory
cd /var/www/pisirpaylas/deployment

# Get temporaray credentials for AWS CodeCommit
# - Remember that the instance must have access rights to the CodeCommit repositories in Gemfile.
git config --global credential.helper '!aws codecommit credential-helper $@'
git config --global credential.UseHttpPath true

# Install gems using bundler
# - Bundle location: /var/www/pisirpaylas/shared/bundle
# - Binary location: /var/www/pisirpaylas/shared/bin
# - Without development and test gems
# - Using gemfile in current directory
# - Also quietly. No need to generate all logs.
RAILS_ENV=production bundle install --binstubs /var/www/pisirpaylas/shared/bin --gemfile ./Gemfile --path /var/www/pisirpaylas/shared/bundle --without development test --deployment --quiet
As you may notice, I added for accessing AWS CodeCommit. It allows to install your gems in your CodeCommit repositories if you have any. Before you can add this step, your instance’s IAM role should have read access to your CodeCommit repositories. You can skip this part if you do not have any gem or Rails engine in your application accessing your CodeCommit repositories.
The last command runs our famous bundle install command for production. I think the comments should explain the options well. We provide shared locations for bundle and binary, exclude development and test gems.
- deployment_scripts/compile-assets.sh
This step compiles assets and places it in the project’s public folder. It is a Rails specific command.
#!/bin/bash

# Go to the deployment directory
cd /var/www/pisirpaylas/deployment

# Load environment variables
source /etc/profile

# Run asset precompilation
# - No need to run assets:clobber because this is a new folder. There should be none. We compile assets from the beginning in all deployments.
RAILS_ENV=production bundle exec rake assets:precompile
As you can see I reloaded environment variables before running the command. I generally use /etc/profile/ folder to place environment variables globally on the instance. The script usually does not load this folder automatically. Some gems such as devise require you to provide secret keys in environment variables or configuration files. As we do not store any credentials in the repository, it is better to use environment variables via CloudFormation templates as I described in the database.yml related section.
- deployment_scripts/run-db-migrations.sh
Actually, you might choose to deploy migrations in a managed way as it effects your database directly. Hence, you might not need this step. However, if you use Ruby on Rails’ built-in migrations feature, this step will allow you to run ActiveRecord migrations in your deployment. If you perform deployments one by one on your instances, the first instance will perform the migrations and running this command more than once in the instances followed will not perform any further actions in your database. Nevertheless, you should be careful while running your migrations. I recommend you back up your database before you run any DB changes for the first time.
#!/bin/bash

# Load environment variables
source /etc/profile

# Go to the deployment directory
cd /var/www/pisirpaylas/deployment

# Run migrations in production
RAILS_ENV=production bundle exec rake db:migrate
ApplicationStart
This is the final lifecycle event where you make final touches to finish the deployment and make additional configurations or clean-ups according to your needs. For example, I add the deployment time as a text file in the public folder which is completely optional. I rearrange application folder permissions and restart Nginx.
#!/bin/bash

# Load environment variables
source /etc/profile

# Print deployment info
DEPLOYMENT_TIME=$( date -u "+%Y/%m/%d %H:%M:%S" )
echo "Deployment finished at: "$DEPLOYMENT_TIME" UTC" > /var/www/pisirpaylas/deployment/public/deployment_time.txt

# Arrange folder permissions
chown -R nginx:nginx /var/www/pisirpaylas/deployment
chmod -R 775 /var/www/pisirpaylas/deployment

service nginx restart
Conclusion
When I first started integrating AWS CodeDeploy to our Pisirpaylas application, there were not many examples on the Internet about how we can use this service for a Ruby on Rails application. Your configurations will depend on the architecture of your AWS environment and the programming language or framework of your application. For example, if you need to deploy applications developed using another programming language such as PHP or Node.js, you will need to adjust your hooks section and customize your scripts accordingly. I hope this post will give you a good idea about how you can customize your steps upon your needs.
Of course, you might need to allocate some time to understand AWS CodeDeploy and other AWS developer tools. However, when you succeed, it worth the effort. When you start automating, you will never want to stop.
From this point, you can build a pipeline on AWS CodePipeline for your Ruby on Rails project. Then, you can enhance it more by adding test actions before deploying it to production. I hope to discuss them in the upcoming posts.
Thanks for reading!