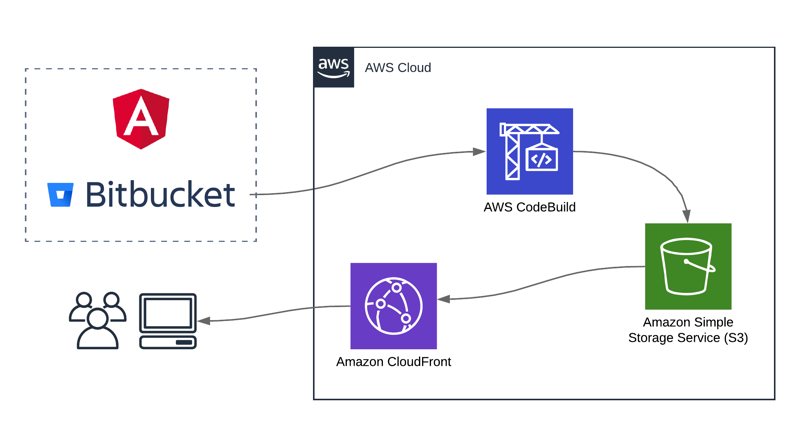
If you use Bitbucket for your private Git repositories, you cannot use AWS CodePipeline to create a CI/CD pipeline. Because CodePipeline does not support Bitbucket as a source repository. However, if you still want to use AWS developer tools to automate your builds and deployments, you have an alternative. AWS CodeBuild supports Bitbucket integration as source allowing to trigger builds after push requests to a Bitbucket repository by publishing it as a webhook to it.
By the way, Angular is one of the most popular frontend frameworks and you can deploy your Angular projects in a serverless manner. So it can be reliable, scalable and cost-effective by design. You can build your code, upload to an Amazon S3 bucket and distribute it via Amazon CloudFront.
In this post, I will make an example of using a Bitbucket repository for your Angular projects and triggering builds on AWS CodeBuild after pushing your changes to it. Then your AWS CodeBuild project can build your Angular code and deploy it to an Amazon S3 bucket making it ready for distributing via CloudFront.
Prerequisites
This blog post needs some settings as prerequisite and you can find them below.
- A Bitbucket repository containing an Angular 6 project. But this example will do fine with Angular versions 2,4 or 8 as well.
- A Bitbucket user and password to provide AWS CodeBuild to access your repo.
- An Amazon S3 bucket which has its static website feature enabled to deploy your Angular project. For Angular projects, you should define both
Index documentandError documentfields asindex.html.
Creating AWS CodeBuild Project
Let’s start with creating the CodeBuild project. You can name it anything you like, but you need to define your Bitbucket repository as its source.
Associating your Bitbucket repository as the source
While creating the AWS CodeBuild project, you should select Bitbucket from the Source provider list. Then you will see that there are two choices to connect AWS CodeBuild to your Bitbucket repository. I will simply select Connect with Bitbucket app password option and provide a Bitbucket username and password in the corresponding fields. After that click Save Bitbucket credentials to establish the connection.
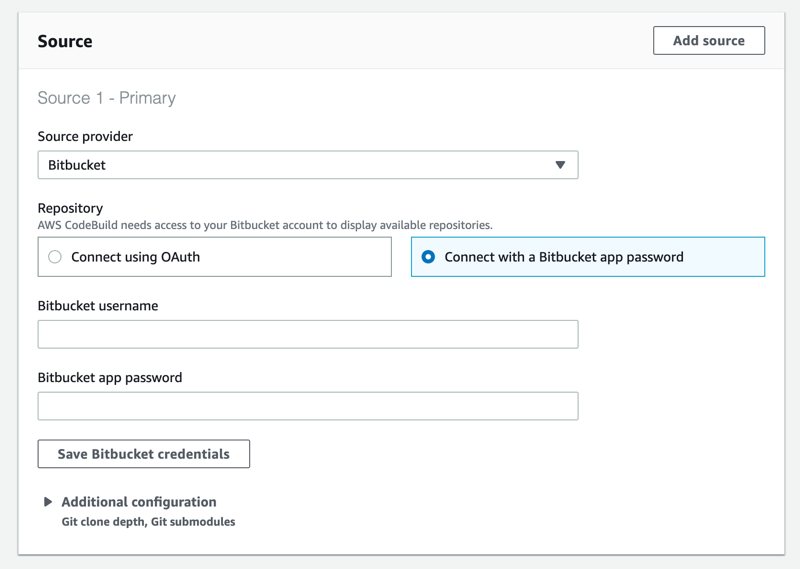
Your Bitbucket credentials will be saved and also used by CodeBuild to connect to your Bitbucket repsoitories in the future. So you need to do this once unless you do not disconnect your Bitbucket account on purpose.
After saving Bitbucket credentials, AWS CodeBuild connects to your Botbucket account and retrieves your repositories as a list. So, please select the repository containing your Angular code from this list.
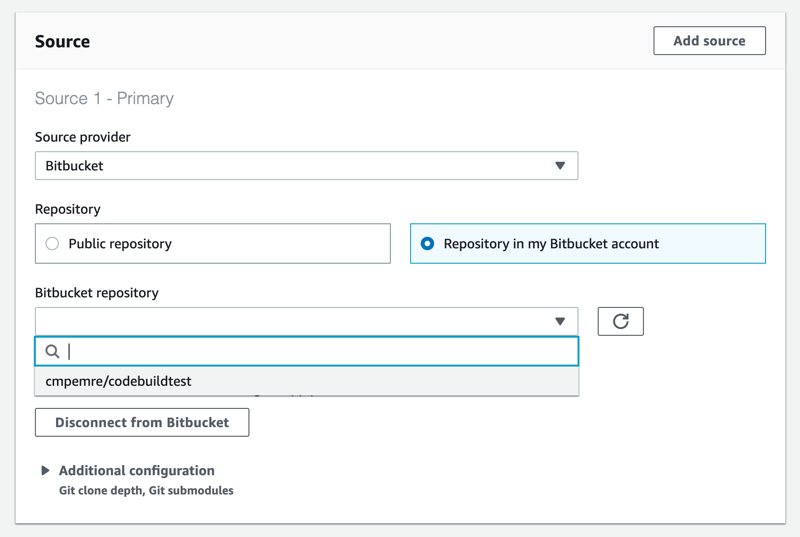
We defined the source as Bitbucket and selected our repository. But this is not enough to trigger builds after Git pushes to your repository. We need to define a source webhook event that will trigger this CodeBuild project. Actually, this webhook will be created on your Bitbucket repository, but creating it through your AWS CodeBuild project creation is easy.
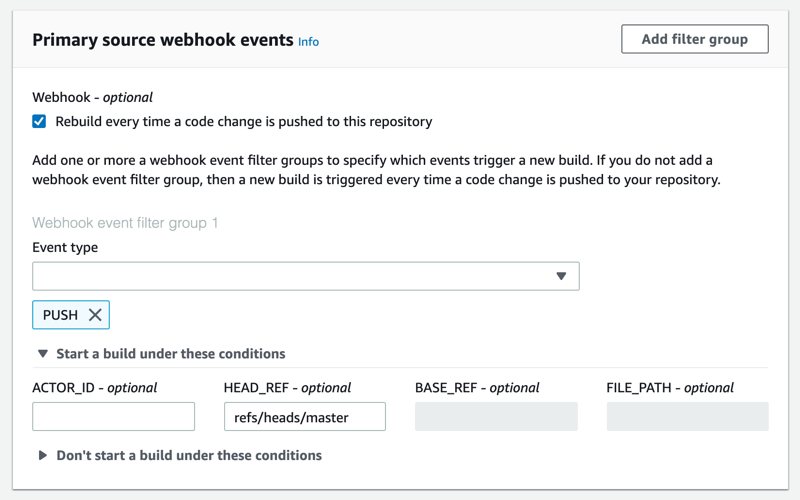
To do this, you need to select Rebuild every time a code change is pushed to this repository checkbox under Primary source webhook events.
However, after checking this option, all Git push or pull actions made on all branches in your Bitbucket repository will trigger this CodeBuild project. So you need to filter them according to your needs.
- In this example, our aim is to trigger this build only after a Git push action is made. To achieve this, you need to select
PUSHfromEvent typelist. - In addition, let’s limit this project for only the master branch. You can do this by defined a condition to start the build project and providing
refs/heads/masterunderHEAD_REFfield.
Defining environment properties for Angular builds
We associated our CodeBuild project with our Bitbucket repository and defined a webhook to trigger it after Git pushes made to the master branch. Next, we need to define environment properties and they are same for all Angular builds even if we use AWS CodeCommit or GitHub as our repositories.
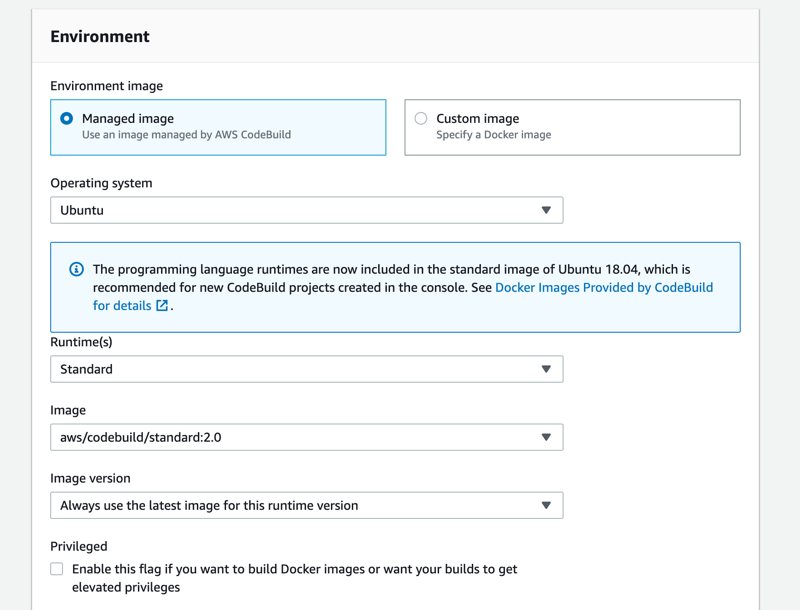
We can provide a Docker image or use a managed image provided by AWS CodeBuild. I will show you how to do this by using the second option.
- Select
Managed imagefromEnvironment image. - Select
UbuntuasOperating System. - Currently, only
Runtimeoption isStandard, so select it as well. - Let’s use the latest image and select
aws/codebuild/standard:2.0.
In the previous versions, we selected the specific image for the programming language here. For example, we selected Node.js version 8 or 10 image to build our Angular project. But this changes with CodeBuild standard 2.0. We need to define the runtime environment in our buildspec.yml and I will discuss this below while integrating our Angular project with CodeBuild.
The result for the image part should be similar to below.
In addition, AWS CodeBuild will create a service role for you. You can also select an existing service role, too. But you need to modify the role to allow access to your S3 bucket. So the CodeBuild project can deploy the code to your S3 bucket in a post_build step.

Before finishing, let’s define some environment variables to allow our Angular project to be built by different CodeBuild projects for different environments like production, staging, and deployed to different S3 buckets.
BUILD_ENV: This environment variable will contain the build environment name for your Angular project. It will be used as the value of the--configurationoption while calling theng buildcommand. For example, you can provideproductionfor this build and use the options defined undersrc/environments/environment.prod.tsandangular.jsonin your Angular project. This will be helpful if you need to create another environment likestagingand use different settings for it as well.BUCKET_NAME: This will be the name of the Amazon S3 bucket that AWS CodeBuild will upload the artifacts underdist/folder in apost_buildstep. Similar toBUILD_ENV, this environment variable will allow defining different S3 buckets for different environments using different CodeBuild projects.
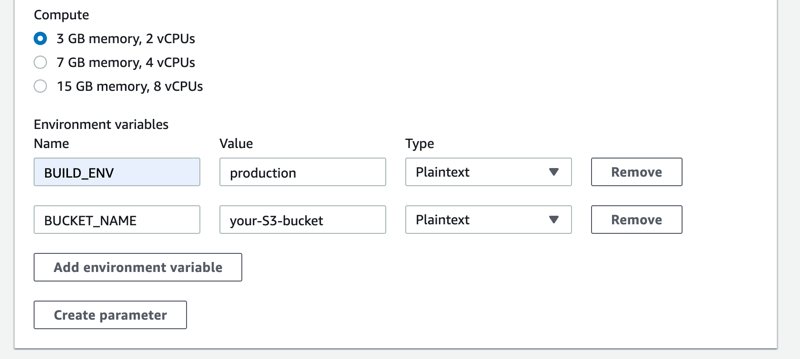
You can name this environment variables differently, but they should be same as the environment variables used in buildspec.yml below.
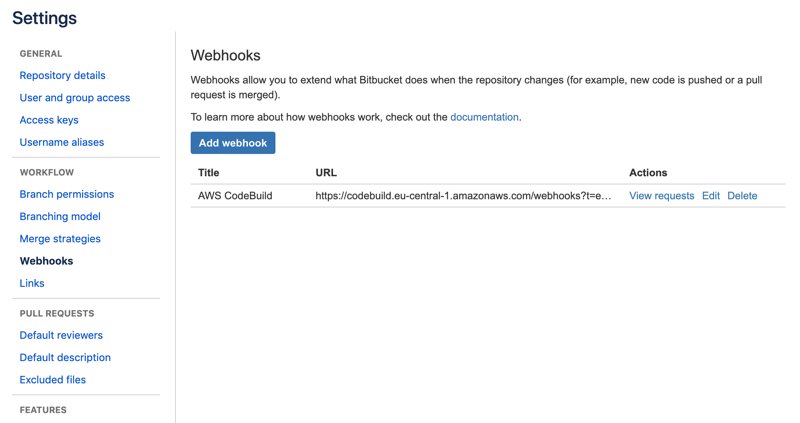
To finish the creation of your project, click Create build project. After your AWS CodeBuild project is created, you can see that there is a new webhook on your Bitbucket repository. You can see it under repository settings.
Integrating the Angular Project with CodeBuild
The last step is providing a buildspec.yml under the root of your repository where AWS CodeBuild can get the details of the build steps for your Angular project. It should be something like this.
version: 0.2
phases:
  install:
    runtime-versions:
      nodejs: 8
    commands:
      - npm install -g @angular/cli@6.0.0
  build:
    commands:
      - ng build --configuration=$BUILD_ENV --build-optimizer
  post_build:
    commands:
      - aws s3 sync dist/ s3://$BUCKET_NAME --delete
The details are below.
versionshould be0.2. Because we selectedaws/codebuild/standard:2.0as the image.- When using version
0.2, providingruntime-versionsis mandatory. Because if you remember, we do not define any programming language environment while creating the build project while using this version. Angular needs Node.js to build the project, so version 8 will do fine. But CodeBuild also supports version 10, too. You can use the appropriate Node.js version for your project. - As I explained above, I defined different environments in my Angular project. So I can use different settings like Cognito User Pool IDs for different environments. As you see, we use
$BUILD_ENVenvironment variable in thebuildphase. This makes our Angular project usable by different AWS CodeBuild projects. For example, we can create another CodeBuild project havingBUILD_ENVenvironment variable asstagingand use settings for the staging environment defined underangular.json. post_buildphase is the place where the deployment of our Angular code take place.ng buildcommand creates the artifacts underdistfolder. So the only thing we need to do is synchronising the contents of this folder with our S3 bucket. Here, using an environment variable likeBUCKET_NAMEagain allows us to define different buckets for different AWS CodeBuild projects and different environments. I simply usedaws synccommand with--deleteoption to delete the previous files. If you would like to preserve older versions of your artifacts, please feel free not to use--deleteoption at all.- If we used CodePipeline and a separate step for deployment, we would need to define
artifactslike below as well. But it is not needed for this example.
...
artifacts:
  type: zip
  base-directory: dist
  files:
    - '**/*'
After committing your code and pushing your changes to the master branch in your Bitbucket repository, you can see that AWS CodeBuild will start building your project. But there is one more thing to do for CodeBuild to be able to finish the build successfully.
Adding new policy to AWS CodeBuild service role to access the S3 bucket
In the post_build phase, AWS CodeBuild synchronizes the dist folder with your S3 bucket. Hence, you should add a policy in your CodeBuild service role that allows listing, putting and deleting objects in this bucket. A policy similar to the one below will do the trick. Please replace your-bucket-name parts in the ARNs with the name of your bucket.
{
    "Version": "2012-10-17",
    "Statement": [
        {
            "Sid": "S3BucketAccess",
            "Effect": "Allow",
            "Action": [
                "s3:PutObject",
                "s3:GetObjectAcl",
                "s3:GetObject",
                "s3:DeleteObjectVersion",
                "s3:GetObjectVersionAcl",
                "s3:ListBucket",
                "s3:DeleteObject",
                "s3:PutObjectAcl",
                "s3:GetObjectVersion",
                "s3:ListObject*"
            ],
            "Resource": [
                "arn:aws:s3:::your-s3-bucket/*",
                "arn:aws:s3:::your-s3-bucket"
            ]
        }
    ]
}
Testing
Now you can make a change and push it to your Bitbucket repository. Then you should see that a build run started and its status is In progress.
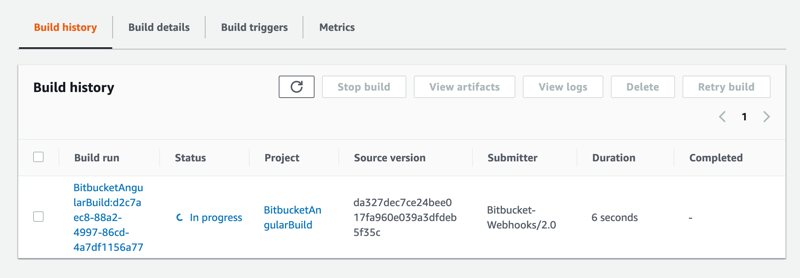
If you follow all the steps correctly, your build will finish successfully in a few minutes and you will find that your Angular app is deployed to your Amazon S3 bucket.
What about CloudFront?
As a serverless frontend, it would be wise to create an Amazon CloudFront distribution having its origin as your S3 bucket. But this is not related to build steps discussed in this post.
The only thing can be added is another command in the post_build phase that invalidates the root url and index.html after synchronising the files built with the S2 bucket. This will allow CloudFront to fetch new files immediately as long as the browser requests.
Conclusion
If you use Bitbucket, you can still use AWS develeoper tools to create a simple deployment pipeline on AWS. AWS CodeBuild’s Bitbucket integration simplifies this process a lot. In this example, I also tried to show how to achieve this in an Angular project. But Bitbucket and CodeBuild part would be same if we used a different framework like React, Vue.js or a backend like Ruby on Rails and PHP Laravel.
However, I prefer AWS CodePipeline and AWS CodeCommit for my projects while creating CI/CD pipelines on AWS environments. Because AWS CodePipeline is a complete pipeline solution with more features whereas AWS CodeBuild is used mostly in build steps. But if you like Bitbucket a lot and would like to continue using it, this is an alternative way of creating a simple pipeline to deploy your applications on AWS.
Thanks for reading!
Would you like to learn to use AWS CodePipeline with AWS CodeBuild?
After writing this post, AWS CodePipeline team announced support for Bitbucket repositories as source actions. So, it is now a more feasible option.
If you are interested in learning AWS CodePipeline, please check out my best-seller AWS CodePipeline Step by Step course on Udemy. The link also includes a special discount for you.
In this course, we use AWS CodeCommit instead of Bitbucket for our Git repositories. You can learn to build a complete CI/CD pipeline for your projects on AWS with AWS developer tools family, AWS CodePipeline, AWS CodeCommit, AWS CodeBuild, and AWS CodeDeploy.
You can also check my available courses on our Online Courses page. Hope to see you in them!

