AWS CodePipeline provides AWS CloudFormation Create or update stack and Create or replace change set action types to deploy your CloudFormation stacks from your pipeline. If you have joined my AWS CodePipeline Step by Step course, you would remember our example there. We automatically create a staging stack from a CloudFormation template before the manual approval action in our pipeline.
However, AWS CodePipeline’s CloudFormation action types only create stacks from deployable stack templates. Therefore, you cannot deploy your CloudFormation nested stacks with local path template definitions directly without packaging and uploading them to an S3 bucket first. In this post, I will talk about achieving this on an AWS CodePipeline pipeline using AWS CodeBuild.
How are nested stacks different than ordinary CloudFormation stacks?
AWS CloudFormation helps you automate the provisioning of your AWS resources by managing them as code. You define your AWS resources, such as EC2 instances or DynamoDB tables, in YAML or JSON format in your template. Then you create an AWS CloudFormation stack from this template, which provisions your AWS resources according to the definitions there.
Now, how is a nested stack different? Well, an AWS CloudFormation stack is also an AWS resource. So, a nested stack is a CloudFormation stack created by a parent stack, which we call the root stack. As you always use your stack to update or delete the resources it created, this time, you use the root stack for creating, updating, or deleting your nested stacks. It is a best-practice use case to organize your AWS CloudFormation stacks.
Then, how does the root stack perform create nested stacks? Well, you provide the S3 URL or local relative paths of the nested stack templates in your root template. So, either you will upload them to Amazon S3 yourself or let AWS CloudFormation CLI perform this for you with the help of the aws cloudformation package command beforehand. The aws cloudformation package command will upload your nested stack templates to an S3 bucket and produce a deployable root template containing their new S3 URLs as output.
I think this is enough for nested stacks as an introduction. I cover AWS CloudFormation basics in my AWS CloudFormation Step by Step: Beginner to Intermediate and nested stacks with other advanced features in my AWS CloudFormation Step by Step: Intermediate to Advanced courses in more detail. So, let me continue to my blog post with AWS CodePipeline.
A brief info about AWS CodePipeline and other AWS Developer Tools
After understanding how nested stacks work briefly, let’s talk about AWS CodePipeline and its friends, AWS Developer Tools.
AWS CodePipeline is the CI/CD orchestrator tool of AWS. It is serverless, so unlike Jenkins or other third-party CI/CD tools, you do not need to maintain an Amazon EC2 instance or another type of server for it. You define your deployment stages and let AWS CodePipeline trigger a new deployment each time you push your code changes.
Then, where do you push your code? You can use GitHub, Bitbucket, or AWS CodeCommit, the private Git repository service of AWS. AWS CodeCommit is built on top of Amazon S3. Hence, it is scalable, reliable, and cost-effective.
At some point in your pipeline, you may need to build your code or run commands to execute tests, etc. It is where AWS CodeBuild comes in. AWS CodeBuild is the build service and the command-line tool in your pipeline. It automatically provisions your serverless Docker nodes and runs the build commands you define in your buildspec file.
After building your pipeline, you will need to deploy it somewhere. AWS CodePipeline is integrated with many services for this, such as AWS CodeDeploy, Amazon S3, Amazon ECS, and of course, AWS CloudFormation.
If you need to learn AWS CodePipeline, I teach AWS CodePipeline with other developer tools in my AWS CodePipeline Step by Step course on Udemy. But, as our topic is about deploying AWS CloudFormation nested stacks, let’s continue with what AWS CodePipeline’s CloudFormation actions lack in terms of our goal.
What is the problem with CodePipeline’s CloudFormation actions for nested stacks?
AWS CodePipeline provides two action types to deploy your AWS CloudFormation stacks: Create or update stack or Create or replace change set. Of course, you will need another action to execute your change set afterward, if you use the Create or replace a change set action type in your pipeline. Change set actions are often used before and after a manual approval action.
These action types use a final, deployable AWS CloudFormation template to deploy your stack. If your stack has nested stacks, none of these actions will package your nested stack templates to Amazon S3 automatically. So, you will not be successful if you try to deploy your root stack using these action types without packaging your nested stacks first. Hence, it is the issue we are trying to solve in this post.
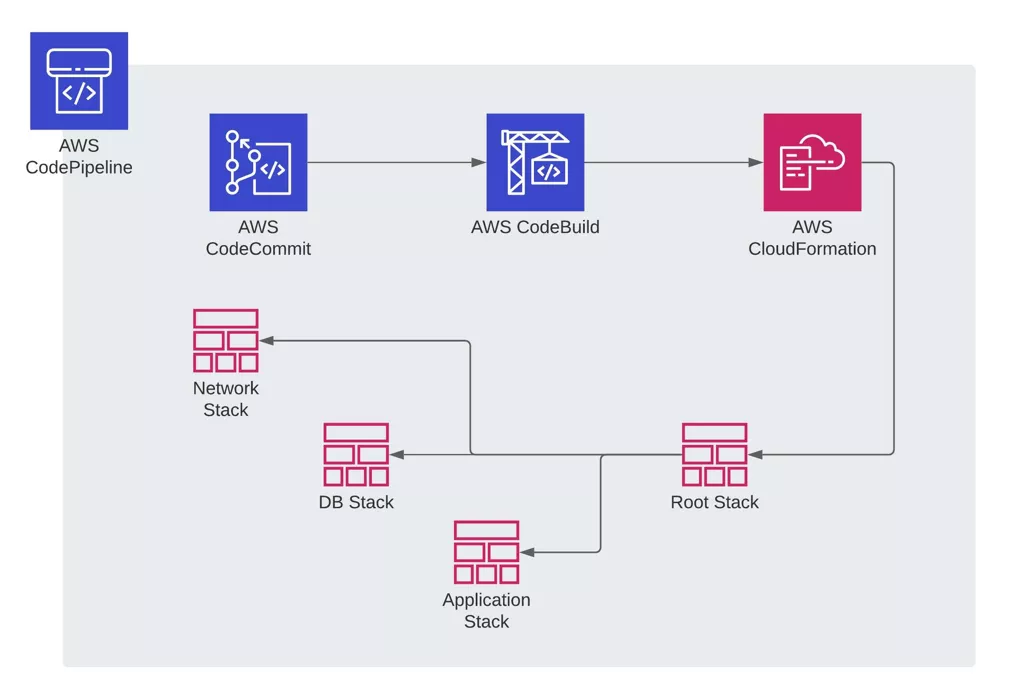
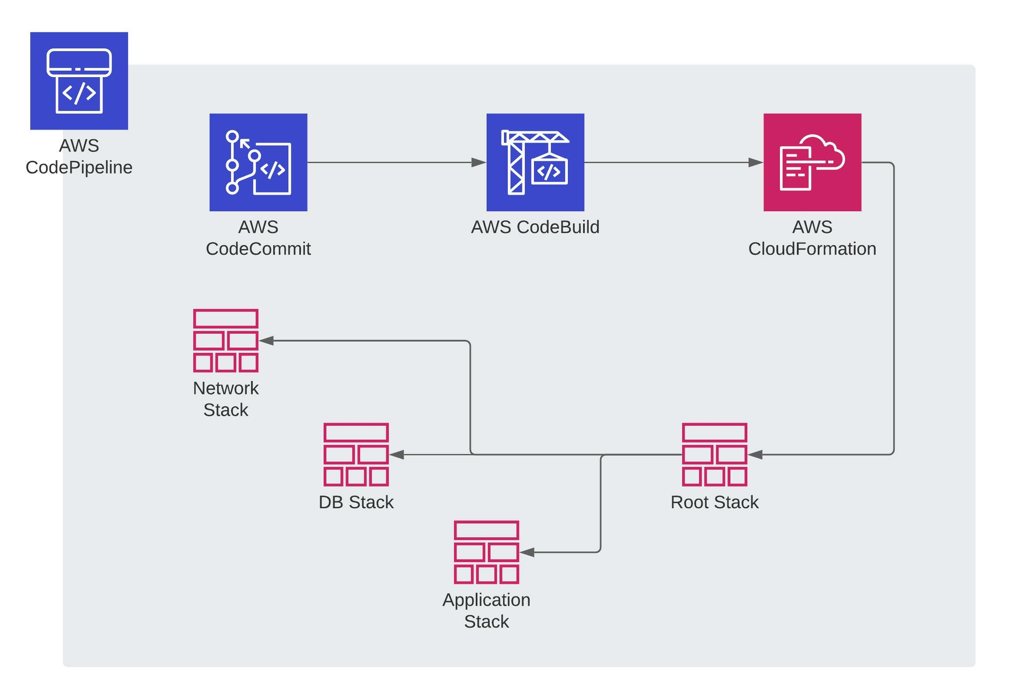
A pipeline to deploy nested stacks
First of all, let’s restate our problem. We need to package our nested stack templates before deploying them. But we do not want to do it manually. We want our AWS CodePipeline to automatically perform this once it gets the source artifact from AWS CodeCommit.
So, if you consider the packaging nested stack templates part as a build action, you can add an AWS CodeBuild build project to package your nested stack templates. You can execute the aws cloudformation package command in your source directory. Then, your build project will produce a build artifact containing the output template of the aws cloudformation package command.
After getting the build artifact from AWS CodeBuild, you can provide the new output template it contains to any of the AWS CodePipeline’s CloudFormation action types for creating your stack.

But of course, there are some details you need to consider while configuring your pipeline. So, let’s continue with the stages of our pipeline.
Source Stage: AWS CodeCommit
In this example, I will use AWS CodeCommit as the source repository for my root and nested stack templates. After I push my code to my CodeCommit repository, it will trigger my pipeline on AWS CodePipeline and produce a source artifact, which will contain all the contents in my source repository.
Build Stage: An AWS CodeBuild build project to package your nested stack templates
After the source artifact, I will add an AWS CodeBuild build action in my pipeline to package my nested stack. Because I will run AWS CLI commands in my build project, the CodeBuild’s latest Amazon Linux 2 image will be sufficient for my example. It has AWS CLI installed already, but you can also add commands to update it in the install phase of your builspec file. I will not do it to keep this post simple.
So, as you know, an AWS CodeBuild project needs a buildspec.yml file for the build commands. So in the simplest way possible, my buildspec.yml file for the latest Amazon Linux 2 image will look like this.
version: 0.2
env:
  variables:
    TEMPLATE_BUCKET: "your-s3-bucket-for-nested-templates"
phases:
  build:
    commands:
      - aws cloudformation package --template root-template.yaml --s3-bucket $TEMPLATE_BUCKET --output-template-file packaged-root-template.yaml
artifacts:
  files:
    - 'packaged-root-template.yaml'
If you noticed, there is an environment variable for the template bucket. This is because the aws cloudformation package command in the build phase requires an S3 bucket to upload your nested stack templates and I chose to use an environment variable for it. You can use your CodeBuild project’s environment variables setting or create a parameter in AWS Systems Manager Parameter Store. I discuss the options to define your environment variables in my Defining Environment Variables in AWS CodeBuild Buildspec Files post. For this example, I just defined a scalar environment variable for simplicity. Of course, you can provide the bucket name to the command directly, but I do not recommend it as it would decrease the reusability of your buildspec file.
Anyway. There is one more crucial thing to note. To upload your templates to this bucket, your AWS CodeBuild project’s IAM service role also needs permissions to put objects to that bucket. Otherwise, your build execution will fail due to unprivileged access.
After the aws cloudformation package command uploads your nested stack templates to your template bucket, it will produce a deployable root stack template. This file’s name will be the value we provide in the --output-template-file option. Hence, in my case, the name of the packaged template file is packaged-root-template.yaml.
However, as soon as your build project completes, AWS CodeBuild will discard the build container created for it and nothing will be preserved. So, we need to export the packaged root template file in some way to provide it to our CloudFormation deploy actions later. This is what the artifacts section does in our buildspec file. It extracts the files defined in the files sub-section as a build artifact and stores it in the pipeline’s artifact store.
Hence, your build project’s IAM service role should also have permissions to put objects to your pipeline’s artifact store. It is a must for all CodeBuild projects producing build artifacts in CodePipeline pipelines.
Deploy Stage: CloudFormation ‘Create or update stack’ action to deploy your packaged root template
So we packaged our nested stack templates and produced a deployable root template from them. Now we can use one of the CodePipeline’s CloudFormation actions to create our stack. I will use the Create or update stack action type, but the same inputs will be valid for the Create or replace change set option as well.
During the configuration, we will provide the BuildArtifact as input of the deploy action.

Then, we will reference the packaged-root-template.yaml from the BuildArtifact as the template of the new stack. This path should be the same as the path in your buildspec file’s artifacts section.

As the last step, please don’t forget to provide a valid AWS CloudFormation service role to your CloudFormation action. It should have the necessary permissions to create your nested CloudFormation stacks and other resource types defined in them.
Conclusion
The nested stacks feature provides many benefits for organizing your AWS CloudFormation stacks. But there are some tweaks you need to do to successfully deploy them automatically with your CI/CD pipelines on AWS CodePipeline. As I described above, you can use AWS CodeBuild before your CloudFormation deploy actions to package your nested stack templates and produce a deployable root template. Then, you can refer to this packaged root template from the build artifact in your CloudFormation actions. I hope this post helps you while configuring your CodePipeline pipelines.
By the way, I teach AWS CloudFormation and AWS CodePipeline services in my courses on Udemy in more detail. I do not cover this example directly in them. But you can find many topics discussed above in these courses, CloudFormation basics or advanced features, nested stacks, creating AWS CodePipeline pipelines with other AWS developer tools, etc. You are welcome to join them if you need to learn more with different use cases. You can also find my previous blog posts mentioned above in the references section below.
Thanks for reading!
References
- Defining Environment Variables in AWS CodeBuild Buildspec Files
- Nested Stacks or Cross-stack References? Which to Organize Your AWS CloudFormation Stacks?
- AWS CodePipeline Step by Step | My AWS CodePipeline course on Udemy
- AWS CloudFormation Step by Step: Beginner to Intermediate | My AWS CloudFormation course for beginners on Udemy
- AWS CloudFormation Step by Step: Intermediate to Advanced | My AWS CloudFormation course for advanced features on Udemy