When you launch an Amazon EC2 instance, you define an Amazon EBS volume size. However, you may eventually need more disk space later for some reason. In this blog post, I will demonstrate an example of how you can increase the root volume size of an EC2 Linux instance.
There are three components of this operation:
- AWS Elastic Block Storage (EBS) volumes attached as block devices to our EC2 instance, such as
/dev/xvda. - Partitions on block devices, such as
/dev/xvda1. - Mounted filesystem on the operating system such as
"/dev/xvda1" mounted on "/".
Checking the Block Devices and the Filesystem on Your EC2 Instance
First of all, let’s connect to our EC2 instance using SSH. For demonstration, I will be using a t2.micro type of Amazon EC2 instance backed by an 8 GB EBS volume initially and running Ubuntu 16.04LTS operating system.
After connecting to our EC2 instance, let’s list its block devices available:
~$ sudo lsblk
NAME    MAJ:MIN RM SIZE RO TYPE MOUNTPOINT
xvda    202:0    0   8G  0 disk
└─xvda1 202:1    0   8G  0 part /
Here, we see that there are 8GB on the xvda block device, and all 8GB is allocated to the xvda1 partition as expected.
Then, let’s display the amount of disk space used and available on the Linux filesystem.
~$ sudo df -h
Filesystem      Size  Used Avail Use% Mounted on
udev            488M     0  488M   0% /dev
tmpfs           100M  3.1M   97M   4% /run
/dev/xvda1      7.7G  965M  6.8G  13% /
tmpfs           496M     0  496M   0% /dev/shm
tmpfs           5.0M     0  5.0M   0% /run/lock
tmpfs           496M     0  496M   0% /sys/fs/cgroup
tmpfs           100M     0  100M   0% /run/user/1000
As can be seen, we have a 7.7 GB disk space available on /dev/xvda1, which we will increase by 2 GB. AWS automatically allocated the remaining, nearly 0.3 GB, to the udev and tmpfs.
One more thing to go, we need to determine whether the disk use ext3-ext4 or xfs file system:
~$ sudo file -sL /dev/xvda1
/dev/xvda1: Linux rev 1.0 ext4 filesystem data, UUID=3e13556e-d28d-407b-bcc6-97160eafebe1, volume name "cloudimg-rootfs" (needs journal recovery) (extents) (large files) (huge files)
So, we checked the initial state of our EC2 instance. Next, let’s continue by resizing its volume using AWS Management Console.
Modifying Your EBS volume on AWS Management Console
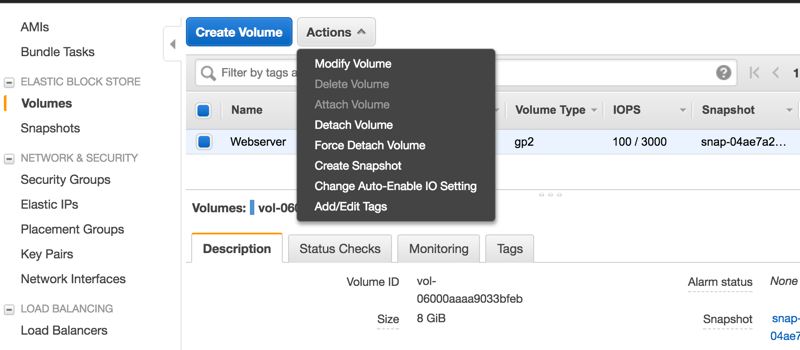
On our Amazon EC2 dashboard, let’s click Volumes under the ELASTIC BLOCK STORE section on the left. Here, we need to select the volume attached to our instance and click Modify from the Actions menu. You can see the screenshot below.
Let’s increase the volume size on the window opened. As an example, I will resize my EBS volume to 10GB.
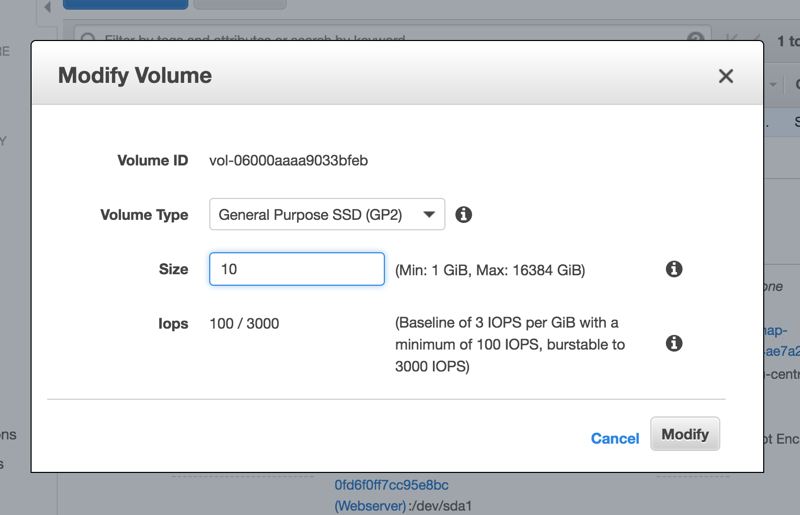
After clicking Modify, AWS will display an approval window to avoid unintended actions; click Yes on this window to continue. After that, a success message will be displayed for the start of the EBS volume resize operation, which you can ignore by clicking Close.
After getting the volume increase request, AWS will resize the EBS volume in seconds. You will need to refresh the page a few times to see that the process finished successfully.
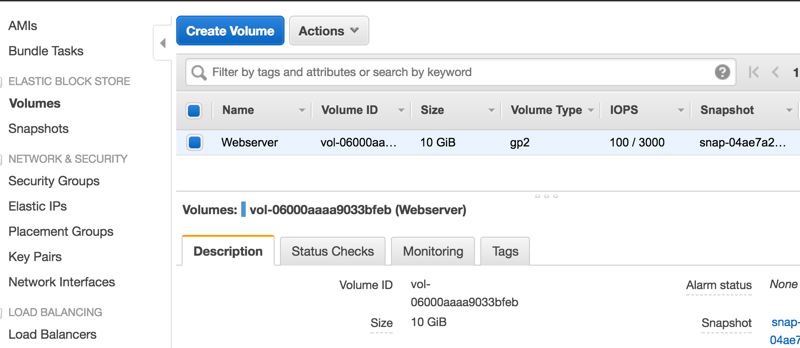
We resized our EBS volume successfully. However, we need to extend the OS file system on our EC2 instance for the new EBS volume size to take effect.
Extending the OS Filesystem (ext3, ext4) on Your EC2 Instance
Please remember that we initially listed the block devices on our EC2 instance and saw that all 8GB of xvda was allocated to the xvda1 partition. Now, let’s list them once more after resizing our EBS volume to see what it displays:
~$ sudo lsblk
NAME    MAJ:MIN RM SIZE RO TYPE MOUNTPOINT
xvda    202:0    0  10G  0 disk
└─xvda1 202:1    0   8G  0 part /
As you see, the size of the xvda block increased from 8 GB to 10 GB; but the xvda1 partition uses only 8 GB of it. We should allocate all 10 GB to xvda1, right? We can do this using the growpart command as our filesystem is ext4.
~$ sudo growpart /dev/xvda 1
CHANGED: partition=1 start=2048 old: size=16775135 end=16777183 new: size=20969439,end=20971487
Now, let’s confirm that all the storage is allocated to the xvda1 partition by listing the block devices again:
~$ sudo lsblk
NAME    MAJ:MIN RM SIZE RO TYPE MOUNTPOINT
xvda    202:0    0  10G  0 disk
└─xvda1 202:1    0  10G  0 part /
OK. We increased block storage, but we also need to resize the filesystem to be able to use it:
~$ sudo resize2fs /dev/xvda1
resize2fs 1.42.13 (17-May-2015)
Filesystem at /dev/xvda1 is mounted on /; on-line resizing required
old_desc_blocks = 1, new_desc_blocks = 1
The filesystem on /dev/xvda1 is now 2621179 (4k) blocks long.
Let’s confirm the operation by redisplaying the filesystem disk space usage.
~$ sudo df -h
Filesystem      Size  Used Avail Use% Mounted on
udev            488M     0  488M   0% /dev
tmpfs           100M  3.1M   97M   4% /run
/dev/xvda1      9.7G  964M  8.7G  10% /
tmpfs           496M     0  496M   0% /dev/shm
tmpfs           5.0M     0  5.0M   0% /run/lock
tmpfs           496M     0  496M   0% /sys/fs/cgroup
tmpfs           100M     0  100M   0% /run/user/1000
As you see, the size of the /dev/xvda1 partition became 9.7 GB with a net 2 GB increase. Hence, our EBS volume resize operation is successful.
Conclusion
In the lifetime of our EBS backed EC2 instances, we may need to increase the root or other EBS volumes of them. In this blog post, I demonstrated to achieve this on an Ubuntu EC2 instance with the ext4 filesystem. For ext3, the process is also the same. If your instance runs Amazon Linux or Centos operating systems with ext3 or ext4 filesystems, you can apply the same method here.
However, if your filesystem is xfs, you need to do the filesystem extension using the xfsprog command. You can find the link for its details on the AWS documentation in the references section below.
Thanks for reading!


