When you make changes on your content distributed via your Amazon CloudFront distribution, you have two options for them to be visible if they are cached: You will either wait for the cache to expire or you will invalidate them to serve the changes immediately. Of course, you cannot do anything about the cached content on your users’ browsers. But in your side, everything is under your control on AWS.
In this post, I will talk about how to invalidate some paths on your Amazon CloudFront distributions using AWS CLI along with some other commands that may be helpful in the process.
Why invalidate?
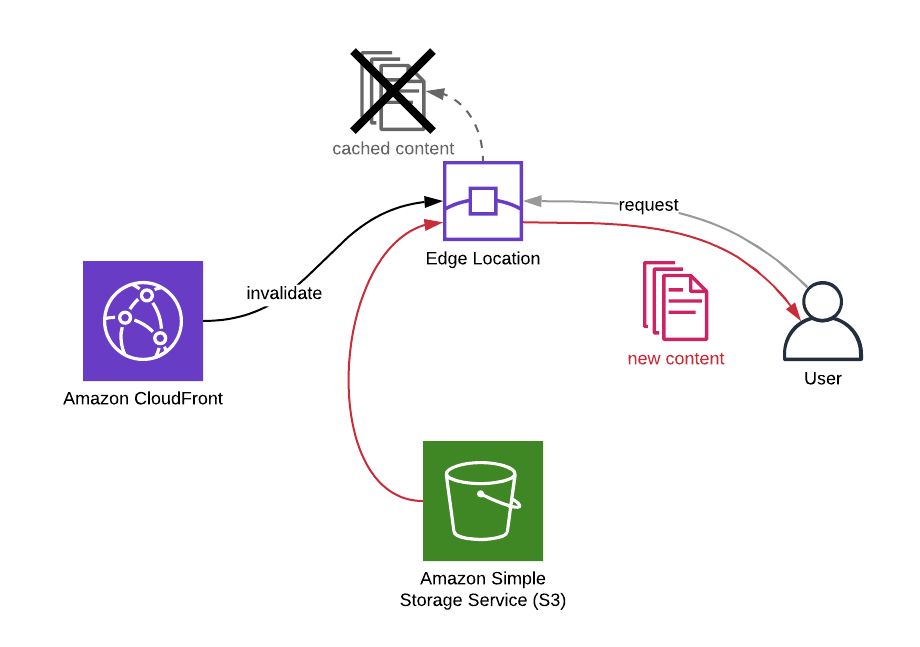
The main reason you use Amazon CloudFront is to cache your most viewed contents on the AWS edge locations near your users and deliver them faster by avoiding access to origin. You can set cache settings on CloudFront or origin.
When you update a content, it may not be displayed immediately. Because you only updated its origin and your users may be receiving it from their closest edge locations. The requests may not be even routed to the origin until the cache expires. I use may here, because it is not certain, too. If your content was not accessed for a while, it may not be in the cache. But most probably it will be, if it is one of the most viewed ones like your homepage.
The update may not be crucial for you. So you may choose to wait for the cache to expire. But what if it is a content that needs to be available immediately. You can do this by invalidating the path of the content on your Amazon CloudFront distribution.
Why use AWS CLI?
AWS CLI is the command line tool of AWS. When you get used to it, it is more convenient than using AWS Management Console. Instead of signing in and finding your resources, you simply type a few commands and it’s done. Besides, you can use the same commands to create bash scripts to make the process even easier and reuse the work done in the future.
You can learn more about AWS CLI on its user guide documentation.
How to list your Amazon CloudFront distributions using AWS CLI
Firstly, you will need to have the ID of your CloudFront distrubution. Should you get it from AWS Management Console? Yes, maybe… But you can list all your active CloudFront distributions using aws cloudfront list-distributions command as well.
$ aws cloudfront list-distributionsBut this command will return a large list if you have lots of distributions like me. So it will be feasible to filter it using the --query option.
To be able to write a correct --query filter, you need to know the format of the command response. Amazon CloudFront returns all responses in the format below. I got this from the command’s CLI reference.
{
    "DistributionList": {
        "Marker": "",
        "Items": [
            {
                "Status": "Deployed",
                "ARN": "arn:aws:cloudfront::123456789012:distribution/EDFDVBD632BHDS5",
                "CacheBehaviors": {
                    "Quantity": 0
                },
                "Origins": {
                    "Items": [
                        {
                            "OriginPath": "",
                            "S3OriginConfig": {
                                "OriginAccessIdentity": ""
                            },
                            "Id": "my-origin",
                            "DomainName": "my-bucket.s3.amazonaws.com"
                        }
                    ],
                    "Quantity": 1
                },
                "DomainName": "d2wkuj2w9l34gt.cloudfront.net",
                "PriceClass": "PriceClass_All",
                "Enabled": true,
                "DefaultCacheBehavior": {
                    "TrustedSigners": {
                        "Enabled": false,
                        "Quantity": 0
                    },
                    "TargetOriginId": "my-origin",
                    "ViewerProtocolPolicy": "allow-all",
                    "ForwardedValues": {
                        "Headers": {
                            "Quantity": 0
                        },
                        "Cookies": {
                            "Forward": "none"
                        },
                        "QueryString": true
                    },
                    "MaxTTL": 31536000,
                    "SmoothStreaming": false,
                    "DefaultTTL": 86400,
                    "AllowedMethods": {
                        "Items": [
                            "HEAD",
                            "GET"
                        ],
                        "CachedMethods": {
                            "Items": [
                                "HEAD",
                                "GET"
                            ],
                            "Quantity": 2
                        },
                        "Quantity": 2
                    },
                    "MinTTL": 3600
                },
                "Comment": "",
                "ViewerCertificate": {
                    "CloudFrontDefaultCertificate": true,
                    "MinimumProtocolVersion": "SSLv3"
                },
                "CustomErrorResponses": {
                    "Quantity": 0
                },
                "LastModifiedTime": "2015-08-31T21:11:29.093Z",
                "Id": "S11A16G5KZMEQD",
                "Restrictions": {
                    "GeoRestriction": {
                        "RestrictionType": "none",
                        "Quantity": 0
                    }
                },
                "Aliases": {
                    "Quantity": 0
                }
            }
        ],
        "IsTruncated": false,
        "MaxItems": 100,
        "Quantity": 1
    }
}
Well, it returns lots of information, but you do not need most of them, right? Then let’s get only their Ids and Aliases. We can use Aliases to see the DNS names attached to each distribution, so we can distinguish the one we need to invalidate.
$ $ aws cloudfront list-distributions --query 'DistributionList.Items[*].{Id:Id,Aliases:Aliases.Items[*]}'Now let’s explain the --query filter here. Firstly, as you see in the response format above, the command returns all distributions in the Items array of the DistributionList object. So we start with DistributionList.Items[*]. [*] means all members of the array. Then we start filtering the attributes returned by using {} and separate them using commas.
In Id:Id or Aliases:Aliases.Items[*], the first string before : is the label you would like to see in the response. I usually keep them as they are. The string after : is how its value will be extracted from the response. Above we want Id and all the aliases of each distribution using [*]. Then the filtered response becomes similar to the one below.
[
    {
        "Id": "A1B234CDEFGHI5",
        "Aliases": [
            "www.example.com"
        ]
    },
    {
        "Id": "B1C235DEFGHIJ6",
        "Aliases": [
            "example.com"
        ]
    },
    {
        "Id": "E1F235GHIJKLM7",
        "Aliases": [
            "subdomain.example.com"
        ]
    },
    ...
]
Let’s say that we would like to invalidate the distribution containing the alias subdomain.example.com. Then the Id of our distribution is E1F235GHIJKLM7.
Invalidating the distribution
In addition to above, let’s say that we will invalidate paths / and /index.html. These paths may have the same content, but for CloudFront they are different. Because it differentiates the contents by their paths.
We have two options to provide the paths we would like to invalidate. If we have only a few paths, we can provide them in the command line using the --paths option as below.
$ aws cloudfront create-invalidation \
> --distribution-id E1F235GHIJKLM7 \
> --paths /index.html /
If we have lots of paths to invalidate, it may be feasible to provide them as a batch using a JSON file.
$ aws cloudfront create-invalidation \
> --distribution-id E1F235GHIJKLM7 \
> --invalidation-batch file://invalidations.json
The format of the invalidations in this file should be similar to the one below.
{
  "Paths": {
    "Quantity": 2,
    "Items": ["/index.html", "/"]
  },
  "CallerReference": "invalidation-2019-11-29"
}
If you provide the paths using --invalidation-batch option, you need to provide CallerReference as well as the number of paths in Quantity. CallerReference is a custom reference for your invalidation. But if you provide the paths using the --paths option, it generates the CallerReference randomly and there is no need to provide Quantity.
Both calls return the invalidation information in the response like below.
{
    "Location": "https://cloudfront.amazonaws.com/2019-03-26/distribution/E1F235GHIJKLM7/invalidation/I3UQXMDE3XDWF6",
    "Invalidation": {
        "Id": "I3UQXMDE3XDWF6",
        "Status": "InProgress",
        "CreateTime": "2019-11-28T17:51:20.961Z",
        "InvalidationBatch": {
            "Paths": {
                "Quantity": 2,
                "Items": [
                    "/",
                    "/index.html"
                ]
            },
            "CallerReference": "cli-1574963480-395333"
        }
    }
}
The value of the CallerReference changes depending on the option you use. I used --path option and it generated something like cli-1574963480-395333.
As you see, the Status is InProgress. The invalidation will take time to complete, because it will clear all edge locations. We need to poll its status until it finishes from time to time. But no need to do this manually! Because there is a helpful wait command for this.
Polling the invalidation status until it completes via AWS CLI
We will use cloudfront wait command for this. This command has a few sub-commands, but we will provide invalidation-completed as we will use it for checking the status of our invalidation. Then we will only need the IDs of the distribution and the invalidation we created.
$ aws cloudfront wait invalidation-completed \
> --distribution-id E1F235GHIJKLM7 --id I3UQXMDE3XDWF6
This command will poll the invalidation status in every 20 seconds until it completes. If you enrolled in my AWS CloudFormation Step by Step: Beginner to Intermediate course and finished the Using AWS CLI to Manage Your Stacks section, you will see that it is similar to cloudformation wait command in behaviour.
When the invalidation status becomes Completed, this command will stop executing and return to our terminal. If this does not happen in 30 tries, it will return a code of 255. So it tries for roughly 10 minutes.
Retrieving the invalidation details
As a final check, you may want to retrieve the invalidation status by yourself and see it with your own eyes. Then you can use get-invalidation command. Again you only need the Ids of your distribution and invalidation.
$ aws cloudfront get-invalidation --distribution-id E1F235GHIJKLM7 --id I3UQXMDE3XDWF6
{
    "Invalidation": {
        "Id": "I3UQXMDE3XDWF6",
        "Status": "Completed",
        "CreateTime": "2019-11-28T17:51:20.961Z",
        "InvalidationBatch": {
            "Paths": {
                "Quantity": 2,
                "Items": [
                    "/",
                    "/index.html"
                ]
            },
            "CallerReference": "cli-1574963480-395333"
        }
    }
}
Conclusion
After updating your content, you may need to invalidate them on edge locations on Amazon Cloudfront to serve the updates to your users as soon as possible. So in this post, we talked about how to achieve this using AWS CLI.
If you need to do this regularly in every update, I recommend you to develop an AWS Lambda function which invalidates the paths you like on your distribution using AWS SDKs and integrate it to your CI/CD pipeline using AWS CodePipeline. Then you can trigger that function from your CodePipeline as a final step. We can make an example of this in this blog in the future. So I recommend you to follow our blog not to miss it when it published.
Thanks for reading!