AWS CloudFormation is the foundation of operational excellence on AWS. We code our infrastructure as JSON or YAML templates and test it as much as we need before deploying to production. We manage our infrastructure as code.
However, some new AWS resources may not be supported by AWS CloudFormation at the time they are launched. As of today, an example of this is the Elastic GPU resource. The solution is to define a custom CloudFormation resource and attach it to an AWS Lambda function which launches these resources. The Lambda function should also be in the same template. So let’s talk about how to do this in this blog post.
About AWS CloudFormation custom resources and AWS Lambda
While provisioning our resources using CloudFormation templates, we may need some custom logic. Also, we may need a resource type that is not supported by CloudFormation yet. This is why we need custom resources in our CloudFormation templates.
A custom resource is a resource which has Type as AWS::CloudFormation::CustomResource or Custom::<our-custom-resource-name> such as Custom::MyEC2. Another requirement is that it must have a ServiceToken attribute that takes the ARN of an AWS Lambda function or Amazon SNS topic as value. Then, during the stack creation, deletion, and update, CloudFormation sends requests to this service. In our case, it will trigger our AWS Lambda function with some standard request inputs like RequestType, ResponseURL, and some custom inputs we may define, such as InstanceType or KeyPair.
When the Lambda function is triggered by CloudFormation, it performs the logic we coded as a regular Lambda function. However, before it finishes, it should send a response request to the ResponseUrl provided by CloudFormation with some required attributes and custom data. We can use them later in our template.
So, this is how it works. Now, let’s continue with an example to launch an EC2 instance with an Elastic GPU.
Example: Provisioning an EC2 with an Elastic GPU
AWS Lambda function
First of all, we need to create an AWS Lambda function that will create our custom resource. CloudFormation provides an input structure to use in our function. As you see in the full code below, our function uses Boto3 to launch, get, and terminate the EC2 instances we create in this stack.
import boto3
import json
import logging
import requests

# Logger settings - CloudWatch
# Set level to DEBUG for debugging, INFO for general usage.
logger = logging.getLogger()
logger.setLevel(logging.DEBUG)

client = boto3.client('ec2')

def handler(event, context):
    logger.info("Received event: " + json.dumps(event, indent=2))
    response_data = {}

    try:
        if event["RequestType"] == "Create":

            # Create the EC2 instance and attach an Elastic GPU
            # Tag with StackId to find during deletion
            response = client.run_instances(
                ImageId=event["ResourceProperties"]["ImageId"],
                InstanceType=event["ResourceProperties"]["InstanceType"],
                KeyName=event["ResourceProperties"]["KeyName"],
                MaxCount=1,
                MinCount=1,
                SecurityGroupIds=[
                    event["ResourceProperties"]["SecurityGroupId"]
                ],
                ElasticGpuSpecification=[
                    {
                        'Type': event["ResourceProperties"]["GPUType"]
                    },
                ],
                TagSpecifications=[
                    {
                        'ResourceType': 'instance',
                        'Tags': [
                            {
                                'Key': 'StackId',
                                'Value': event["StackId"]
                            }
                        ]
                    },
                ]
            )
            logger.debug(response)

            response_data["InstanceId"] = response['Instances'][0]['InstanceId']

        elif event["RequestType"] == "Delete":

            # find created instances using StackId
            response = client.describe_instances(
                Filters=[
                    {
                        'Name': 'tag:StackId',
                        'Values': [
                            event["StackId"]
                        ]
                    }
                ]
            )
            logger.debug(response)

            if response["Reservations"] and len(response["Reservations"]) > 0:
                instance_ids = [ i["InstanceId"] for i in response["Reservations"][0]["Instances"] ]

                logger.debug(instance_ids)

                # terminate instances the stack created
                response = client.terminate_instances(
                    InstanceIds=instance_ids
                )
                logger.debug(response)

        # Send SUCCESS response to CloudFormation to notify that resource creation is successful
        send_response( "SUCCESS", event, context, response_data)


    except Exception as e:
        logger.error( "An error occured: {}".format(e) )

        # Send FAILED response to CloudFormation to notify that resource creation was failed
        send_response( "FAILED", event, context, response_data)


def send_response(status, event, context, data):
    headers = {
        "Content-Type": ""
    }
    request_body = {
        "Status": status,
        "PhysicalResourceId" : context.log_stream_name,
        "StackId" : event["StackId"],
        "RequestId" : event["RequestId"],
        "LogicalResourceId" : event["LogicalResourceId"],
        "Data" : data
    }
    logger.debug(request_body)

    response = requests.put( event["ResponseURL"], headers=headers, data=json.dumps(request_body) )
    logger.info("Response status code: {}".format( response.status_code ))
In this code, we use the value of the RequestType to understand whether this function was triggered for a create or delete action. If CloudFormation triggered this function with the Create value in the RequestType, we simply create a new EC2 instance with an Elastic GPU. For the instance attributes, we use the ResourceProperties dictionary that is passed to the Lambda function in the event dictionary. Actually, we will define these values in our template. For now, you should know that CloudFormation sends our custom parameters in the ResourceProperties.
The Lambda function sends success or failure responses to CloudFormation using StackId, RequestId, LogicalResourceId values provided in the event dictionary. Besides, we use log_stream_name attribute of the context to construct PhysicalResourceId. This is standard.
As you see, CloudFormation provides all of the required values to the AWS Lambda function in the event dictionary. The only thing left to us is making an HTTP PUT request to the signed URL provided with either SUCCESS or FAILED status. Sending an empty status will also mean failure.
Another thing to note is the response_data provided in the Data attribute of the response sent by our AWS Lambda function. In this example, we do not need it at all. However, I added here to show that we can pass our custom key-value pairs in the response to reference them from another resource in our CloudFormation template later. For example, we could return an ‘InstanceId’ and then reference it in our template using the intrinsic GetAtt function like below.
{ "Fn::GetAtt": [ "CustomResourceName", "InstanceId" ] }For the deployment, we need to package this function into a zip file and upload it to an S3 bucket. We will use this bucket in our CloudFormation template. Please let me remind you to install the requests package into the same directory where your Lambda function app.py resides. Then you should select and compress all files and folders into a zip package.
Important Note from 2020/08!: I wrote this blog post before starting to use the Serverless Framework or AWS Serverless Application Model almost three years ago. AWS SAM was very new at that time, and AWS Lambda was around two years old. Now I recommend using AWS SAM to deploy your AWS Lambda functions.
The CloudFormation template
CloudFormation uses templates to provision our resources, and these templates can be in JSON or YAML format. I will not dive into the details of templates here. However, please check the AWS documentation, which I included in the References section below, if you need more information.
Our template will provision these resources:
- A custom resource that triggers the Lambda function.
- The AWS Lambda function that I discussed above.
- An IAM role for our Lambda function with necessary CloudWatch and EC2 permissions.
  "CustomServer": {
    "Type": "Custom::EC2InstanceWithElasticGPU",
    "Properties": {
      "ServiceToken": { "Fn::GetAtt" : ["LambdaFunction", "Arn"] },
      "Region": { "Ref": "AWS::Region" },
      "ImageId": { "Ref": "ServerImageId" },
      "KeyName": { "Ref": "KeyName" },
      "InstanceType": { "Ref": "ServerInstanceType" },
      "SecurityGroupId": { "Ref": "ServerSecurityGroup" },
      "GPUType": { "Ref": "GPUType" }
    }
  },

  "LambdaFunction": {
    "Type": "AWS::Lambda::Function",
    "Properties": {
      "Code": {
          "S3Bucket": { "Ref": "LambdaS3Bucket"},
          "S3Key": { "Ref": "LambdaS3Key"}
      },
      "Handler": "app.handler",
      "Role": { "Fn::GetAtt" : ["LambdaExecutionRole", "Arn"] },
      "Runtime": "python3.6",
      "Timeout": "30"
    }
  },

  "LambdaExecutionRole": {
    "Type": "AWS::IAM::Role",
    "Properties": {
      "AssumeRolePolicyDocument": {
        "Version": "2012-10-17",
        "Statement": [{
            "Effect": "Allow",
            "Principal": {"Service": ["lambda.amazonaws.com"]},
            "Action": ["sts:AssumeRole"]
        }]
      },
      "Path": "/",
      "Policies": [
        {
        "PolicyName": "root",
        "PolicyDocument": {
          "Version": "2012-10-17",
          "Statement": [{
              "Effect": "Allow",
              "Action": ["logs:CreateLogGroup","logs:CreateLogStream","logs:PutLogEvents"],
              "Resource": "arn:aws:logs:*:*:*"
          },
          {
              "Effect": "Allow",
              "Action": ["ec2:*"],
              "Resource": "*"
          }]
        }
      }]
    }
  }
You can provide LambdaS3Bucket, LambdaS3Key, ServerImageId, KeyName, ServerInstanceType, GPUType and ServerSecurityGroup values in the Parameters section of your template to make it reusable.
While creating an Elastic GPU using AWS CLI or Boto3 as in this post, AWS attaches the same security groups to the Elastic Network Interface (ENI) of the Elastic GPU and the EC2 instance. Hence you should add a rule to allow port 2007 to the same security group.
You can also create a ServerSecurityGroup resource to grant RDP (port 3389) access and then a circular ingress rule as below. Again, you can define a VPC parameter in the Parameters section of the template and reference it in the resource.
  "ServerSecurityGroup": {
    "Type": "AWS::EC2::SecurityGroup",
    "Description": "Security group for Windows servers",
    "Properties": {
      "VpcId": { "Ref": "VPC" },
      "GroupDescription": "Security group for windows servers",
      "SecurityGroupIngress": [
        {
          "CidrIp" : "0.0.0.0/0",
          "FromPort": "3389",
          "ToPort": "3389",
          "IpProtocol": "tcp"
        }
      ],
      "SecurityGroupEgress": [],
      "Tags": [
        {
          "Key": "Name",
          "Value": { "Fn::Sub": "${AWS::StackName}-sg-windows-server" }
        }
      ]
    }
  },
  "ServerSecurityGroupIngressCircular": {
    "Type": "AWS::EC2::SecurityGroupIngress",
    "Description": "Security group ingress rule for Elastic GPU communication",
    "Properties": {
      "GroupId": { "Ref": "ServerSecurityGroup" },
      "SourceSecurityGroupId": { "Ref": "ServerSecurityGroup" },
      "FromPort": "2007",
      "ToPort": "2007",
      "IpProtocol": "tcp"
    }
  }
Deployment result
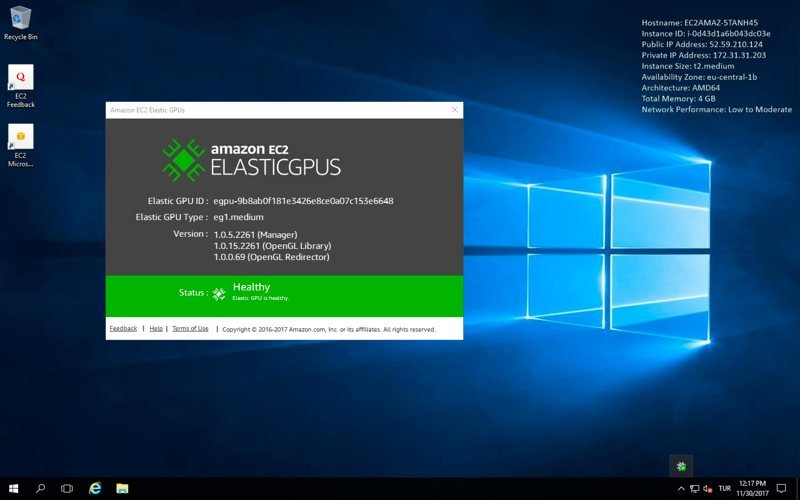
We can check whether the Elastic GPU was attached successfully by establishing an RDP connection to our EC2 instance. The result should be similar to the below.
Conclusion
Infrastructure as code concept is one of the fundamentals of operational excellence on AWS. With custom resources and AWS Lambda, we can provision any AWS resource we like as long as AWS SDKs support it.
Thanks for reading!
Would you like to learn AWS CloudFormation?
If you would like to learn AWS CloudFormation to manage your infrastructure as code and automate the provisioning of your AWS resources, I would be happy to help you with my courses on Udemy. I divided the topics into two courses according to your knowledge level.
If you are a beginner to AWS CloudFormation, AWS CloudFormation Step by Step: Beginner to Intermediate will teach you its basics and most of the associate-level features. After finishing it, or if you know all those topics, you can enroll in my next-level CloudFormation course, AWS CloudFormation Step by Step: Intermediate to Advanced, which covers more advanced, professional-level features.
Besides, for all my available courses, please check out our Online Courses page. Hope to see you in them!


