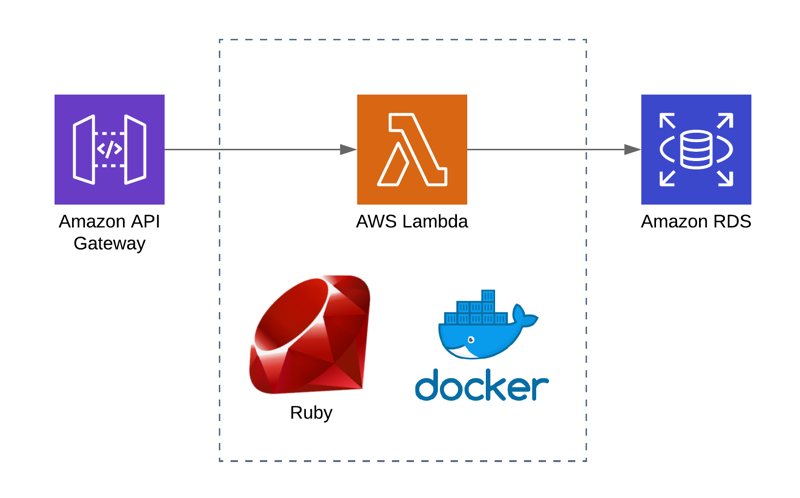
Having a Ruby on Rails background, I got excited to try Ruby to code my AWS Lambda functions when its support for AWS Lambda was announced at Re:Invent 2018. Finally, to try Ruby on AWS Lambda, I developed a simple API using AWS Serverless Application Model (SAM) to access an Amazon RDS MySQL database. I wanted to compare it with my experiences of doing this with Python and Node.js.
Although it may seem simple, installing mysql2 gem as a dependency proved itself to be challenging than others, because it has native extensions and depends on the environment you use bundler. As always, Docker simplifies our job by providing a similar environment that our AWS Lambda function runs inside.
In this post, I will make an introduction to AWS SAM CLI and using Ruby for AWS Lambda functions. Let’s begin!
Introduction to AWS Serverless Application Model and SAM CLI
In this example, I will use AWS Serverless Application Model (SAM) and SAM CLI to setup the project and automate the deployment of our API and AWS Lambda functions.
If you developed AWS Lambda functions in the past, you may heard about the popular Serverless Framework. It is a third party framework written in Node.js to simplify the creation and management of serverless applications not only on AWS, but also on other platforms like Google Cloud and Azure. It has cool features and we may discuss them in the future as well.
AWS Serverless Application Model and SAM CLI is a similar tool to create and manage serverless applications specifically on AWS, but it is developed and maintained by AWS. It is an extension of AWS CloudFormation. So if you know CloudFormation well enough, it becomes easier to get used to SAM. AWS also launched SAM CLI as a CLI tool to make the project setup easier.
Creating a project with SAM CLI for Ruby 2.5 AWS Lambda environment
Installing SAM CLI
I will not dive into the details of installing SAM CLI here. If you are using Mac OSX and python 3 was installed in your machine, it is simple to install it using pip:
pip install --user aws-sam-cliFor other environments, please go to SAM reference. You can find it in References section at the end of this post.
By the way, you will also need to install Docker for building native extensions and testing your serverless applications using SAM in the future.
Example Project Database
In this project, I created a MySQL database on an Amazon RDS instance during the launch. Then I created an items table inside it having only name and description columns. It can be something below.
CREATE TABLE `items` (
  name VARCHAR(100),
  description VARCHAR(255)
);
Then, I inserted 3 rows. I used some fruit names as items. You can insert anything you like. It is a simple database.
Initializing the Project
To build an AWS SAM project we need a template file, a project folder for our AWS Lambda function and other intermediary files. Luckily, SAM CLI provides a command to initialize our folder.
sam init --runtime ruby2.5 --name myApi By default, sam init command initializes the AWS Lambda environment in Node.js. So we need to provide ruby2.5 as its runtime and a name for our project. This will create the folder structure below.
myApi/
...hello_world/
......app.rb
......Gemfile
...tests/
...events.json
...Gemfile
...template.yaml
...RAEDME.md
Here hello_world folder contains our AWS Lambda function and a basic example inside it. I will name it to items to make it look like a real project. app.rb inside this folder is the Ruby file that contains our AWS Lambda function code. I will keep it as it is, but it can also be named differently.
myApi/
...items/
......app.rb
......Gemfile
...tests/
...events.json
...Gemfile
...template.yaml
...RAEDME.md
We need to get into myApi folder.
cd myApitemplate.yamlis the main template we will use to define the resources and deploy our project.testsfolder contains some unit tests.events.jsonandGemfilein the root folder are also used in tests. But, I will not cover unit testing in this post.
template.yaml
When your AWS Lambda functions need to access Amazon RDS, they have to be run inside a VPC and the security group attached to your database instance should allow access to the security group attached to your AWS Lambda functions. In a previous post in this blog, I shared how to do this. Please read that post for more information about how to run an AWS Lambda function in a VPC to access an Amazon RDS instance.
So, the template.yaml file is actually a CloudFormation template file containing a Transform section to integrate it with SAM. Transform section defines the version of the SAM used in this template. Hence, we can add parameters to increase the reusability of it. The final version of our template becomes as below.
AWSTemplateFormatVersion: '2010-09-09'
Transform: AWS::Serverless-2016-10-31
Description: >
  sam-app

  Sample SAM Template for ItemsApi

Parameters:
  LambdaSg:
    Description: "Lambda security group ID"
    Type: AWS::EC2::SecurityGroup::Id
  LambdaSubnets:
    Description: "Lambda subnets"
    Type: List<AWS::EC2::Subnet::Id>
  DBEndpoint:
    Type: String
    Description: "Database endpoint"
  DBName:
    Type: String
    NoEcho: true
    Description: "Database name"
  DBUsername:
    Type: String
    NoEcho: true
    Description: "Username for database access"
  DBPassword:
    Type: String
    NoEcho: true
    Description: "Password for database access"
Globals:
  Function:
    Timeout: 3
Resources:
  ItemsListFunction:
    Type: AWS::Serverless::Function
    Properties:
      CodeUri: items/
      Handler: app.lambda_handler
      Runtime: ruby2.5
      Policies:
        - VPCAccessPolicy: {}
      VpcConfig:
        SecurityGroupIds:
          - !Ref LambdaSg
        SubnetIds: !Ref LambdaSubnets
      Environment:
        Variables:
          DB_HOST: !Ref DBEndpoint
          DB_PORT: 3306
          DB_USER: !Ref DBUsername
          DB_PASSWORD: !Ref DBPassword
          DB_NAME: !Ref DBName
      Events:
        ItemsApi:
          Type: Api
          Properties:
            Path: /items
            Method: get
Outputs:
  ItemsApi:
    Description: "API Gateway endpoint URL for Prod stage for Hello World function"
    Value: !Sub "https://${ServerlessRestApi}.execute-api.${AWS::Region}.amazonaws.com/Prod/items/"
  ItemsListFunction:
    Description: "ItemsList Lambda Function ARN"
    Value: !GetAtt ItemsListFunction.Arn
  ItemsListFunctionIamRole:
    Description: "Implicit IAM Role created for ItemsListFunction"
    Value: !GetAtt ItemsListFunctionRole.Arn
As you see, I added parameters for Lambda security group and subnets as well as our DB endpoint, port and credentials. So we can re-use this template to create multiple environments from it.
In this template, our only resource is ItemsListFunction. But SAM will also create an API Gateway API and an IAM role from its definition.
Now let me explain ItemsListFunction.
- Its type is
AWS::Serverless::Functionmaking it an AWS Lambda function. - We provide the folder containing the Lambda code using
CodeUri. Please remember that I changed thehello_worldfolder name toitems. - When using SAM, we do not need to create an IAM role separately. We can provide the policy template to it and it creates the role itself. This is why we use a
Policiesproperty. I am using a managed policy template calledVPCAccessPolicy. It simplifies the creation of IAM policies to provide AWS Lambda VPC access. For more examples of these, you can visit SAM’s policy templates documentation at GitHub - We defined environment variables that will be defined in our function using
Environmentproperty. VpcConfigproperty allows us to define the security group attached to this function and the subnets it will be run inside.
In our template, Globals section is used to define shared properties in all AWS Lambda functions unless they overwrite those properties. By the way, I also edited Outputs of the template to adapt it to our name change.
In the Events property, we define how this function will be triggered. There are multiple methods like S3 events, SNS topic as well as API Gateway endpoint as we do here. This definition will create an ItemsApi along with the function on API Gateway containing an items resource and a GET method inside it triggering our Lambda function. The integration method will be lambda proxy.
By the way, we can create API separately and control its definition using a separate Swagger file as I also do in most of my projects. But there is no need to do over-engineering in this example, so let’s keep it simple. Maybe I can cover it in another blog post.
items/app.rb - Lambda function’s Ruby code
If you noticed in the template.yaml, Handler property has its value as app.lambda_handler. This means that our Lambda code will be in an app.rb file and that file must have an lambda_handler function which will be run as our AWS Lambda function.
The final code becomes as below.
require 'json'
require 'mysql2'

$client = Mysql2::Client.new(
  host: ENV["DB_HOST"],
  username: ENV["DB_USER"],
  password: ENV["DB_PASSWORD"],
  database: ENV["DB_NAME"],
  port: ENV["DB_PORT"]
)

def lambda_handler(event:, context:)

  results = $client.query("SELECT * FROM items;").to_a

  {
    statusCode: 200,
    body: results.to_json
  }
end
As in a Rails application, we will use mysql2 gem to access our MySQL database. We need to place db connection code outside the lambda_handler, so it can be run only when the function initialized first and all subsequent function runs can reuse the existing connection. $client global variable allows us to achieve this.
Our query is simple. It returns all records of the items table. We need to convert the query result to an array to be able to convert it to a proper json while returning the result.
As in Python and Node.js APIs which is configured as lambda_proxy on AWS API Gateway, we need to return a StatusCode and body in our JSON response. As you may understand, StatusCode is the HTTP response code and body is the response body containing our records in JSON.
Packaging the AWS Lambda function
Until now, it was simple. We have a simple Ruby code accessing a MySQL database and a template file containing the definitions. But packaging this function is the trickiest part. mysql2 gem has native extensions, so it must be built in the same environment that will run our AWS Lambda function. We will do this by running a Docker container built from AWS Lambda Ruby 2.5 runtime image.
items/Gemfile
Unless we use AWS Lambda layers, we need to package all libraries along with our Lambda function. So we will start with including mysql2 inside items/Gemfile. The Gemfile in the root folder is for deploying the function locally, for testing. Please be sure to change the Gemfile under the function’s folder.
The contents of items/Gemfile becomes as below.
source "https://rubygems.org"

gem "mysql2"
In this example, I do not neet httparty gem, so I intentionally removed it from the file.
Then, we need to update our bundler and lock the gem file locally using bundle install inside this folder.
myApi emreyilmaz$ gem update bundler
myApi emreyilmaz$ cd items
items emreyilmaz$ bundle install
Installing mysql2 gem using Docker
All external dependencies of our function should be under vendor/bundle folder inside the function folder or in other words, CodeUri value of the function in template.yaml. It is the items folder in our example.
If mysql2 gem did not contain native extensions we could use sam build command or bundle install --deployment commands to install the gem and package with our function. But if you tried these, you may have already saw that your function executions fail because of this gem.
Therefore, we need to install this gem in a similar environment that our AWS Lambda function will be run into. To do this, we will create a Docker container using the Docker image for AWS Lambda Ruby 2.5 runtime. But we need to do this inside the function folder, items.
docker container run -v "$PWD":/var/task -it lambci/lambda:build-ruby2.5 /bin/bashThis will mount the current directory (items) as /var/task folder in our container which will also be the entry point for AWS Lambda and allow us the connect to it using bash.
Now let’s proceed with building this gem. Inside the container, firstly we will install mysql-devel package.
bash-4.2# yum -y install mysql-develThen we will update the bundler inside the container to make it consistent with the bundler we used locally to lock the Gemfile. Then we will run bundle install with --deployment option to install the gem inside vendor/bundle in the current folder.
bash-4.2# gem update bundler
bash-4.2# bundle install --deployment
Alternatively, we could also run the commands until now while starting your container as below.
docker container run -v "$PWD":/var/task -it lambci/lambda:build-ruby2.5 /bin/bash -c "yum -y install mysql-devel ; gem update bundler; bundle install --deployment ; bash"After running bundler, you will see that vendor/bundle folders were created in items folder. This is where AWS Lambda searches dependencies of your Lambda function in a Ruby 2.5 environment.
However, this is not enough if you stop here and deploy the function. Because, AWS Lambda will also search for libmysqlclient.so library inside the lib folder to be able to use mysql2 gem. So we will create a lib folder in the current directory and copy libmysqlclient.so.18 file in our container to there. This will also create a lib folder in our local machine inside function folder as we mounted it as /var/task while running the container.
bash-4.2# mkdir lib && cp /usr/lib64/mysql/libmysqlclient.so.18 lib/Now we can exit the Docker container and package our function and deploy it using SAM CLI.
Packaging and deploying with SAM
Next, we will package our serverless application using SAM. It will prepare a zip file containing the necessary files inside the items folder and also create a new template file as output which will be ready for deployment. Then we will deploy the package using sam deploy command.
As we have parameters in our template.yaml, I find it feasible to create a deploy.sh bash script under the project folder and execute it to simplify the process.
The contents of myApi/deply.sh is below.
#!/bin/bash
STACK_NAME="ItemsApiStack"
LAMBDA_SG="sg-11111111"
LAMBDA_SUBNETS="subnet-1111111,subnet-22222222"
SAM_BUCKET="sam-bucket-name"
DB_ENDPOINT="your-rds-endpoint"
DB_NAME="testdb"
DB_USER="dbadmin"
DB_PASSWORD="987654321"

sam package --template-file template.yaml --s3-bucket $SAM_BUCKET --output-template-file packaged-serverless.yaml

sam deploy --template-file ./packaged-serverless.yaml --stack-name $STACK_NAME --parameter-overrides LambdaSg=$LAMBDA_SG LambdaSubnets=$LAMBDA_SUBNETS SwaggerBucket=$SAM_BUCKET DBEndpoint=$DB_ENDPOINT DBName=$DB_NAME DBUsername=$DB_USER DBPassword=$DB_PASSWORD --capabilities CAPABILITY_IAM
Of course, you should edit LAMBDA_SG, LAMBDA_SUBNETS, DB_ENDPOINT, DB_NAME, DB_ENDPOINT, DB_USER, DB_PASSWORD and SAM_BUCKET variables with your own values as explained in this post.
Here SAM_BUCKET corresponds to --s3-bucket option in sam package command. It defines the S3 bucket name that your AWS Lambda artifact will be uploaded after packaging. You will see the references to the S3 url of these artifacts in packaged-serverless.yaml file created as output of sam package command. Then let’s explain both commands.
sam packagecommand takes a template file from its--template-fileoption and produces an output file defined in--output-template-fileoption which ispackaged.serverless.yamlin our example. It also uploads the Lambda artifacts to the S3 bucket defined in--s3-bucketoption.Then
sam deploycommand takes the output template file produced bysam packagecommand from its--template-fileoption and creates a CloudFormation stack. As you may understand, the inputs are same asaws cloudformation deploycommand.--stack-nameoption defines the name of the stack,--parameter-overridesis used to provide the parameter values and--capabilities CAPABILITY_IAMallows the call to be able to create an IAM role for the AWS Lambda function.
Making HTTP Calls
After stack creation finishes successfully, you can make a call to your API endpoint using curl.
curl -i -X GET https://your-api-dns-endpoint/itemsThis call will return all the items as an array of items in JSON.
Conclusion
Although installing and packaging mysql2 gem is more difficult when compared to installing pymysql library for Python AWS Lambda functions with pip, I am happy to be able to use Ruby for my AWS Lambda functions.
Normally, using DynamoDB is the way to go when you are creating a serverless application from scratch. I plan to try aws-record gem to access a DynamoDB table soon. But if you have existing data on an Amazon RDS MySQL database, you can use Ruby for your AWS Lambda functions and create an API using AWS Serverless Application Model as well.
If you enjoyed this post and would like to follow my new posts, you can follow me on Twitter and LinkedIn.
Thanks for reading!
References
[What Is the AWS Serverless Application Model (AWS SAM)? AWS Reference](https://docs.aws.amazon.com/serverless-application-model/latest/developerguide/what-is-sam.html) [Installing the AWS SAM CLI AWS SAM Reference](https://docs.aws.amazon.com/serverless-application-model/latest/developerguide/serverless-sam-cli-install.html) [AWS SAM CLI Command Reference AWS SAM Reference](https://docs.aws.amazon.com/serverless-application-model/latest/developerguide/serverless-sam-cli-command-reference.html) [AWS SAM Specification GitHub](https://github.com/awslabs/serverless-application-model/blob/master/versions/2016-10-31.md) [Building Lambda functions with Ruby AWS Lambda documentation](https://docs.aws.amazon.com/lambda/latest/dg/lambda-ruby.html) [Building Gems with Native Binary Packages in AWS Lambda Blackninja Dojo Blog](http://blog.blackninjadojo.com/aws/serverless/2019/02/18/build-package-and-deploy-an-aws-lambda-using-the-ruby-runtime.html#building-gems-with-native-binary-packages-in-aws-lambda)