In our Ruby on Rails web applications, we use Amazon S3 to store files. Uploading files to Amazon S3 buckets via HTTP requests requires signing the request. The current recommended, and safe signing method is Signature Version 4, and AWS regions opened after January 30, 2014, such as London and Frankfurt, only support this version.
In this blog post, I will try to explain how to sign HTTP requests for Amazon S3 uploads in a Rails application and make requests by using AngularJS ng-file-upload module.
Origin of our problem
In Pisirpaylas, we used Amazon S3 buckets in the Ireland region and older Signature Version 2 to sign our requests. However, when we tested using Amazon S3 buckets in the AWS Frankfurt region, requests started failing.
After some research, I have found that AWS only supported Signature Version 4 in regions opened after January 30, 2014. There were not any complete examples for doing these in a Ruby on Rails application. Also, we were using AngularJS, and this needed to be integrated with it.
I hope this blog post helps people find an example for Signature Version 4 in a Ruby on Rails and AngularJS 1.x application.
When do you need signing and Signature Version 4?
If you allow your users to upload files directly to your Amazon S3 buckets anonymously or use AWS SDKs to transfer files to Amazon S3 buckets, you don’t need to use this method. Because anonymous requests do not require signing and the latest AWS SDK versions automatically sign requests using Signature Version 4, respectively.
However, we do not recommend anonymous uploads as a security measure.
For the second case, we prefer uploading directly to Amazon S3 because of the reasons below:
Uploading directly to S3 buckets saves time and compute performance as you use Amazon S3’s scalable infrastructure. Your instances save network bandwidth and CPU time resulting from this upload operation.
If your files need post-processing, mostly uploading a file to your web server, then processing and transferring to your Amazon S3 bucket takes much more time than uploading it directly to a temporary Amazon S3 bucket. Then you can process this file using a background worker such as Sidekiq or trigger an AWS Lambda function.
AWS recommends Signature Version 4 as it is more secure and does not support older versions in new regions. AWS may finish supporting Signature Version 2 in all regions in the future. It is better to get prepared and start using better authentication.
A typical photo uploading scenario
In this blog post, I will describe a typical scenario for this problem:
- A user uploads a photo directly to one of our Amazon S3 buckets which acts as temporary storage.
- Then, one of our background workers, Sidekiq, for example, pulls the file, processes it for generating thumbs.
- Lastly, the worker uploads to its final location in our primary bucket.
As you can see, in the beginning, when the user uploads directly to the Amazon S3 bucket, we use HTTP requests, and there should be an authentication mechanism for AWS to verify that this request is made with our knowledge and permission. This is where we need to use Signature Version 4 to sign our request.
In this scenario, we are using Ruby on Rails as the backend and AngularJS as the frontend.
- Rails version: 4.2
- AngularJS version: 1.5
- Ruby version: 2.2
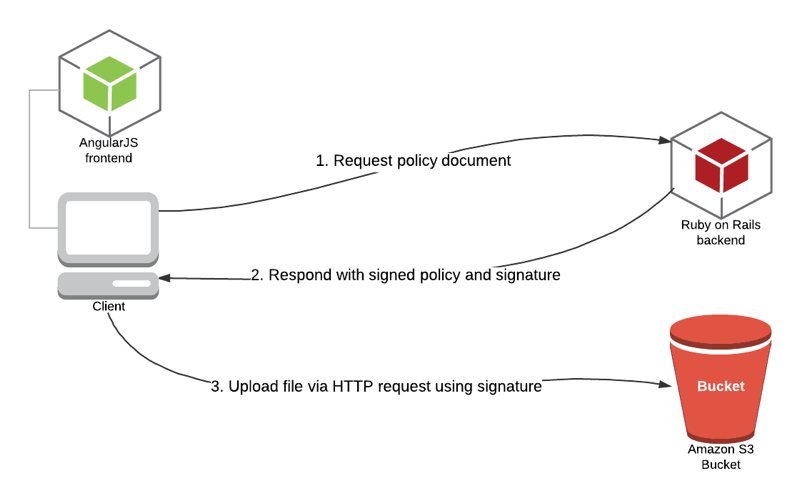
The signing process will be realized as follows:
- AngularJS frontend sends a signed policy request to the backend.
- Ruby on Rails backend constructs the policy document and signs it with a signing key derived from a secret access key.
- Backend responds to policy requests with signed policy data and signature.
- AngularJS frontend makes an HTTP request to upload the file to the Amazon S3 bucket with signature.
Ruby on Rails backend part
In the Ruby on Rails backend part, we need an algorithm to generate a signing key to sign our policy document first. In signature version 2, we use a secret access key directly to sign the request. However, in signature version 4, a signing key is derived from a secret access key, enhancing the secret access key’s security. Instead, we supply the credential scope.
The signature key generation algorithm takes four parameters:
- key: Secret access key of your IAM user with programmatic access and permissions to the bucket. If this is wrong, AWS will be unable to decrypt the policy, and upload will be unsuccessful.
- date_stamp: 8-digit string representing the date of the request, in year (YYYY), month (MM), day (DD) format, such as 20170511.
- region_name: The region where the bucket belongs to, such as a-central-1.
- service_name: The service that the signature_key is generated for. For this example, it will simply be “s3”.
Also, in the last part of the signing process, we use a particular termination string for AWS Signature v4 operations: “aws4_request”.
def get_signature_key( key, date_stamp, region_name, service_name )
  k_date = OpenSSL::HMAC.digest('sha256', "AWS4" + key, date_stamp)
  k_region = OpenSSL::HMAC.digest('sha256', k_date, region_name)
  k_service = OpenSSL::HMAC.digest('sha256', k_region, service_name)
  k_signing = OpenSSL::HMAC.digest('sha256', k_service, "aws4_request")
  k_signing
end
Then, we generate a policy document and encode it with Base64. Our method for this operation takes these inputs:
- bucket: Amazon S3 bucket name that the file will be uploaded to.
- x_amz_algorithm: The signing algorithm used during the signature calculation. In this case, it is “AWS4-HMAC-SHA256”.
- x_amz_credential: The credentials used for calculating signature, explained below.
- x_amz_date: The date of the signature in the ISO8601 formatted string.
The policy document will be in JSON format. Some additional notes to explain its attributes:
- expiration: When will this policy expire? Here we define it as 1 hour from now in UTC.
- acl: Access control list value for the object. We specify as “private” to make the object uploaded private. It can be “public-read” or else, whichever you prefer.
- starts-with: It is a condition matching operator. We assume all types for the key and content type.
- content-length-range: The minimum and maximum size for uploaded document.
    def get_encoded_policy_document( bucket, x_amz_algorithm, x_amz_credential, x_amz_date )
      Base64.encode64(
        {
          "expiration" => 1.hour.from_now.utc.xmlschema,
          "conditions" => [
            { "bucket" =>  bucket },
            [ "starts-with", "$key", "" ],
            { "acl" => "private" },
            [ "starts-with", "$Content-Type", "" ],
            {"x-amz-algorithm" => x_amz_algorithm },
            {"x-amz-credential" => x_amz_credential },
            {"x-amz-date" => x_amz_date},
            [ "content-length-range", 0, 524288000 ]
          ]
        }.to_json
      ).gsub("\n","")
    end
In addition to the above, we need a final module for generating the signature using the policy document. Here, we get the signature key using the get_signature_key method and then sign the policy document using this key. Our resulting get_signature method takes three inputs:
- policy_date: 8-digit string representing date as explained in get_signature_key method.
- s3_region: AWS region where our bucket resides.
- encoded_policy: Policy document.
    def get_signature( policy_date, s3_region, encoded_policy )
      # Gets signature key that will be used in signing
      signature_key = get_signature_key( ENV['AWS_SECRET_ACCESS_KEY'], policy_date , s3_region, "s3")

      # Sign and return the signature
      OpenSSL::HMAC.hexdigest('sha256', signature_key, encoded_policy )
    end
Finally, we merge all the above and construct our controller action. Here, I assume that you know how to generate a Rails controller, an action, and configure a route for it. For example, our controller is named “PolicyController” and the action name is “index”, which is accessed from the ‘/policy.json’ path.
Rails controller action algorithm is as follows:
1) Get or set the S3 region and bucket name variables. We use environment variables to use different values in different environments (dev, test, prod).
2) Get the current date. Then we generate policy date (8-digit date explained above) and x-amz-date (ISO8601 format date string explained above).
3) Generate credential scope in x_amz_credential variable. Its format is simple:
_access key id_/_policy date_/_s3 region_/_service name (here, it is s3)_/_termination string(here, aws4_request)_
4) Get Base64 encoded policy document.
5) Generate signature by supplying policy, date, and region information.
6) Finally, render the JSON response. In the response x_amz_date, x_amz_algorithm, x_amz_credential, bucket name values are the same as explained above. Let me explain additional information about it as follows:
- s3_region_endpoint: This is the S3 regional endpoint we will use in the frontend while making the request. It is to avoid hard coding in the frontend for maintainability.
- x_amz_expires: POST header for expiration, 24 hours.
- policy: We also supply the Base64 encoded policy document.
AWS will recalculate our signature using x-amz-credentials and generate a signature with the policy we provide. Then, it will compare this to the signature.
  # GET /policy.json
  def index

    # Replace with the code of AWS region where your bucket is
    s3_region =  ENV["AWS_REGION"]

    # Replace with the name of your bucket
    bucket = ENV["PHOTO_UPLOAD_BUCKET"]

    current_dt = DateTime.now
    policy_date = current_dt.utc.strftime("%Y%m%d")
    x_amz_date = current_dt.utc.strftime("%Y%m%dT%H%M%SZ")
    x_amz_algorithm = "AWS4-HMAC-SHA256"
    x_amz_credential = "#{ENV['AWS_ACCESS_KEY_ID']}/#{policy_date}/#{s3_region}/s3/aws4_request"

    encoded_policy = get_encoded_policy_document( bucket, x_amz_algorithm, x_amz_credential, x_amz_date )
    x_amz_signature = get_signature( policy_date, s3_region, encoded_policy )


    render json: {
      bucket_name: bucket,
      s3_region_endpoint: get_s3_region_endpoint(s3_region),
      x_amz_algorithm: x_amz_algorithm,
      x_amz_credential: x_amz_credential,
      x_amz_date: x_amz_date,
      x_amz_expires: 86400,
      x_amz_signature: x_amz_signature,
      policy:    encoded_policy
    }
  end
This is a helper method to make things easy and not required. Amazon S3 region endpoints except for us-east-1 generally follow the same format. You can use your region’s s3 endpoint directly instead of this method.
def get_s3_region_endpoint(region_name)
    # Returns S3 endpoint for the region

    case region_name
    when "us-east-1"
      "s3.amazonaws.com"
    else
      "s3.#{region_name}.amazonaws.com"
    end
end
AngularJS front end part
In the Angular front end, we first get the policy document by calling ‘/policy.json’, and after the response is successful, we make a POST request using the signature with our file.
We do these in the upload function after selecting the file. Please note these below:
- Before calling this function, a file is selected and saved to $scope.file.
- Upload.upload() is the function I use in ng-file-upload module. It has many features such as progress percentage that we can use in $scope.progressPercentage.
    // Uploads file directly to S3 bucket
    $scope.uploadPhoto= function(){

      // Get policy, signature, credentials and algorithm
      $http.get( "/policy.json").then(
          function(response) {

            Upload.upload({
                url: 'https://'+response.data.s3_region_endpoint+'/'+response.data.bucket_name,
                method: 'POST',
                data: {
                  key: $scope.file.name,
                  acl: 'private',
                  "Content-Type": $scope.file.type != '' ? $scope.file.type : 'application/octet-stream',
                  'X-Amz-Credential': response.data.x_amz_credential,
                  'X-Amz-Algorithm': response.data.x_amz_algorithm,
                  'X-Amz-Date': response.data.x_amz_date,
                  'Policy': response.data.policy,
                  'X-Amz-Signature': response.data.x_amz_signature,
                  file: $scope.file

                }
            }).then(
              function(response) {
              },
              function(response) {
              },
              function (evt) {
                $scope.progressPercentage = parseInt(100.0 * evt.loaded / evt.total);
              }
            );


          },
          function(response) {
          }
      );

    };
Conclusion
In your Ruby on Rails applications, if you are making HTTP requests to upload files to your Amazon S3 buckets, you need to sign your requests for AWS to authenticate them. Currently, all AWS regions support Signature Version 4 signing, and regions opened after January 30, 2014, do not support previous versions. Hence, you can follow the methods in this blog post to sign your requests in your Ruby on Rails backend and use it in your AngularJS frontend.
Please do not forget to make the Cross-Origin Sharing (CORS) configuration of your bucket correctly as a final reminder. It is beyond the scope of this post. We may explain it in another post later.
You can find a sample application for implementing the signing process in this blog post in our Github repository.
Thanks for reading!