Whether you have a static website like this blog or a front-end application developed using a framework like Angular, React, or Vue.js, you can follow similar steps to create a continuous deployment pipeline on AWS using AWS CodePipeline. In this post, I will share the AWS services you can use while creating this type of pipelines to achieve fast and frequent deployments.
AWS architecture for static websites
Before discussing deployment automation, let’s start with the typical AWS architecture used to deploy static websites and front-end applications. Actually, I call both of them static websites, because their contents are similar. You have HTML, Javascript, or CSS files to serve your clients in the end.
Where do you host your static websites? You can deploy your static websites on an Amazon EC2 instance. But it is not ideal if you have a more scalable, reliable, and cost-effective option like Amazon S3. Besides, you can distribute your content on your S3 bucket globally with Amazon CloudFront to serve it faster.
Hence, our typical architecture for a static website will be like below:
- Amazon S3 bucket configured for static website hosting. We will be deploying this bucket using our pipeline.
- Amazon CloudFront in front of the S3 bucket to distribute content globally.
- Amazon Route 53 for DNS hosting.
- Amazon Certificate Manager SSL certificate configured on CloudFront to encrypt data in transit.

Why create a CI/CD pipeline?
If you are familiar with DevOps principles, you already know that one of the goals of DevOps is to deploy new versions of your software fast and frequently. Hence, you can deploy the changes in your applications in small chunks and take actions at an early phase if they do not perform as expected. But to be able to deploy fast and frequently, you should have standard and tested deployment processes. In other words, you need to automate your deployments because manual processes are not repeatable and prone to errors.
CI/CD introduces automation to your deployment process to solve this problem. By applying CI/CD, you create a pipeline that builds, tests, and deploys your code automatically each time you submit your changes. AWS CodePipeline is the continuous delivery service of AWS which you can use to create your CI?CD workflows. You can build a pipeline for just continuous integration (CI) or one of the CD processes, continuous deployment, or continuous delivery. But what are CI and CD?
- CI is the process of building your code and running unit tests on it automatically each time you push your changes to your code repository. The aim is to solve possible integration errors due to compilation or another reason earlier.
- In continuous delivery, you do all steps in CI, but you deploy to a staging environment after it. Then you may run additional tests, and you submit to manual approval. After the approval, all changes are deployed to your production environment automatically.
- If you apply continuous deployment, all is the same with continuous delivery except the manual approval. All your changes are automatically deployed to the production environment after your tests finish successfully on the staging environment. But you should have good test coverage to apply continuous deployment successfully.
Now let’s continue with building a pipeline on AWS CodePipeline to deploy your static website content and apply continuous deployment.
The Pipeline on AWS CodePipeline
AWS CodePipeline concepts
AWS CodePipeline is the orchestrator of your pipeline. You create a pipeline on AWS CodePipeline. It automatically triggers when you update your source repository and passes your changes through its stages. So it executes your workflow for your CI/CD.
But how does AWS CodePipeline do this? In your pipeline, you define actions in your stages to pull the source changes, build your source code, test your changes, deploy them, etc. In your actions, you can use AWS developer tools like AWS CodeCommit, AWS CodeBuild, AWS CodeDeploy, third party tools like Jenkins, BlazeMeter, or you can define custom actions using AWS Lambda.
Now let’s talk about what to use to build a continuous deployment pipeline for a static website.
Stages for a static website deployment to Amazon S3
To deploy a static website like Jekyll automatically using AWS CodePipeline, you need at least the stages below.
- A source stage to pull your changes from a central repository.
- A build stage to install dependencies and build your code. You can run unit tests in this stage if you have.
- A production stage to deploy to your production environment.
You can have more stages, such as a staging or testing stage, to deploy to a non-production environment before the production stage. In that case, you will add a deployment action to deploy to your staging environment and one or more test actions to run some integration or load tests. But to keep this blog simple, I will focus on only the least needed ones.
So which AWS services will you need to create this pipeline? The answer is in the diagram below.
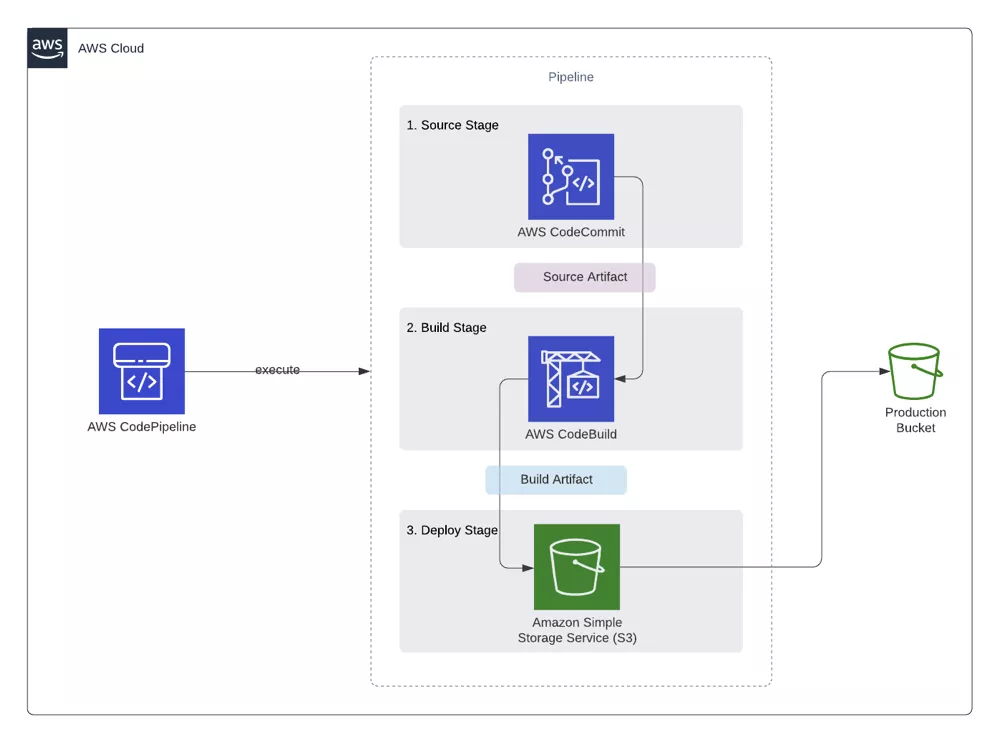
Source action with AWS CodeCommit
Whether you apply CI or CD, it all starts with pushing your code changes to a central source repository. On AWS CodePipeline, you can define an S3 bucket, an Amazon ECR repository, or a Git repository on AWS CodeCommit, GitHub, or Bitbucket.
S3 buckets have their use cases. ECR may suit well if you need to update an Amazon ECS service when a Docker image is built and deployed in another pipeline. But a Git repository fits better to manage versions of a software project and static website content. Besides, even for Docker deployments triggered from ECR, you will still need a Git repository to get the ECS task definitions.
AWS CodeCommit is the private Git repository service of AWS. It is not different than using GitHub or Bitbucket because you use Git commands to pull and push your changes. Hence, in our example, we have a Git repository on AWS CodeCommit, which is defined as the source location of our pipeline. It may contain our Jekyll website content or Angular, React, or Vue.js code, whatever we use to build our static website.
To trigger the pipeline, we will push our source code to this repository without building. The libraries required, such as Ruby gems, NPM packages, will not be uploaded to this repository. Our pipeline will download and install them in the build stage.
Build action with AWS CodeBuild
In the build stage, we install the dependencies and build the source code pulled in the source stage. On AWS CodePipeline, we do this with the help of a build action, and we can use AWS CodeBuild for this. You use AWS CodeBuild on your pipeline by creating a CodeBuild project and defining it as the provider of your build action.
AWS CodeBuild acts like a command-line tool for your source. You define a buildspec.yml file at the root of your source code, which contains the specifications to build it. Then AWS CodeBuild launches a container you defined in it, such as a Ruby or Node.js image, and runs your commands in it one by one. Then it packages and exports the outputs you defined as artifacts.
Let me give you an example of the buildspec file for building a Jekyll website below.
version: 0.2
env:
  variables:
    JEKYLL_ENV: production
phases:
  install:
    runtime-versions:
      ruby: 2.6
    commands:
      - gem install bundler
      - bundle install
  build:
    commands:
      - bundle exec jekyll build
artifacts:
  type: zip
  base-directory: _site
  files:
    - '**/*'
    -
AWS CodeBuild buildspec files have their own structure, and this also depends on the version of the specification you use. In this example, I use the newest version at the time of this post, which is 0.2. Now let me explain the sections of this file below.
envsection is the place where you define your environment variables in your build container. To build a Jekyll website for production, you need to set theJEKYLL_ENVenvironment variable toproduction. In most examples, you may see thatJEKYLL_ENV=productionis provided just before thejekyll buildstep. But providing it in theenvsection is more suitable for AWS CodeBuild specs.phasessection is where you define your commands in each phase of the AWS CodeBuild project.You set the environment and install the dependencies in the
installphase.You define the runtime for your AWS CodeBuild container under the
runtime-versionsof theinstallphase. In this example, our AWS CodeBuild project uses an Ubuntu image, and we would like our environment to have Ruby version 2.6 installed. Similarly, if you need Node.JS version 12.0 to build Angular code, you can define it in a list item here. You can specify both Ruby and Node.js packages as well.In the
commandslist of theinstallphase, you provide all commands necessary to install your dependencies. In our example, we need Ruby bundler to be installed for Ruby v2.6 and then use it to install our gems defined in theGemfile. If we had an Angular front-end, we would provide thenpm installcommand here. The commands in this list are executed in the order they are specified.In the
buildphase, you build your code. So itscommandslist should contain the commands for this. In our example, we build a Jekyll website, so our command isbundle exec jekyll build. Actually, we could install thejekyllgem as a global gem and use it directly with thejekyll buildcommand as well. But we might encounter version mismatches in our source and container. So it is best to usebundlerwhile performingJekyllbuilds. However, this is specific toJekyll. If you have an Angular app, you can run theng buildcommand with the necessary options here.artifactsis the place where you define your outputs of the build execution. In this example, we provide the contents under the_sitefolder because it is where Jekyll builds your content by default. In an Angular app, this would be thedistfolder. Also,typeshould bezipbecause we will extract it in the deploy action.
When your build run finishes, AWS CodeBuild automatically tears down the build container, and you pay only for the time it is executed.
What about unit tests? You can add a Test action using AWS CodeBuild and run unit tests on your code. For example, for Ruby on Rails applications, you can execute Rspec or minitest tests. The usage will be the same, except you will provide your test execution commands in the build phase. Alternatively, you can add your test commands to the same buildspec above and run as another command after your build command or in the post-build phase. However, I prefer separating build and test actions to troubleshoot easier when I have an error in either of them.
Deploy action to Amazon S3
Last year, AWS CodePipeline started supporting Amazon S3 buckets as deployment actions. Before that, I used an AWS Lambda function that I created to deploy the zip package exported by the build action. Now it is more straightforward. You only configure an S3 action.
However, you should note these things to deploy to your S3 bucket successfully.
- You should enable
Extract before deployto extract the contents of the zip package the pipeline receives from the build action. - You should set
CannedACLtopublic-readto make your content readable from the internet. Then the extracted content will be automatically made public.
How can you enhance this pipeline more?
This is a pipeline with basic actions to deploy a static website. But you can add new stages or actions depending on your needs. You can enhance it by adding test actions or for unit and integration tests. In the end, you can send SNS notifications to inform your team about the pipeline execution state. You can also perform custom actions, such as invalidating your CloudFront distribution with a custom AWS Lambda function to serve the new content to your users as soon as possible.
You can add a manual approval step, again using Amazon SNS, after deploying to a staging environment and before production. By doing so, you can apply continuous delivery instead of continuous deployment. You can edit your pipeline as your organization works.
Join my AWS CodePipeline Step by Step Course on Udemy!
Would you like to learn AWS CodePipeline? Please check out my AWS CodePipeline Step by Step course on Udemy. The links in this post also includes a discount coupon for you. Please feel free to use it if Udemy does not offer a better promotion at this time.
In this course, you will learn to use AWS CodeCommit, AWS CodeBuild, and AWS CodeDeploy with AWS CodePipeline to create CI/CD pipelines to deploy your applications to EC2 and S3. Besides, you will use a basic Angular application in your hands-on examples.
You can also read my AWS CodePipeline Step by Step announcement post to get more information about the topics covered in the course.
Hope to see you in AWS CodePipeline Step by Step!
Conclusion
I have been using AWS CodePipeline and other AWS developer tools to build CI/CD pipelines on AWS since 2017. Until now, I created dozens of pipelines for applications such as Jekyll and Angular front-ends like the one in this post; Ruby on Rails, PHP, PHP Laravel back-ends using AWS CodeDeploy; serverless applications and AWS infrastructures using AWS CloudFormation, Docker deployments with Amazon ECR and Amazon ECS, AWS Fargate etc. AWS CodePipeline team is continuously enhancing it by adding new features, and it is a great tool to deploy all types of applications on AWS.
Besides, using AWS CodePipeline only costs $1 per pipeline per month if you have at least one execution on your pipeline in that month. Of course, you also pay for the data transfer if you deploy cross-regionally and AWS CodeBuild runtime, but those are negligible. If you have no executions, you pay nothing for that pipeline.
It is a serverless service. You do not maintain any EC2 instances like a Jenkins server for your builds or anything like that. It is also customizable using AWS Lambda, as I described in the deploy action. Hence, I recommend you learn and use it to automate your deployments.
Thanks for reading!