When you decide to distribute your content stored in your Amazon S3 bucket with Amazon CloudFront, you most probably would like to avoid your users bypassing CloudFront and accessing them directly from Amazon S3.
In this blog post, I will demonstrate how you can utilize Origin Access Identities to restrict access to your S3 bucket on your Amazon CloudFront distributions.
What are Amazon S3 and Amazon CloudFront?
Amazon Simple Storage Service or S3, as you can understand from its name, is the storage service offered by Amazon Web Services. You can store all types of your static files; serve your static website like this blog or your serverless website on Amazon S3. It is scalable, 99.999999999% reliable, and cost-effective. An S3 bucket is automatically replicated across multiple availability zones in its AWS region.
However, as Amazon S3 is served from an AWS region, the destination of your users to the region negatively affects the latency in delivering content to them. You can solve this problem using content delivery networks (CDNs), and Amazon CloudFront is the native CDN service offered by AWS.
Amazon CloudFront is distributed worldwide through AWS edge locations. When a request is received for the content, it is served from the nearest edge location to the user if it was cached before. Actually, the first user accessing the content does not benefit from this speed because the content would not be cached before the request. However, the edge location will serve the content from the cache to all subsequent users near it. You define a time-to-live (TTL) value for your content to tell CloudFront when to refresh its cache by getting the content from the Amazon S3 bucket.
UPDATE 2018/12/14: By the way, I limited this post to distributing static content from your Amazon S3 buckets. But you can also distribute dynamic content from your webservers using Amazon CloudFront. I discussed this topic in a later post, Serving Dynamic Websites with Amazon CloudFront.
What is an Origin Access Identity (OAI) used for?
The problem with CloudFront distributions with default settings is that you make your bucket public, and your users can also access your content through the Amazon S3 bucket if they know the bucket address. This makes CloudFront’s caching mechanism ineffective. Besides, if you would like to serve your private content with signed URLs through CloudFront, you need to allow access to your content only through CloudFront. Otherwise, unauthorized users can access your content through Amazon S3 without your control.
To avoid this situation, you need to define an Origin Access Identity (OAI) for your CloudFront distribution, make your bucket private, and only grant access to this Origin Access Identity.
However, let me note that origin access identities are only applicable to distributions that have Amazon S3 buckets as Origin Domain Name. Unfortunately, you cannot use an Origin Access Identity on a distribution for a static website hosted on Amazon S3, which should have its S3 website address as the origin domain name.
How to create an Origin Access Identity
An Origin Access Identity is a special Amazon CloudFront user. You can create an Origin Access Identity while creating your CloudFront distribution.
The process is identical for both web or RMTP distributions. After entering Origin Domain Name as your S3 bucket, select Yes on the Restrict Bucket Access section displayed. You will find it under the Origin Settings if you are creating a web distribution or under the RMTP Distribution Settings if you are creating an RMTP distribution. When you enable bucket restriction, be sure to select Create a New Identity on the Origin Access Identity section. It has only the Comment field, which you can leave as it is or type a meaningful explanation to remember in the future.

Alternatively, you can create an Origin Access Identity on Amazon CloudFront Console under the Private Content -> Origin Access Identity section.
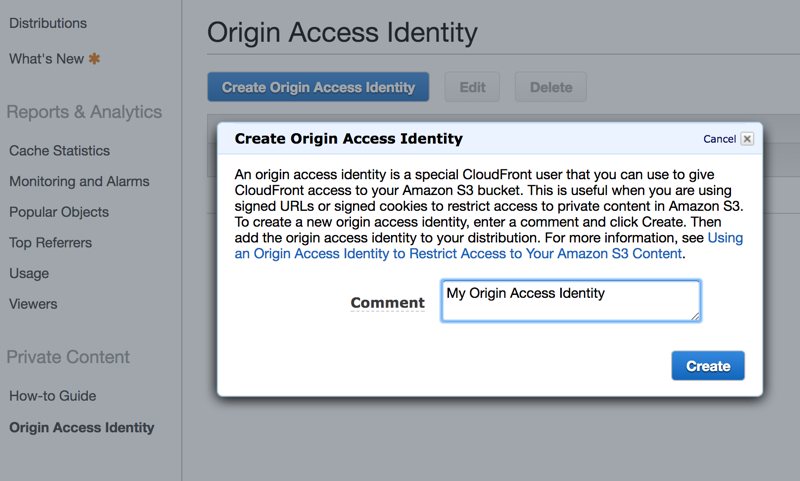
Then, during the CloudFront distribution creation, select Use an Existing Identity and choose your newly created Origin Access Identity from the list.

Granting read access to the Origin Access Identity
You created an Origin Access Identity (OAI), but it has no permissions yet. You need to grant it read access to your Amazon S3 bucket to serve your users. Again, you can do this while creating your CloudFront distribution by selecting Yes, Update Bucket Policy in the Grant Read Permissions on Bucket section.

Behind the scenes, it will modify your S3 bucket’s bucket policy to grant read access to your Origin Access Identity (OAI).
{
    "Version": "2008-10-17",
    "Id": "PolicyForCloudFrontPrivateContent",
    "Statement": [
        {
            "Sid": "1",
            "Effect": "Allow",
            "Principal": {
                "AWS": "arn-of-your-origin-access-identity"
            },
            "Action": "s3:GetObject",
            "Resource": "arn-of-your-bucket/*"
        }
    ]
}
If you would like to grant read access to the Origin Access Identity manually, you can select No, I Will Update Permissions. In this case, you will need to set its CanonicalUser as the Principal in your S3 bucket policy as below. You can find your Origin Access Identity’s Amazon S3 Canonical User Id on Amazon CloudFront Console -> Private Content -> Origin Access Identity.
{
    "Version": "2008-10-17",
    "Id": "PolicyForCloudFrontPrivateContent",
    "Statement": [
        {
            "Sid": "1",
            "Effect": "Allow",
            "Principal": {
                "CanonicalUser": "amazon-s3-canonical-user-id-of-the-origin-access-identity"
            },
            "Action": "s3:GetObject",
            "Resource": "arn-of-your-bucket/*"
        }
    ]
}
After refreshing the bucket policy page, you will see that Amazon S3 converted your policy with CanonicalUser to the ARN version automatically.
By default, only the owner of the S3 bucket has access to objects in an Amazon S3 bucket. If you are modifying an existing bucket, please be sure to remove the permissions on object access control lists (ACLs).
After creating your CloudFront distribution, you should wait for its status to switch from “In Progress” to “Deployed”. After that, your objects will only be distributed via CloudFront URLs.
Attention for creating distributions for recently created S3 buckets
You might need to wait for a while for your CloudFront distribution to take effect if you created both your Amazon S3 and CloudFront bucket just new. Because CloudFront may make a temporary 307 redirect if your S3 bucket was also created recently. In this case, please wait without making any changes. After a few hours or so, it should be okay.
You can also test this by applying the same steps for an old bucket. You should see that it works.
Conclusion
In this blog post, I explained how to restrict Amazon S3 bucket access on your Amazon CloudFront distributions. It would make your CloudFront distributions more effective.
Where can you go from here? You can define an alternate domain and SSL via Amazon Certificate Manager to your CloudFront distribution to access it from a domain like https://cdn.example.com. Besides, you may further restrict access only through your website using the Web Application Firewall (WAF) service. If you serve private content to only subscribed users for a limited time, you can activate signed URLs. I plan to discuss these topics in this blog in the future.
Thanks for reading!


