The most popular usage of Amazon CloudFront is to distribute static content such as images, videos or other objects existing in an Amazon S3 bucket. However, you can also use Amazon CloudFront to distribute your dynamic content such as a Ruby on Rails or PHP web application and benefit from the advantages of utilizing the globally distributed network infrastructure of AWS. In this blog post, I will talk about the advantages and the necessary configuration options for creating an Amazon CloudFront distribution for a dynamic web application.
Why to use CloudFront for dynamic content?
Well, at first, it might not seem feasible as your data will be dynamic. But, actually there are many benefits:
As I described in my first blog post about Amazon CloudFront, your clients will connect to your applications through an AWS edge location closest to them. Then, this connection will utilize AWS network infrastructure which is expected to be more stable and provide faster access to your servers on an AWS region, even if the content was not cached before.
Although we will decrease the time to live (TTL) or cache expiration to 0 as I will describe below; this will not mean that CloudFront will not cache your content. Actually, it will. The only difference will be that it will send the last caching time of the content alongside with the request to your origin. This will allow your origin to respond faster if the content was not changed and edge location will serve the content from its cache. When you compare the small packet size in this process with retrieving the full content from your origin, this will decrease the load on your servers and delivery time of your content to your clients.
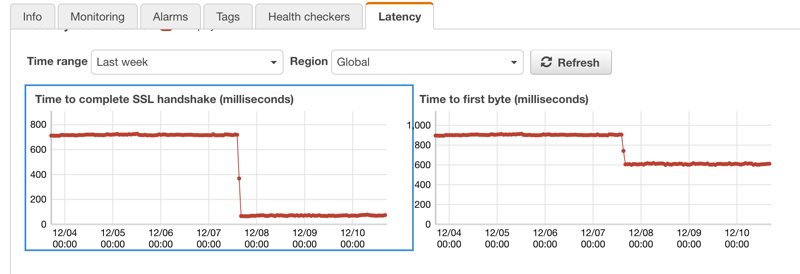
The most obvious benefit will be the decrease in SSL handshaking time and time to first byte metrics. SSL handshaking is done on edge locations and time to first byte improvement is a result of the enhanced network speed.
To explain this benefit better, you can see a Route 53 health check - latency graph below which is for a dynamic web application placed behind Amazon CloudFront at December 7th. Amazon Route 53 makes these health checks geographically distributed allover the world and what you see on the graph is an aggregate. As can be seen, placing the load balancer behind a CloudFront distribution made a simultaneous improvement in both average SSL handshaking and time to first byte values. The good thing is it is an easy process once you understand the basics.

Amazon CloudFront only accepts well-formed connections and reduces the number of requests and TCP connections back to your web application. These will help you to prevent many of the common DDoS attacks such as SYN floods and UDP reflection attacks; because they will not reach to your origin. Also geographically distributed architecture will help you to isolate these attacks in a close location to them, allowing you to continue to serve your application without any impact on other locations.
You can also enhance your web application’s security by integrating AWS Web Application Firewall (WAF) with your CloudFront distribution and make use of its features. By creating AWS WAF Web Access Control Lists (ACL), you can filter and block requests based on request signatures, URI, query string matches; as well as IP addresses when the number of their requests matching a rule exceeds a threshold you define. Of course, you will need a well-architected monitoring mechanism such as Amazon CloudWatch in this process.
Sample Architecture
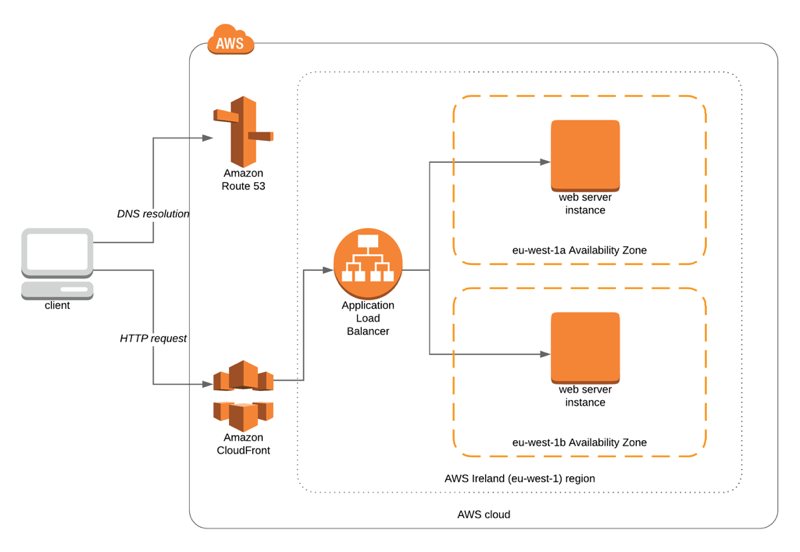
Let’s continue with a sample architecture. In this architecture Amazon CloudFront distribution has an origin of an application load balancer which distributes the traffic to 2 EC2 instances in different availability zones. I also assume that you use a custom domain for your CloudFront distribution such as www.example.com.

When a client makes an HTTP GET request to “https://www.example.com” these below happen:
It connects to Route 53 from an edge location for DNS resolution. By the way, Route 53 is also distributed to edge locations like CloudFront distributions. In this case, you will use an alias record which points to your distribution.
CloudFront receives the request from the nearest edge location to the client.
After receiving the request, there are multiple cases:
- If the content does not exist in the cache of the edge location, CloudFront redirects request to the origin (application load balancer), retrieves the content and serves it to the client.
- If the content exists in the cache, CloudFront makes a GET request with
If-Modified-Sinceheader to the origin to ask whether the content changed since its last caching time. If the content was changed, the origin sends the new version withHTTP 200response. Otherwise, the origin responds CloudFront withHTTP 304notifying that object was not changed and the cached version is served to the client. Of course, your backend should be configured to handle this process.
Configuration for CloudFront Distribution
After explaining the architecture and how it works, let’s talk about the configuration steps while creating the CloudFront distribution using AWS Management Console.
First of all,
the delivery methodwill be a web distribution.As
Origin Domain Nameyou should select your load balancer from the list or enter the DNS name of it directly to the corresponding field.Default value of
Allowed HTTP MethodsisGET, HEADand it is valid for a static web distribution. This means that CloudFront will not pass any HTTP requests which have different methods than these two options. However, your application is dynamic and this means that your clients will make HTTP requests for editing content. Therefore, selectGET, HEAD, OPTIONS, PUT, POST, PATCH, DELETEoption from this field.For dynamic websites, SSL usage is a must in these days. Hence, I recommend selecting
Redirect HTTP to HTTPSfromViewer Protocol Policy.Object Cachingis an important option for this configuration. By default,Use Origin Cache Headersis selected meaning that the origin determines the cache expiration withCache-Control max-ageorCache-Control s-maxagedirectives, or anExpiresheader field. If these are not provided by the origin, the file is cached for24 hoursby default. However, as your website is dynamic your origin will not ask the content to be cached and it should not be cached for 24 hours, as well. Making TTL=0 solves this problem. To do this, follow these steps:Select
CustomforObject Cachingwhich will enableMinimum TTL,Maximum TTLandDefault TTLfields.Enter 0 to
Minimum TTLandDefault TTLfields.For
Maximum TTLI generally define 84600, which is 24 hours in seconds.
As I described in the previous section, this will make TTL value 0 and enable CloudFront to cache the content, but make GET requests with an
If-Modified-Sinceheader to allow the origin to respond fast and serve cached content from edge location. Your backend should determine whether the content was changed as fast as possible without executing much logic and respond quickly with HTTP 304 if not modified. Otherwise, it will be unable to make use of this feature.Forward CookiesisNoneby default. This means that no cookies will be forwarded to the origin. This is bad if your application makes use of cookies for storing session-related information such as authenticity header of Ruby on Rails or session ids. Because, your post/put/patch requests will be unsuccessful. To solve this, selectAllto send all domain cookies to the backend. Alternatively, if you know which cookies the application should expect, selectWhitelistand enter the values to theWhitelist Cookiesfield opened.Actually,
Query String Forwarding and Cachingis not related directly to a dynamic backend, but I will discuss it here,too. As you would see, it isNoneby default which means that CloudFront does not take query strings into account when caching. It simply ignores them. However, if your application behaviour changes according to query strings, you should selectforward all, cache based on allorforward all, cache based on whitelist. If you are sure which query strings to expect, selecting the latter and determining the query strings is better. But, please be sure that your query strings are always in the same order to cache the content correctly on CloudFront. I can discuss this more in a new blog post in the future.The last thing I will share with you is SSL configuration. CloudFront is integrated well with Amazon Certificate Manager. If you have a domain name in Route 53, it is even simpler. You should create an SSL certificate in
us-east-1region where CloudFront gets its SSL certificates as a global service. Then, forSSL Certificatefield selectCustom SSL Certificate (example.com)and your certificate created from the list enabled. This will enable SSL handshaking on edge locations and speed up the responses.Finally, create your distribution. After its state becomes
Deployed, redirect your domain name using an alias record on Amazon Route 53.
Conclusion
Today, I discussed the benefits of distributing your dynamic web applications with Amazon CloudFront. Besides, I also tried to explain each CloudFront configuration option necessary to realize this goal. I hope this post helps you well and you start distributing your content globally with CloudFront to benefit from its advantages like caching, networking and SSL handshaking.
Thanks for reading!
References
- Restricting Amazon S3 Bucket Access on CloudFront Distributions
- Optimizing Content Caching and Availability Section - AWS CloudFront Documentation
- Managing How Long Content Stays in an Edge Cache (Expiration) - AWS Documentation
- Amazon CloudFront – Support for Dynamic Content - AWS Blog
- Using HTTPS with CloudFront - AWS CloudFront Documentation
- What Is AWS Certificate Manager? - AWS Documentation
- Monitoring the Latency Between Health Checkers and Your Endpoint - AWS Route 53 Documentation
- AWS Best Practices for DDoS Resiliency Whitepaper


